Guide: Use Any HTML Template With ExpressionEngine
In this four-part guide, I will show you how easy it is to take any HTML/CSS template from the web and make it the basis of an ExpressionEngine site.
You won’t need to be a hard-core coder to follow along. You won’t even need to have used ExpressionEngine before, but you should have a basic understanding of HTML and CSS. There are links below to a few primers on ExpressionEngine that are well worth watching if you have never used it before.
I explain things thoroughly with lots of screenshots, which is why a pretty simple guide still got big enough to split into four parts. It is well worth it though, as you’ll be able to create ExpressionEngine-driven sites from any HTML/CSS template when you’re done.
And you will be able to convert existing sites to run under ExpressionEngine because the principles will be the same.
Table of Contents
Assumptions and setting up
ExpressionEngine
I’m assuming that you already have ExpressionEngine installed, either locally or on a server. If not, please refer to the official installation guide here, the system requirements here, and the Getting Started video mentioned below.
Also, I’m assuming you’ve removed index.php from your site’s URLs. If you have not, it’s not critical for this guide. It just looks nicer, and you should do it for any “real” site you create. If you choose not to, you should modify any URL examples I give to include index.php like so: https://example.com/index.php/template_group/template.
As mentioned, I will be going into detail and have lots of screenshots in this guide. However, if you have never used a CMS before, you might want to complete (or at least watch) the following videos-guides from the learning section of ExpressionEngine.com:
Further, I recommend you check out (and bookmark) the ExpressionEngine Documentation. This article from the docs — The Big Picture — is also an excellent read for any newcomer.
These videos and links will give you a good primer on ExpressionEngine if you never used it before or if you are coming from another CMS.
I’m using the latest ExpressionEngine version 6 for this guide, and I recommend you do the same. You can download ExpressionEngine from here.
During installation, you will be asked if you want to install the default theme with ExpressionEngine. I recommend you choose not to, so you have a blank slate to start with.
Server
This guide was created while running a test site on a $5/month Linode server running Ubuntu 20.10, Apache, MySQL, and PHP.
If you just want to experiment and run the site locally, I highly recommend MAMP or MAMP Pro for Windows and macOS.
And if you’re on Linux, any LAMP stack (Linux/Apache/MySQL/PHP) will work.
SSH Access
If you’re using a remote host like Linode or Digital Ocean, make sure you follow their guides on setting up SSH access and creating SSH keys for your server. It’s a lot more secure, and you won’t have to type your password every time you connect.
Trust me, setting up SSH access and keys will make your life so much easier. And when we get to editing ExpressionEngine templates later in this guide, I will assume you have this set up. Unless, of course, you’re running the site locally.
There is lots of help to find on the web and in your host’s support. If you run into problems, feel free to post in the comments section where we will try to help.
Computer
Anything works … well, not anything. But whether you’re using a Mac, or a Linux or Windows PC, won’t make any difference!
Text/Code Editor
I’m using Visual Studio Code for this guide. But if you already have a favorite code editor, you can, of course, use that. Just note that you will then have to adapt the Visual Studio Code-related parts of this guide to that editor.
If you don’t have a preferred editor yet, you could try Visual Studio Code when following this guide. That way, everything will match what you see on your screen.
I will be going into more detail on setting up Visual Studio Code for use with ExpressionEngine and remote development in part two of this guide.
Downloading the template files
We begin by downloading the HTML/CSS template we want to use, as the basis for our site.
For this guide, I chose Strata from HTML5 UP. They have a lot of great templates that are all free and open source. In fact, this site is running a customized version of their Editorial template.
You could, in principle, choose any of their templates. But if you’re new to this, I recommend sticking with Strata. It is a simple, beautiful, and fully responsive template that will work on computers, tablets, and smartphones.
Start by downloading Strata from HTML5UP.net by clicking the red Download button in the top right corner.
Unzip the downloaded file if your computer did not do that for you, so you end up with a folder named
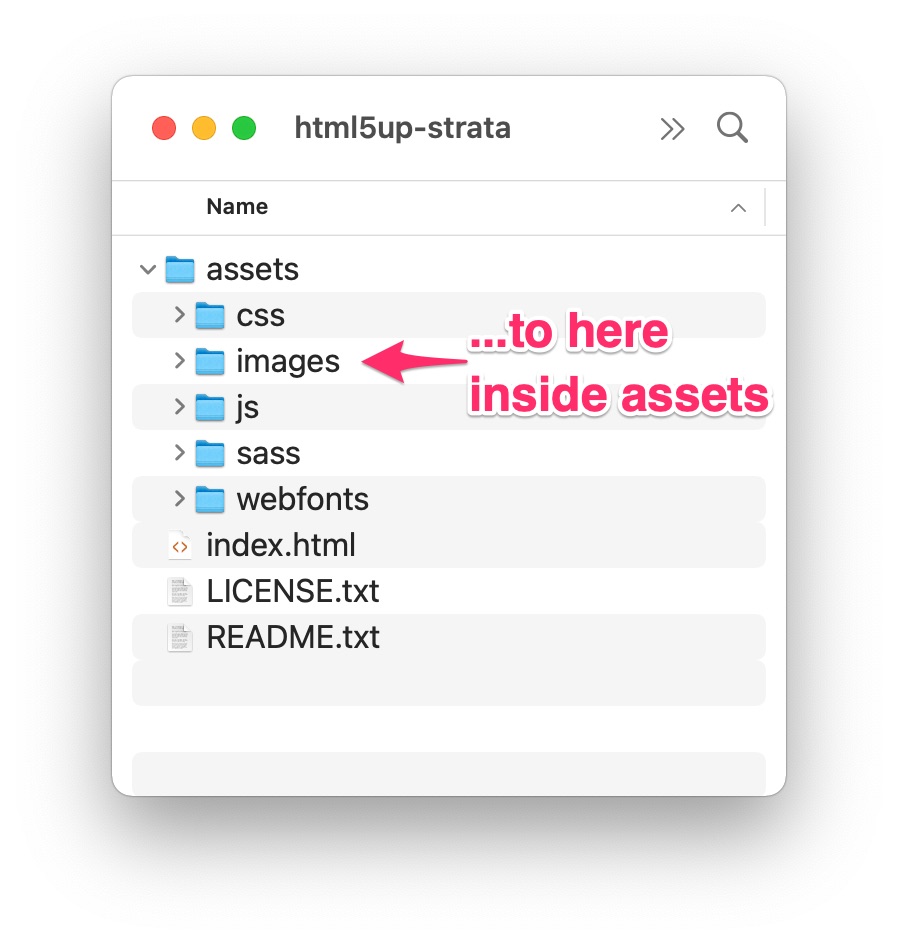
html5up-strata.Move the
imagesfolder inside theassetsfolder, so you get this folder structure: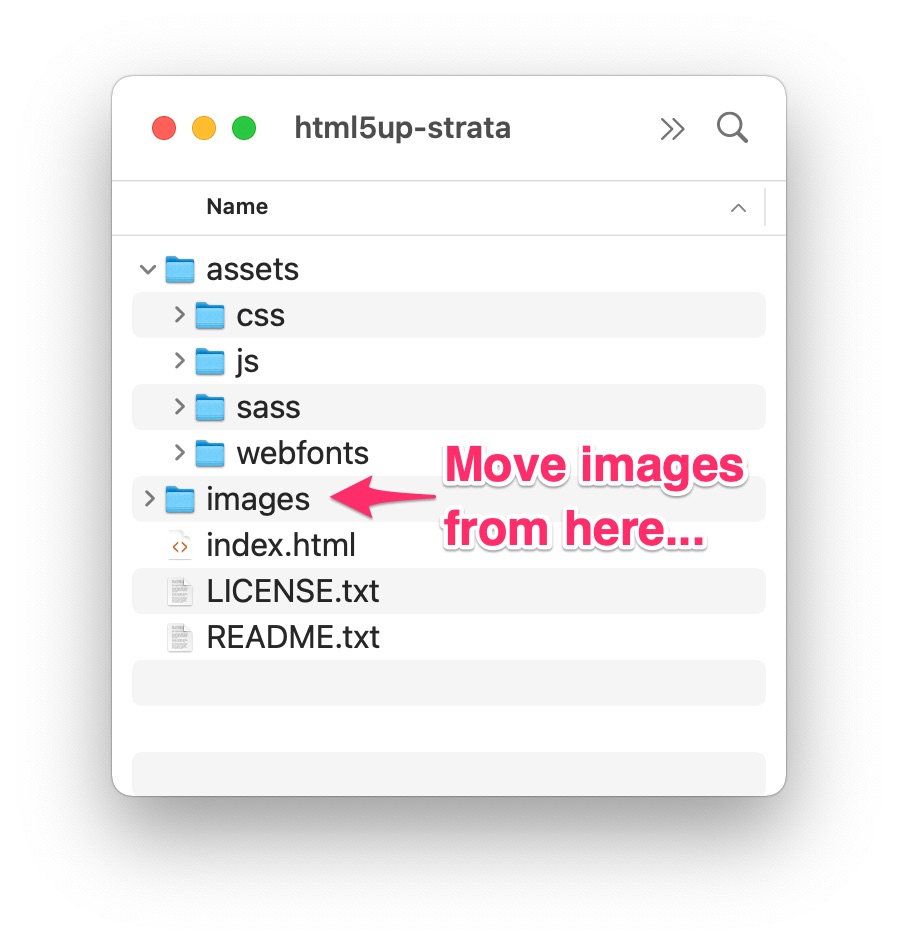
We do this because ExpressionEngine has its own images folder, that would be overwritten when we upload the Strata files and folders to the server later. And since the images folder that Strata comes with only contains a few demo images and thumbnails that we won’t need for long, we will do it this way, for now.
We could, of course, also have renamed the folder. But since images are also assets, this way we’ll end up with all Strata-related files in one folder, which makes more sense.
Making the front-page work
We will start by getting our front page to display properly with the included static text and images.
Then we will be replacing the static text and images with ExpressionEngine tags. That way, our text and images will be pulled from the entries we write in ExpressionEngine, making the site dynamic.
Creating our first ExpressionEngine template
In ExpressionEngine, we start by creating a Template Group and then a Template in that group.
This template will hold the contents of the index.html file from our downloaded html5up-strata folder, and will therefore be the front page of our site. After checking this all works, we will start making everything nice and dynamic.
- Start by logging in to ExpressionEngine, and in the Control Panel choose Templates from the sidebar.
- Click the New button next to Template Groups.
- Name the group site. Note: You can name this news or blog or whatever you like, but just to stay on the same page, let’s stick with site.
- And then click Save Template Group.
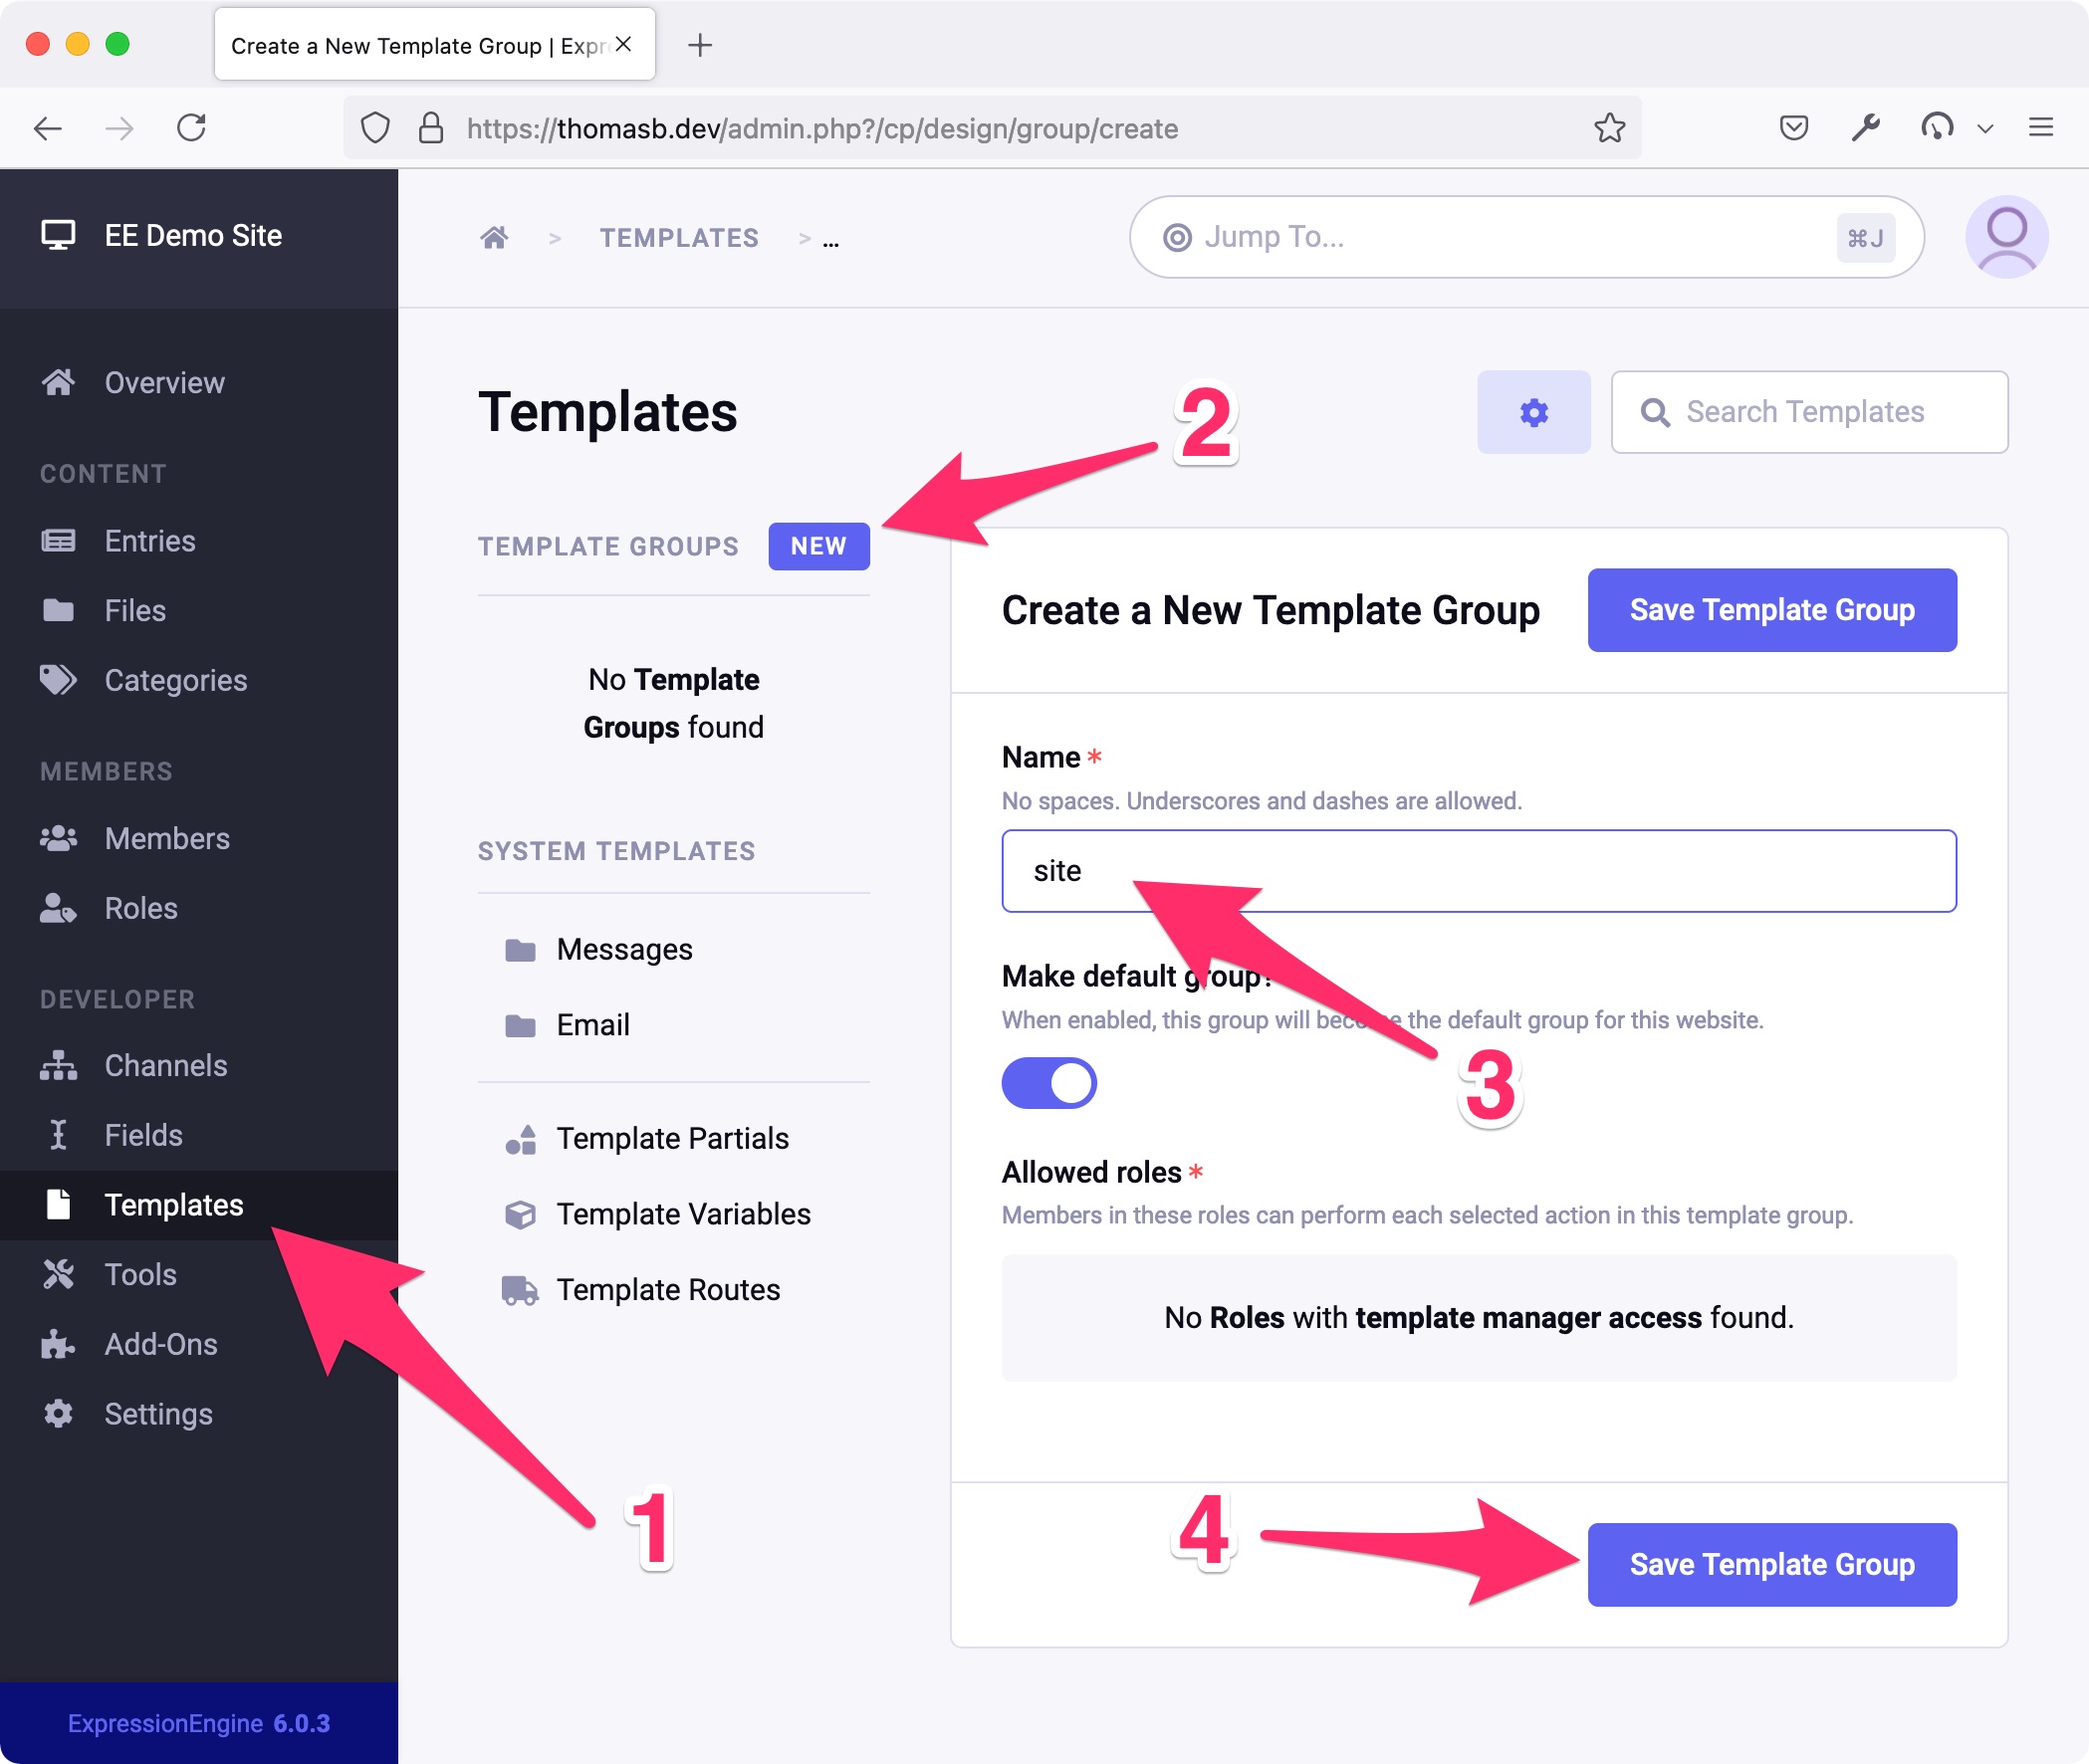
The site template group, along with an index template, is now created and ready for use.
Moving index.html into our ExpressionEngine template
Now we will move the code from our downloaded index.html template file into the index template we created above.
Click on the index template to open it in ExpressionEngine’s built-in text editor. We’ll use our own real editor soon. But for now, we use this to paste the raw HTML code from
index.htmlinto the index template.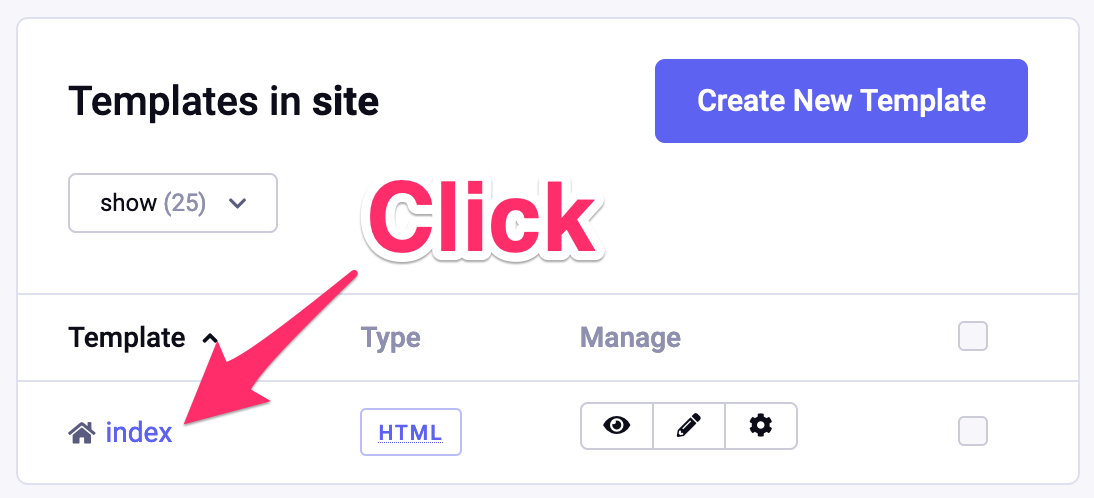
Next, go to the folder named
html5up-strata. Either in Finder, if you’re on Mac, Windows Explorer on Windows, or your favorite file-viewer or terminal on Linux.Open
index.htmlin your text editor.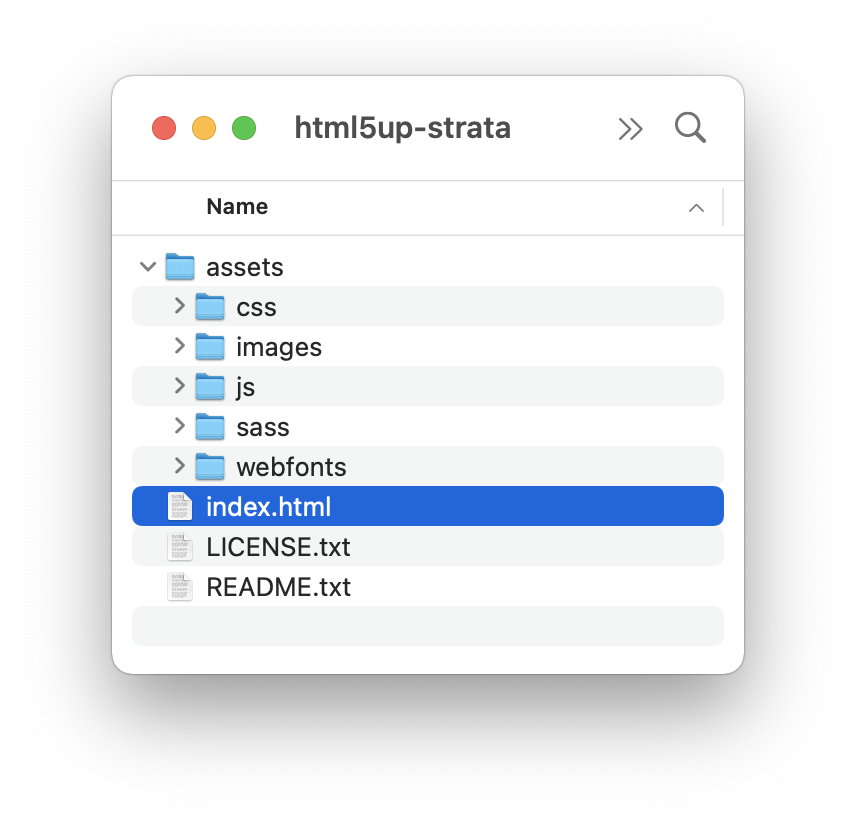
Select everything with Cmd-A (Mac) or Ctrl-A (Windows/Linux) and then copy with Cmd-C/Ctrl-C
Return to ExpressionEngine and paste the whole thing into the open index template and click Save & Close.
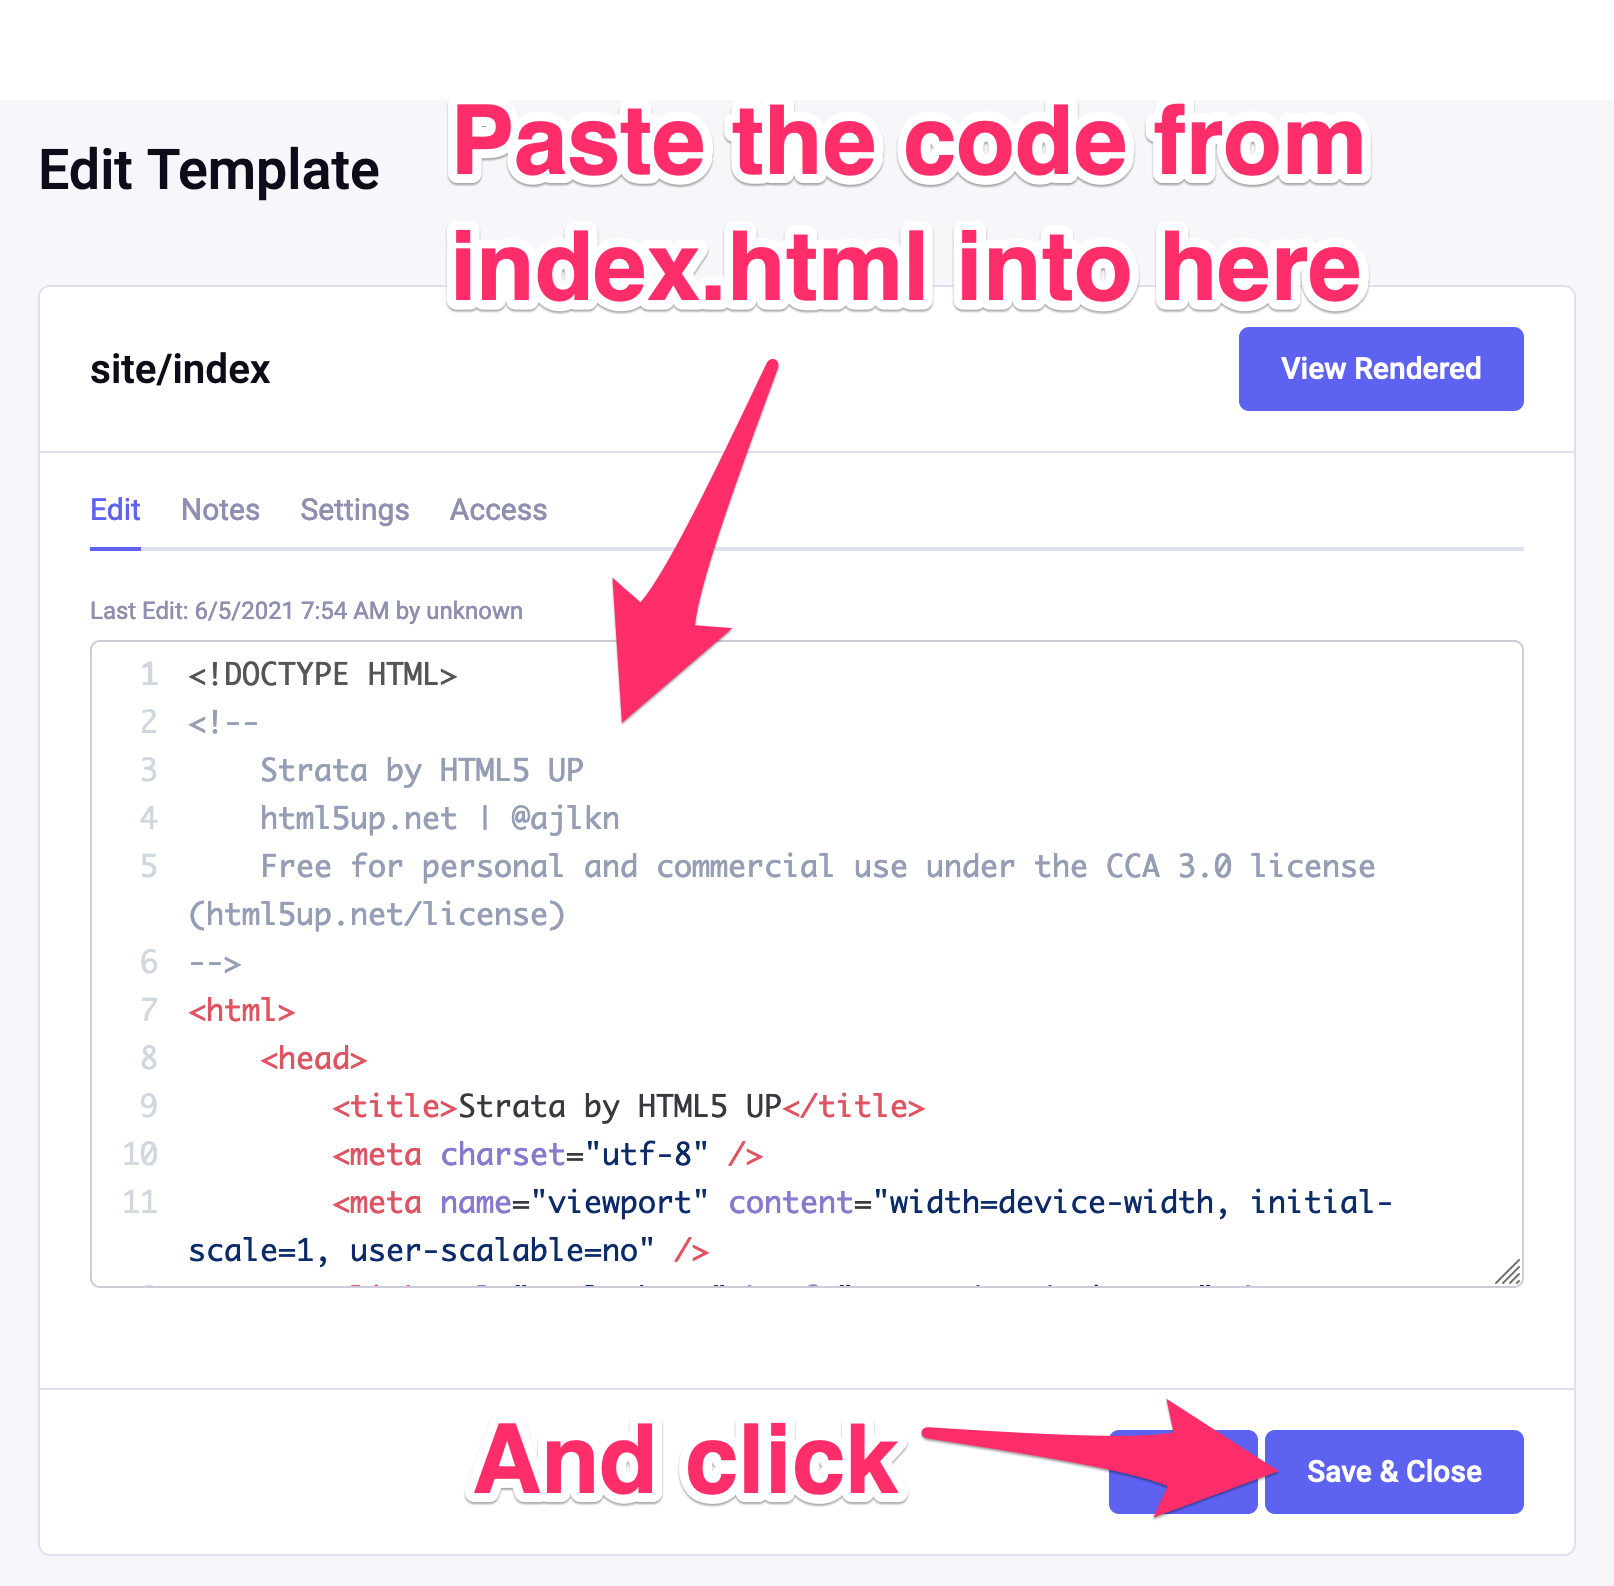
Note: If we were to check the site in a browser now, everything would look terrible. That’s because the HTML in the index template can’t find its corresponding CSS file. We need to upload the assets folder containing CSS, images, and everything else that makes the site work to our server.
We’ll tackle that soon. But if you do want to check the site just to make sure something works, go to the ExpressionEngine Control Panel and click on the site name in the top right corner:
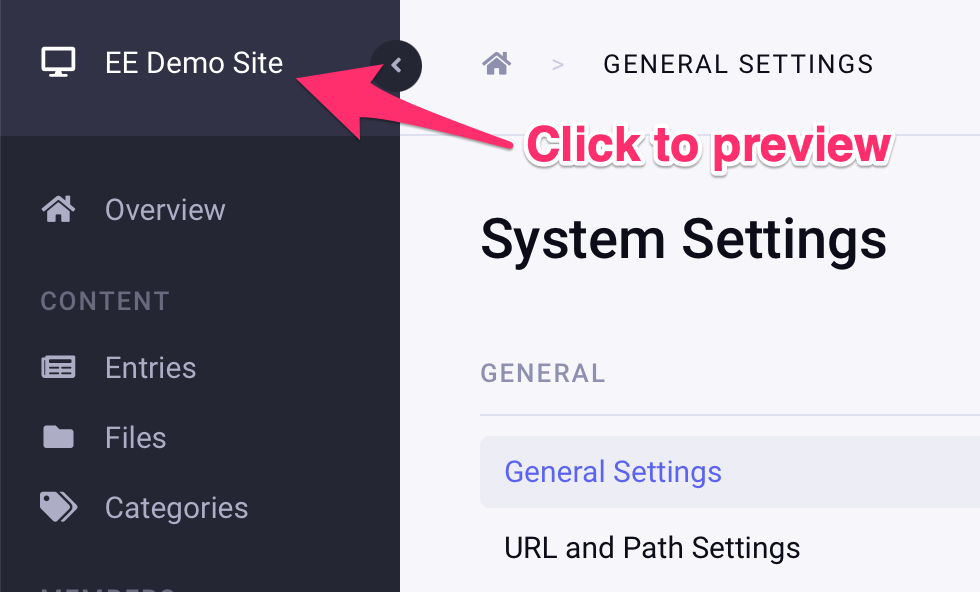
This will open a new tab in your browser that shows the site’s front page.
Note: Some browsers block opening tabs this way, so you may have to tell yours to allow this specifically.
Other types of templates
ExpressionEngine allows you to keep other things than HTML in templates. CSS, JavaScript, XML, RSS, and static text are all types of content you can store in templates.
However, unless there is a specific reason for having CSS or JavaScript in templates, keeping them as regular files on the server is generally recommended. Then, just link to them from the templates that use them, as with any other web project:
<link rel="stylesheet" href="/assets/css/my-css.css" />
<script src="/assets/js/my-script.js"></script>
It is more standard, and you won’t be taxing ExpressionEngine’s template parser unnecessarily.
Note: Being able to use tags or PHP inside your stylesheets, can sometimes be pure genius. So if you need to, of course, you can.
Moving the assets folder onto the server
Finally, let us move Strata’s assets folder containing the CSS, JavaScript, and other support-files, onto our server.
Find the html5up-strata folder and locate the assets folder within.
Note: Check that you followed this step above, where we moved the
imagesfolder into theassetsfolder.Connect to your web server with your FTP client, or if you’re working locally via MAMP/WAMP/LAMP, go to the folder where ExpressionEngine is installed.
Upload or copy the
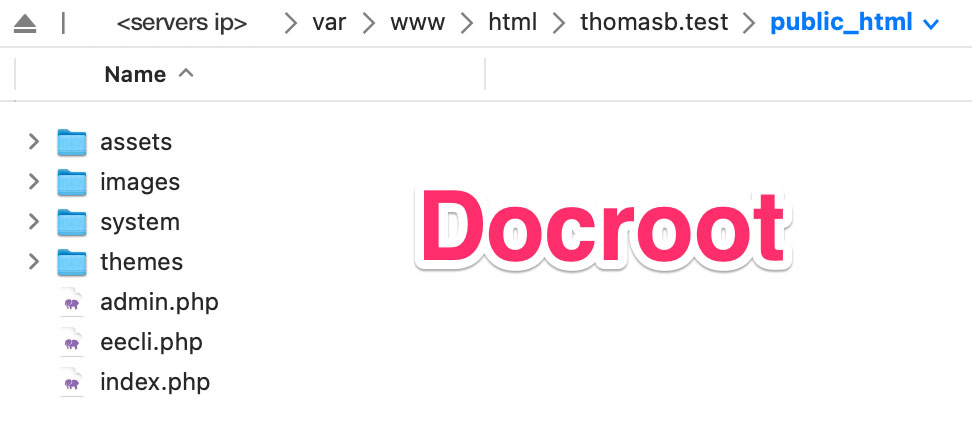
assetsfolder to your web server’s docroot, so the folder structure looks like this: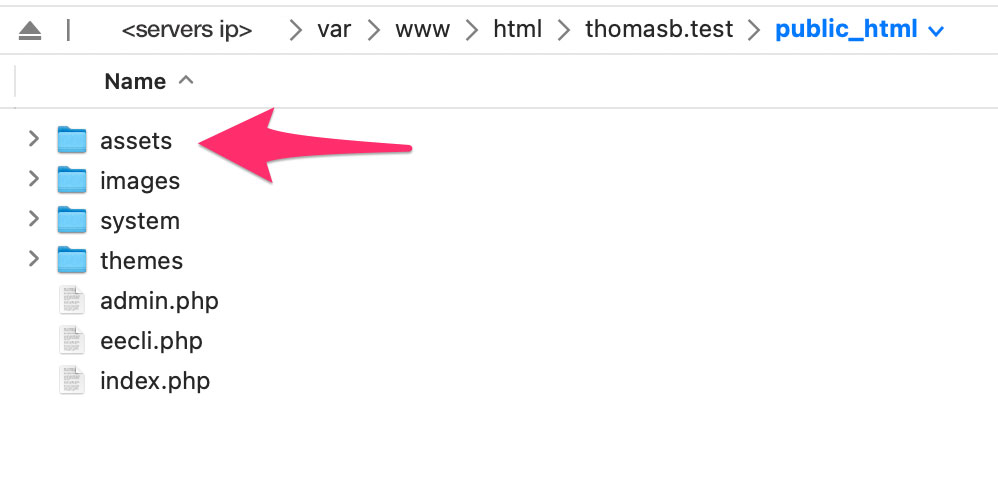 Note: Docroot is the folder on your web server where ExpressionEngine is installed. You can read more about docroot in the section below.
If you were to reload the site now, things would look much better. The CSS should be working because the assets folder is now on the server and in the correct location.
The only thing left to make the site look right is to get the images working. It will still be all static text, of course, but we’re getting there!
A note about docroot and PHP info
From now on, we will refer to the folder shown below as docroot. This is the folder on the server where ExpressionEngine is installed and where our assets are located.
If in doubt about anything to do with paths and folder locations, you can go to Tools > PHP Info in the ExpressionEngine Control Panel. This will show you a plethora of server-related information, like paths, environment variables, and many, many other things.
You can learn more about this and the other utilities found in the Control Panel in the documentation here.
Continue to part 2
That’s it for part one of this guide, please click here to continue with part two.
If you have any comments, corrections, or tips, please post them below. We would love to hear from you!
Comments
Write a Comment: