Guide: Use Any HTML Template With ExpressionEngine (part 4)
Welcome to the last part of this guide, where I will show you how easy it is to take any HTML/CSS template from the web and make it the basis of an ExpressionEngine site.
You won’t need to be a hard-core coder to follow along. You won’t even need to have used ExpressionEngine before, but you should have a basic understanding of HTML and CSS.
I explain everything thoroughly with lots of screenshots, which is why a pretty simple guide still got big enough to split into four parts. It is well worth it though, as you will be able to create ExpressionEngine-driven sites from any HTML/CSS template when you’re done.
And you will be able to convert existing sites to run under ExpressionEngine because the principles will be the same.
Please make sure you have completed parts one, two, and three before continuing.
Table of Contents
Using Entry Status to differentiate entries
About statuses and how we’ll use them
Continuing from part three of this guide, we need to make ExpressionEngine only show one specific entry as the top post. We can do this in several ways.
- We could handle it with dates so that the newest entry was always the top post on the page, and depending on the site we’re creating, that would be the preferred way in many cases.
- We could also give the top entry a certain category and filter by that. Again, you may want to do that in many cases.
- A third way would be to create an entirely new channel for the top-post, and again this would be completely valid. However, creating an entire channel just to pick out a single entry is overkill in this case.
Three valid approaches, but there is an even better way in our case: Statuses.
We’ll assign a specific status to the entry we want at the top and then limit the Channel Entries tag to pull only one entry with that status.
For the six “Recent Work” entries, we’ll limit the Channel Entries tag to only pull entries with the Open status. Open and Closed are the two built-in statuses in ExpressionEngine, but you can create as many additional ones as you need.
Adding Status to our entries
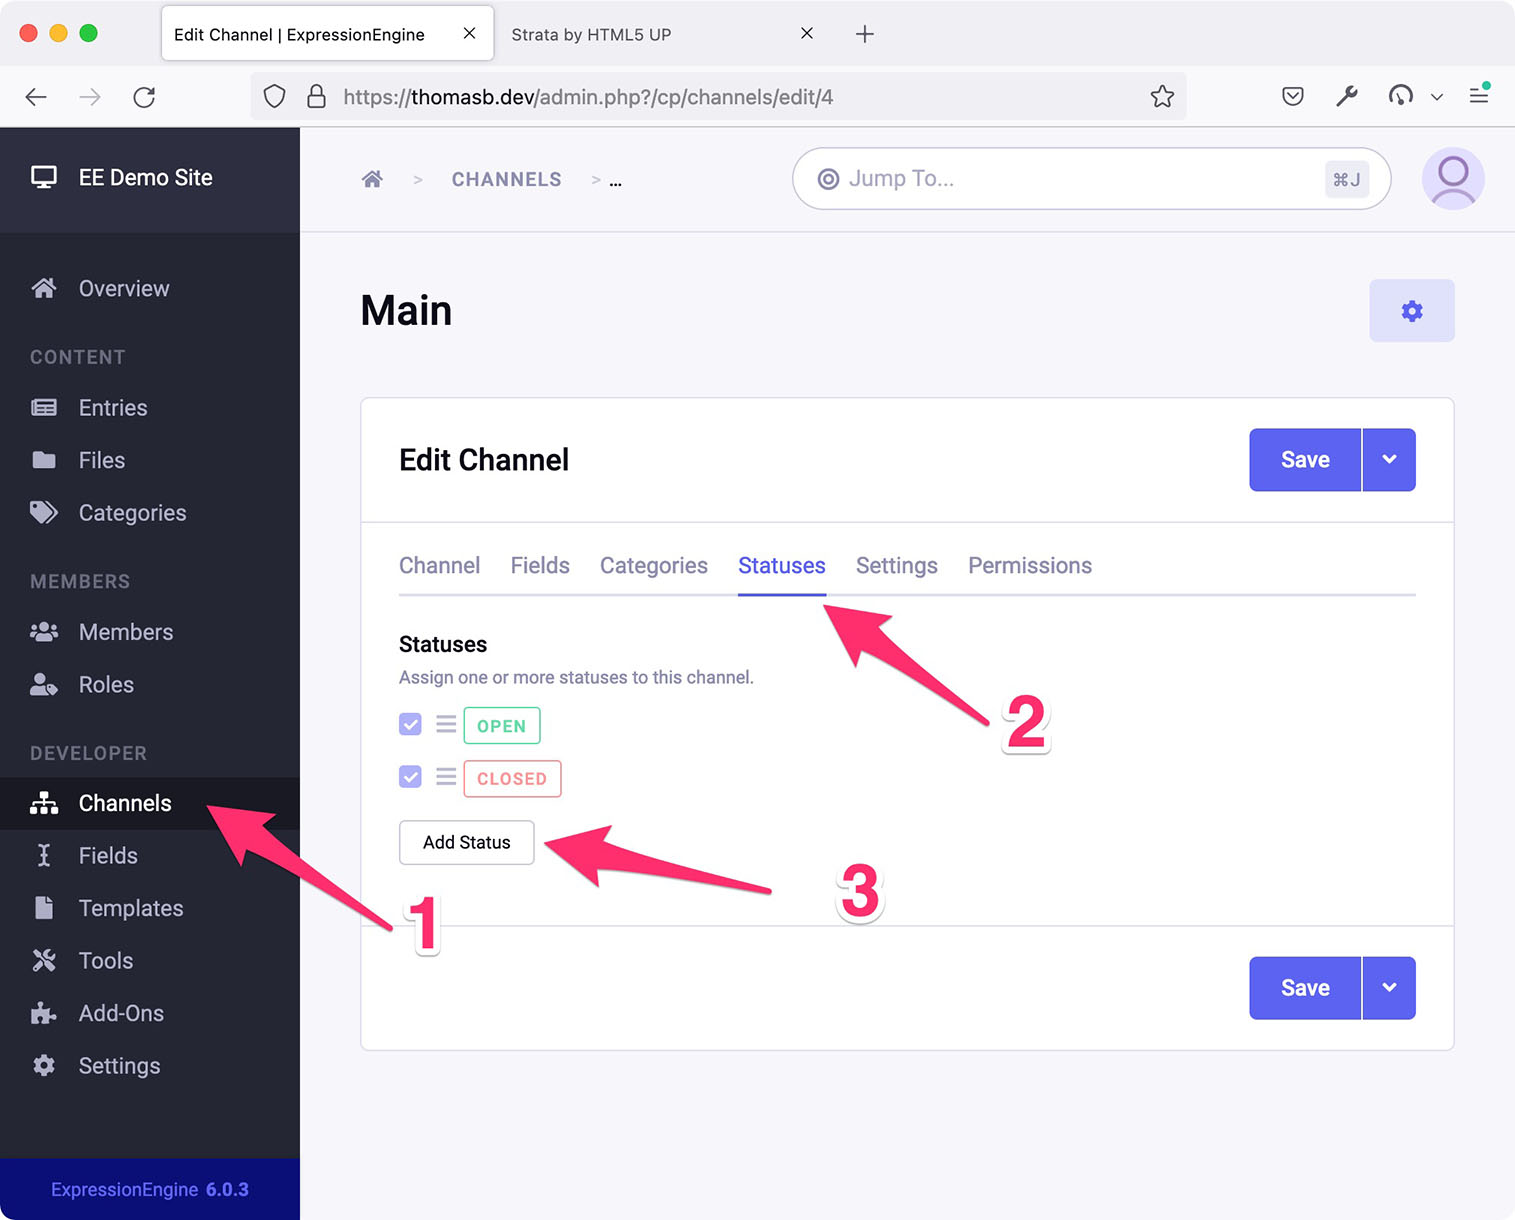
Start by going to the ExpressionEngine Control Panel.
- Then Channels and click on the Main channel
- Choose Statuses.
- And then Add Status:
Name the new status Top-Post and give it a highlight color via the color-picker, if you wish. This color is only used as a visual aid when you publish or edit an entry, so it’s easier to tell statuses apart if you have many of them.
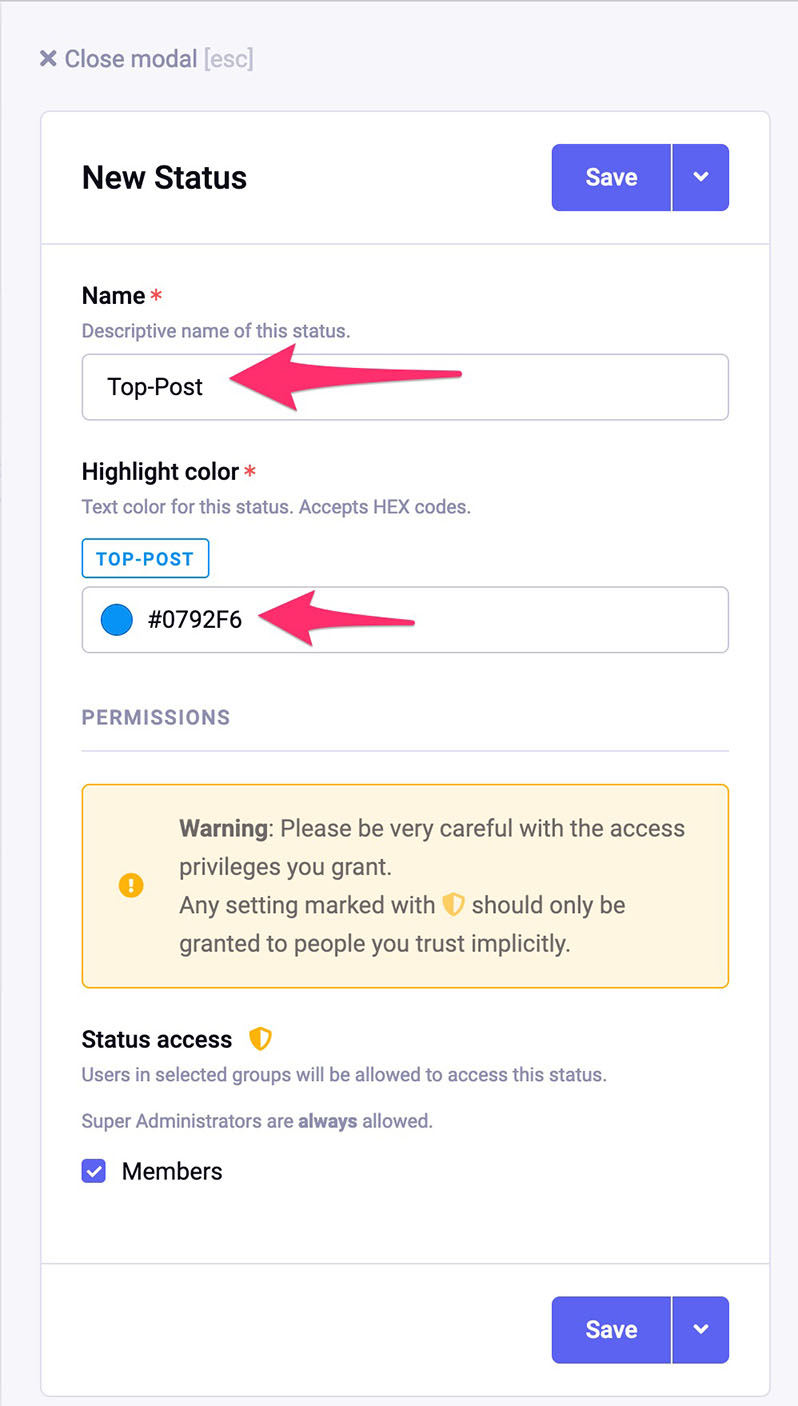
Click Save to save the status, and then Save again to save the change to the main channel.
Go to Entries in the sidebar, and then open the entry you want to make the top one on your site, for example, “My First Test Entry”.
Click Options and then select the new Top-Post status you just created:
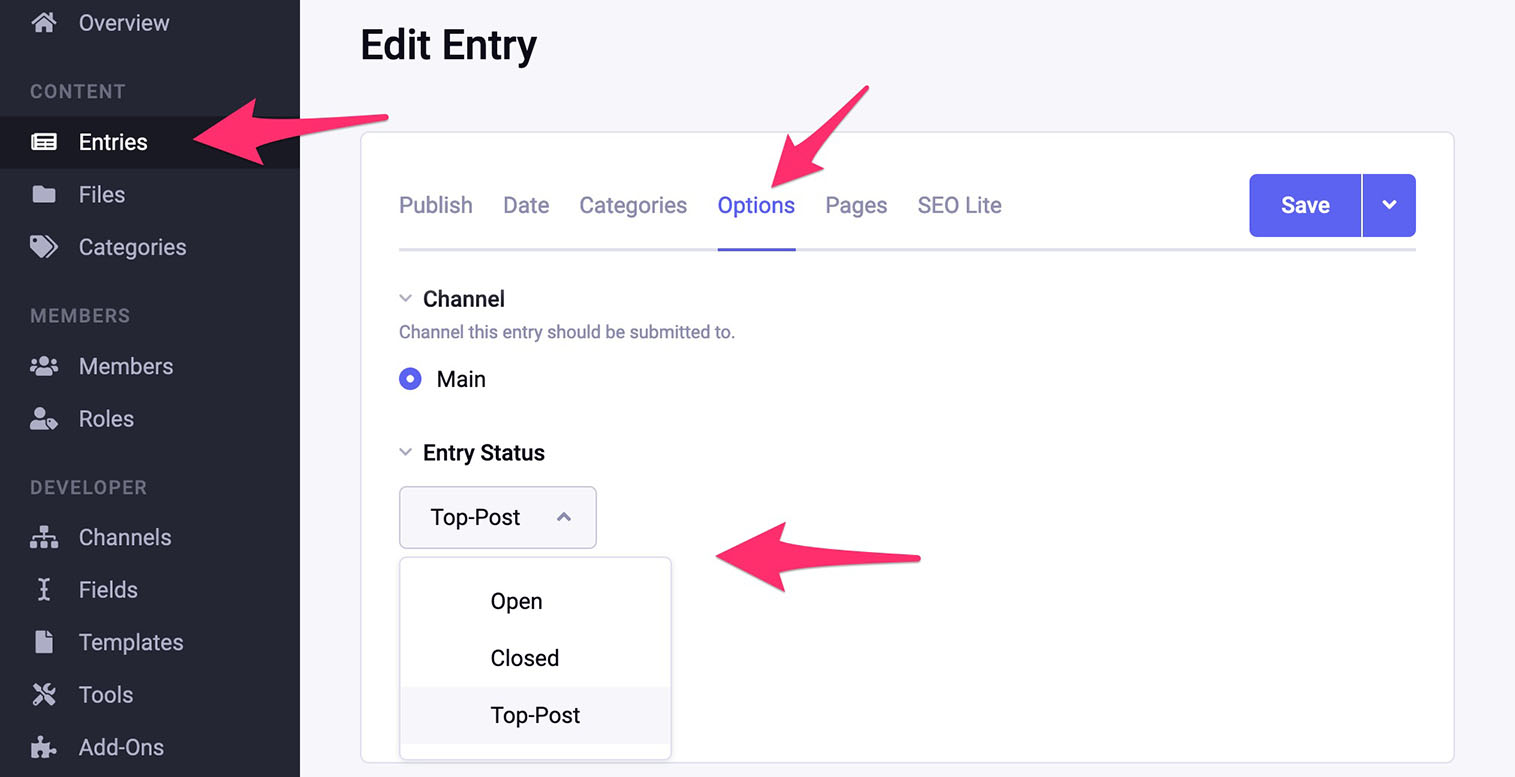
Click Save.
We won’t be touching the other entries’ statuses — they already have a status of Open by default.
You can create as many statuses as you need when developing ExpressionEngine sites, and you can read more about statuses in the docs here and here.
Making the Channel Entries tags use Status
Now we have to tell our “top post” Channel Entries tag to use the new Top-Post status we added above.
We also have to tell the Channel Entries tag for the six “Recent Work” posts to only use the Open status, so it does not pull the top post.
So, let’s get back into Visual Studio Code and open index.html from the server if it isn’t already open.
Find the first Channel Entries tag, probably around line 30, that looks like this:
{exp:channel:entries channel="main" limit="1"}Change the tag so it pulls only entries with a Top-Posts status:
{exp:channel:entries channel="main" limit="1" status="Top-Post"}Find the next Channel Entries tag around line 47 that looks like this:
{exp:channel:entries channel="main" limit="6"}And change it so it only pulls entries with an Open status:
{exp:channel:entries channel="main" limit="6" status="Open"}And finally save the changes.
If you look at the site now, the entry we changed the status for is now at the top of the page, as it should be.
The other entries still don’t have any images but we’ll fix that next.
Adding images to our entries
Set up an upload directory
First, we have to tell ExpressionEngine where to upload our images.
We can have as many upload directories as we want. And we can even have ExpressionEngine constrain or crop the images automatically during upload. We won’t be using these features in this guide, but you can read more about them in the docs here.
But for now, let’s create a single upload directory.
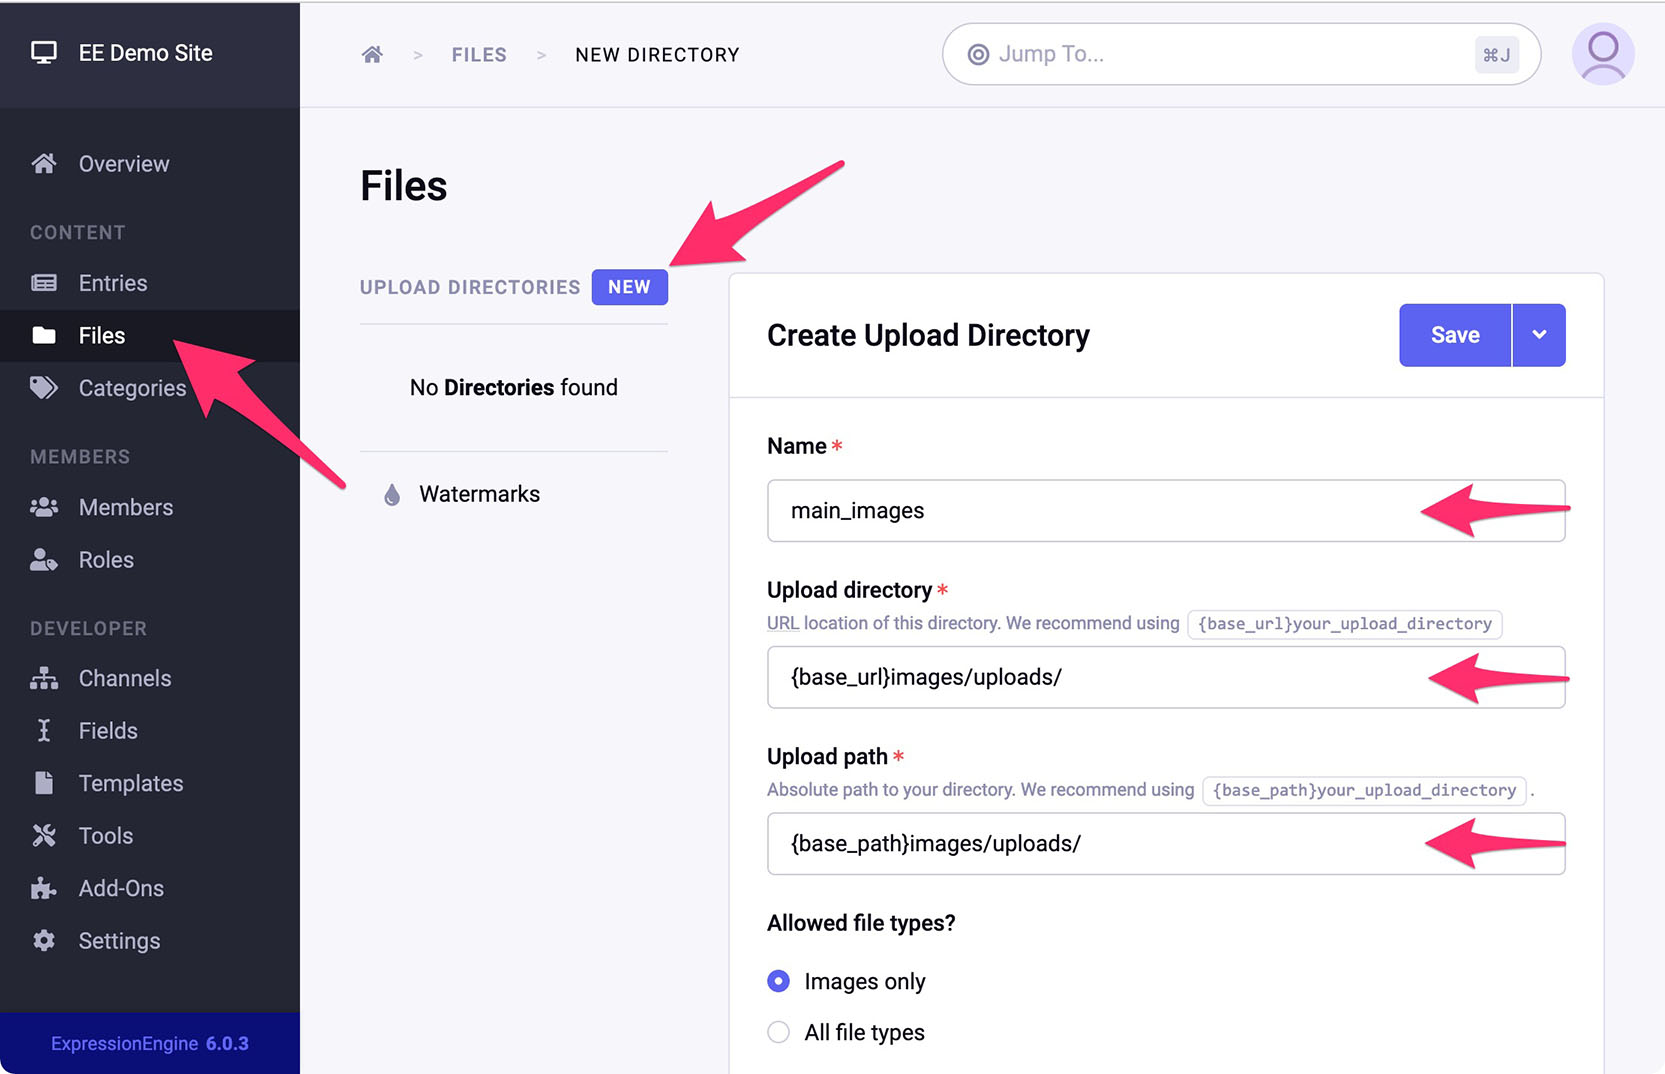
In the ExpressionEngine control panel and choose Files.
Click New under Upload Directories.
Fill out the three fields like so:
Name =
main_imagesUpload directory =
{base_url}images/uploads/Upload path =
{base_path}images/uploads/Click Save.
About {base_url} and
The {base_url} and {base_path} tags are special shortcut tags that take the paths found under Settings > URL and Path Settings > Default base URL and Default base path and inserts them where we place the tags.
As long as we’ve used these tags throughout the control panel settings and in our templates, all we have to do is change Default base URL and Default base path, and any URLs and paths will be updated site-wide.
This is very useful if we ever need to move the site from one server or domain to another.
Creating an Image field
We also need to add a new field to our Main Field Group, so each of our entries can have an image associated with them.
Go to Fields in the control panel and click on Main Field Group.
Click New Field and fill out the form like so:
Type = File
Name = Main Image
Short name (will be auto-filled) = main_image
Scroll down to Allowed Directory and select main_images. This is the upload directory we set up a moment ago!
Click Save.

Adding images to our entries
Now we’re ready to add some images to our entries.
You can find many great and free-to-use images on Unsplash.com, so download six you like or use some of your own photos.
The downloaded images from Unsplash are quite large, and even though our themes’ CSS will scale them to fit on the page, we should resize them so they’re a more manageable file size.
As mentioned above, this is something you can have ExpressionEngine do for you during upload. But for now, use your favorite image editor to crop and/or scale the images. The test images provided with the Strata template are 740 X 434 px. so scale yours to something near that.
Then add the images to your entries in ExpressionEngine like so:
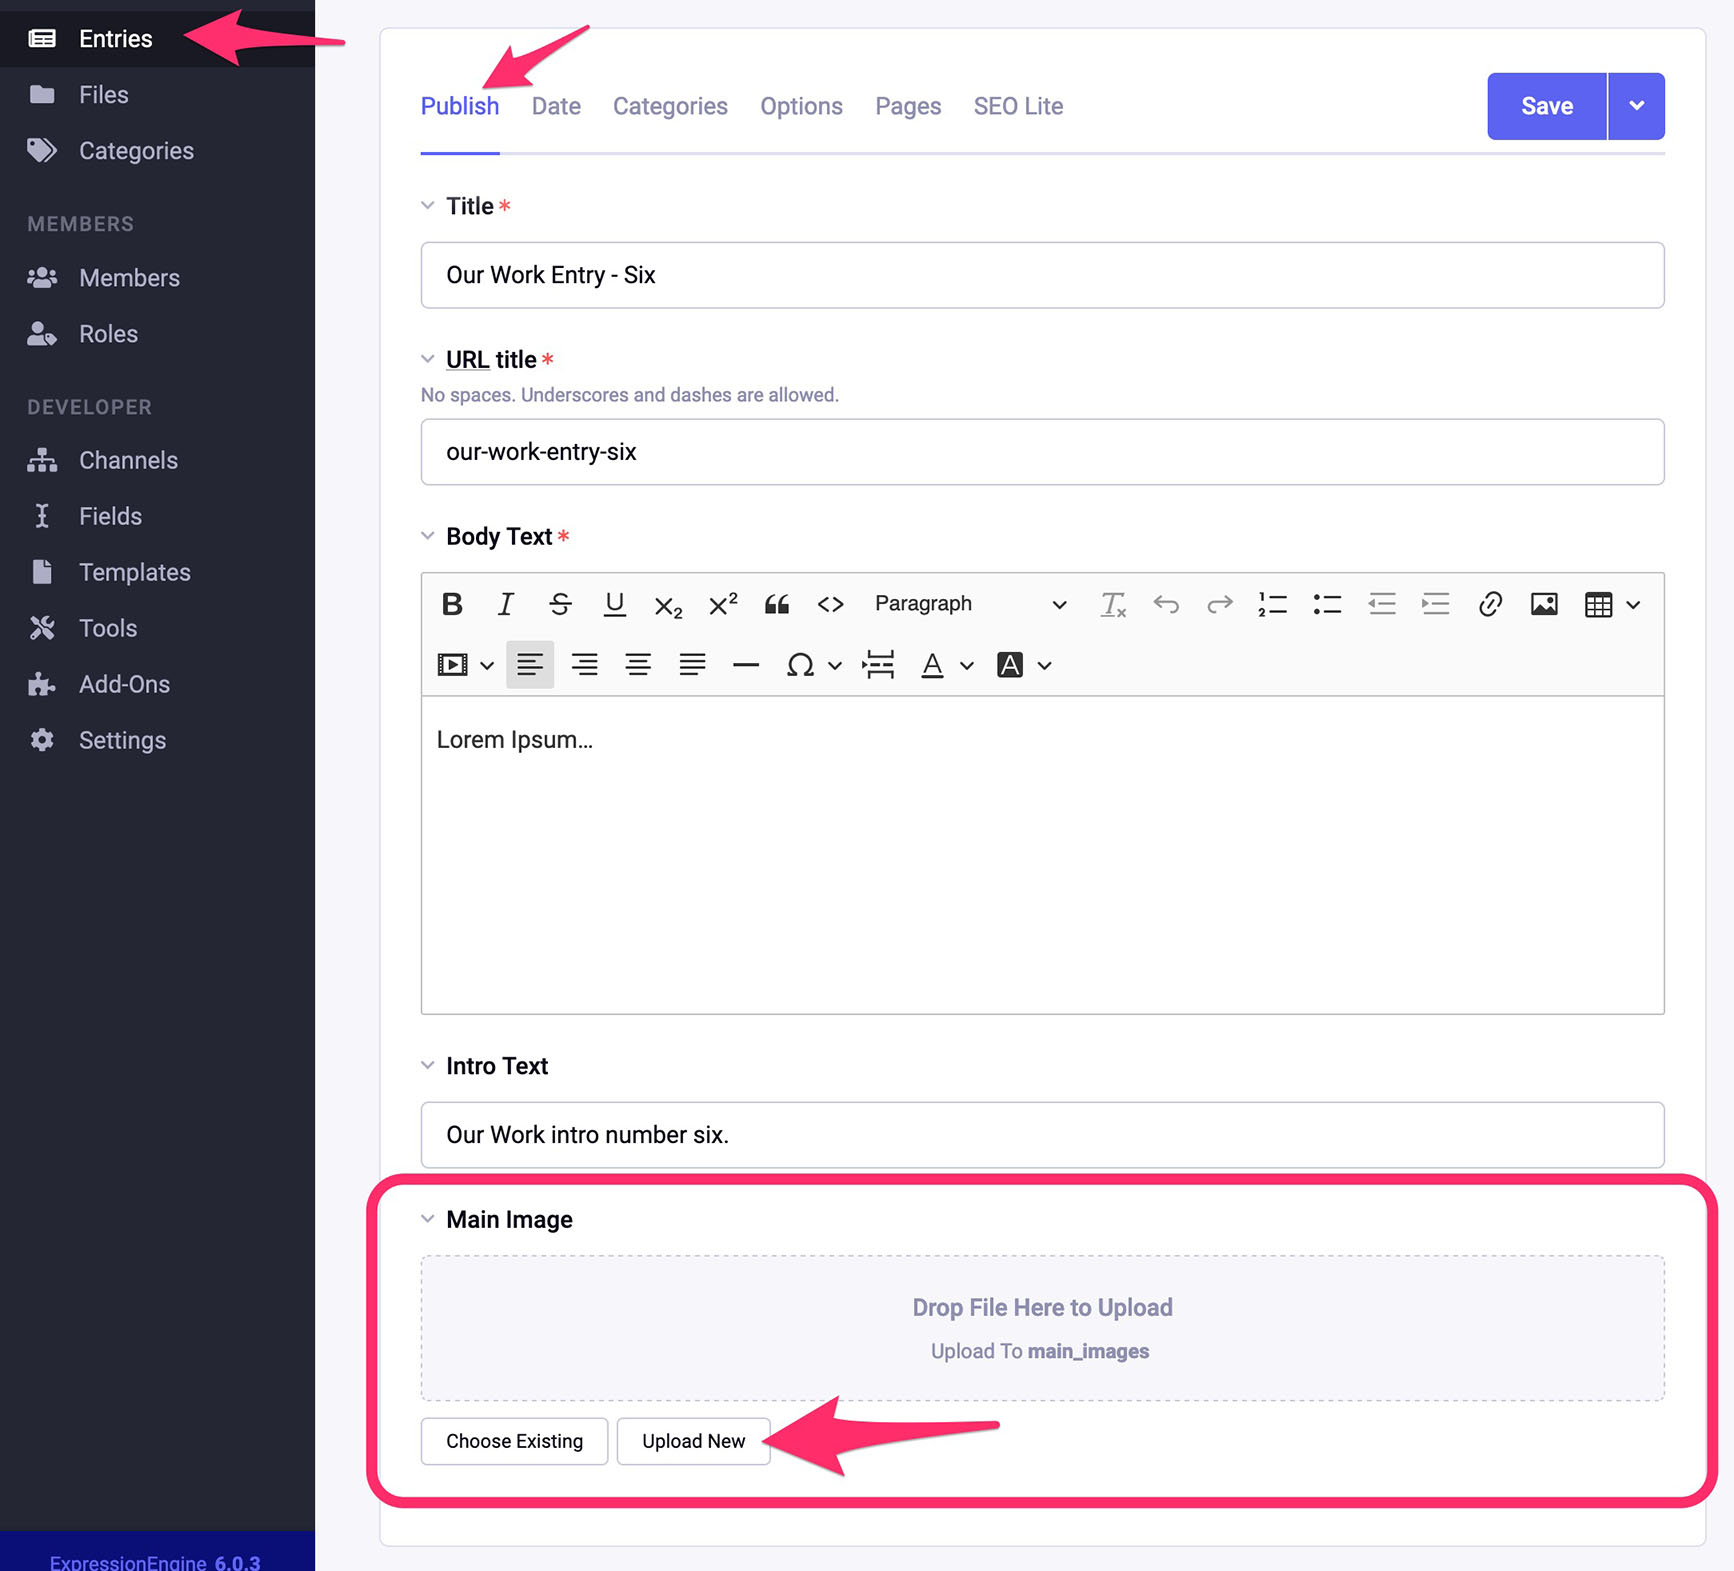
Go to Entries in the control panel, and click on one of the entries from the “Recent Work” section of the site (one of the six entries with the Open status).
In the Publish tab of the selected entry, if we scroll down, we’ll see our newly created Main Image field. It’s the part I have highlighted below.
Click Upload New.
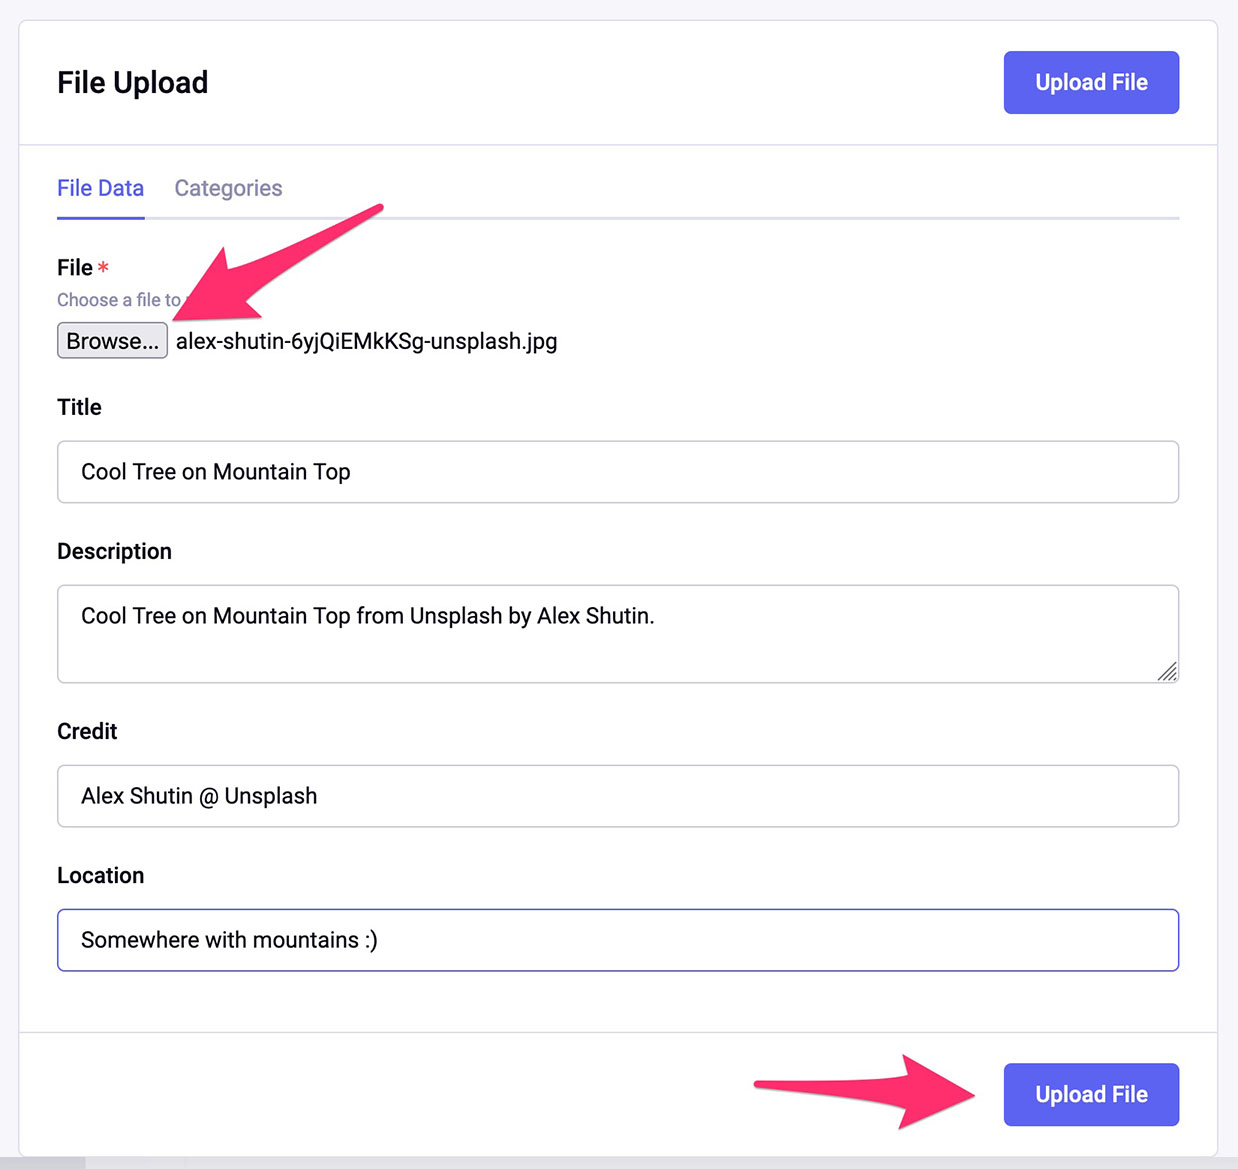
Click Browse and select one of your images.
It’s a good idea to get into the habit of filling out the metadata fields on the File Upload form, as shown below. You never know when you might want to use this data on your site.
But more importantly: I’ll show you in a second how to use the Title and Description fields to create title and alt attributes in our HTML. Something we should always do, as it helps people who rely on screen-readers or other accessibility software to browse the web. It’s a small effort for us that makes a huge difference in many people’s lives.
The alt attribute is what screen-readers use to convey the meaning of an image to the visually impaired. It should therefore be thought of as an alternate version of the image and as important as the image itself.
The title attribute is most often used to show a tooltip when the mouse hovers over the image. It is not used by most screen-readers but since we have the option we should include both, with alt being the most important to remember.
Click Upload File when done.
Click Save to save the changes to the entry, and then do the same for the other five “Recent Work” entries.
Note: You won’t see any changes on the site just yet, as we need to edit index.html to use the uploaded images.
Making index.html pull our new images
Let’s edit index.html to show our images and then add the alt and title attributes mentioned above.
We can use our Main Image field in our code in two ways:
We can either use it as a single variable as
{main_image}which will simply output the path to the image.This is fine if we just need to show the image. But in our case, we also need to pull the Title and Description associated with the image (the metadata we filled out above).
So, we need to use
{main_image}as a variable pair, which I’ll show below. This enables us to pull a boatload of information about the file, as described here.
Open index.html in Visual Studio Code and find this code at around line 49:
<a href="assets/images/fulls/01.jpg" class="image fit thumb"><img src="assets/images/thumbs/01.jpg" alt="" /></a>First, we’ll surround this line with our
{main_image}field in the form of a variable pair, like so:{main_image} <a href="assets/images/fulls/01.jpg" class="image fit thumb"><img src="assets/images/thumbs/01.jpg" alt="" /></a> {/main_image}Then we’ll replace the hard-coded URL’s to the images with the
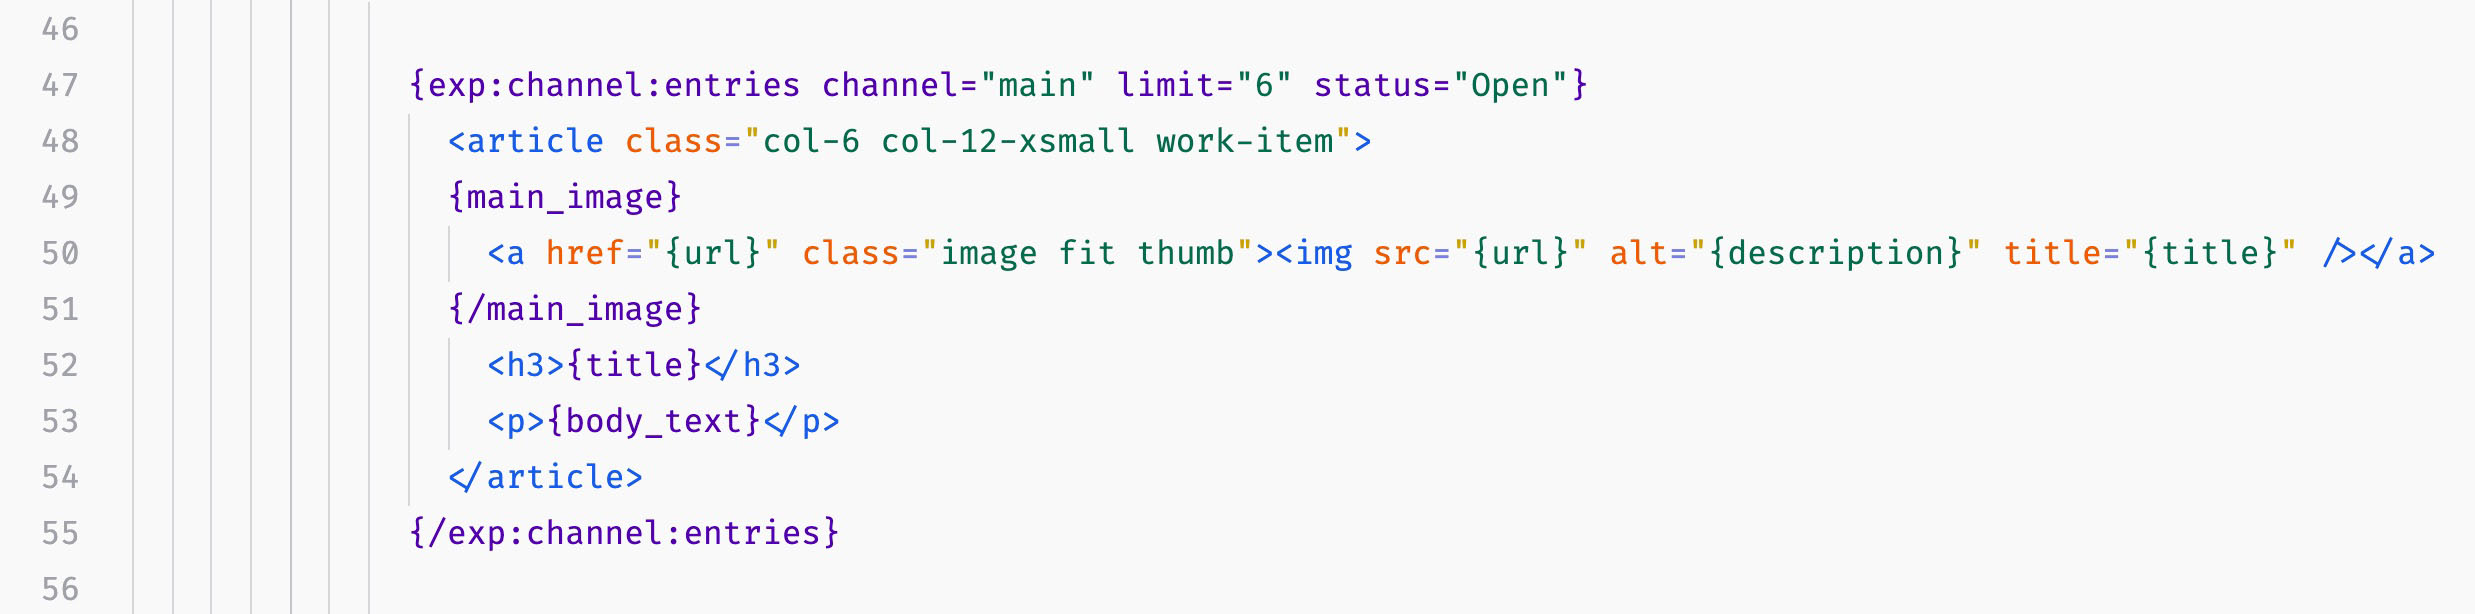
{url}tag like so:{main_image} <a href="{url}" class="image fit thumb"><img src="{url}" alt="" /></a> {/main_image}And lastly, we’ll add the alt and title attributes:
{main_image} <a href="{url}" class="image fit thumb"><img src="{url}" alt="{description}" title="{title}" /></a> {/main_image}Note: Here you can see how we’re using the Title and Description fields from the image’s metadata as content for the title and alt attributes.
Our final code block in Visual Studio Code should then look like this:
Save the file from Visual Studio Code and reload your browser.
If you have added images to all six entries, our site is now working and this guide is complete!
Congratulations, you’re done!
Great Job my friend!
You now know a lot about how ExpressionEngine works, and you can use that knowledge to download any template from the web and create an awesome ExpressionEngine site from it.
If you want to expand on this site, here are some ideas to what can be improved or added:
- Since this template from the good people at HTML5Up was only a single page, you could add more. For example, add a page that shows each entry on its own, with more text and a larger image.
- Change the sidebar image, sidebar text, and footer to something more personal. Perhaps place those things in entries in a separate channel?
- Look at the source code for index.html — at the bottom of the file is a lot of code that is commented out. Uncomment it and see what items you can use to expand the site.
If you want to go further, you could:
- Download another template from HTML5Up. Maybe Editorial that Greycells.net is based on, or one of the other great templates they have, and customize it to make it your own.
- Take an existing site you may have and copy its HTML and CSS over to ExpressionEngine, to give it some seriously solid underpinnings.
Using WordPress themes with ExpressionEngine?
Can this really be done? Yes, it can!
I know. It sounds sacrilege, weird, even impossible, but it’s not. Because while you can’t one-click install a WordPress theme under ExpressionEngine, you can use what we covered in this guide to “do it by hand”. It’s not difficult and you’ll learn so much!
Install the theme under WordPress and then copy the source code over, adding ExpressionEngine tags as you go. Of course, for complex themes with many sub-pages, you’ll have to do some work. But the principles are the same and, you can start with the front page and go further at your own pace.
I have converted WordPress themes to ExpressionEngine multiple times over the years. Once I even converted this entire Newspaper theme to ExpressionEngine by using the techniques we covered in this guide.
Some WordPress themes rely on a lot of plugins or even whole frameworks, but I have always been able to use what’s available in ExpressionEngine to make the site run.
So… It really can be done!
If you need help
First of all, if you have questions related to this guide, please post them in the comments section of part one. I’m always happy to help.
If you find any errors, also please let us know in the comments section of part one. Or e-mail us via the link in the sidebar.
And if you have questions in general, take a look at these resources:
- ExpressionEngine.com Forums
- ExpressionEngine on StackExchange
- Plus, you can find lots of other great resources on our own links page here.
Comments
Write a Comment:
Commenting is not available in this channel entry.