Guide: Use Any HTML Template With ExpressionEngine (part 3)
Welcome to part three of this guide, where I will show you how easy it is to take any HTML/CSS template from the web and make it the basis of an ExpressionEngine site.
You won’t need to be a hard-core coder to follow along. You won’t even need to have used ExpressionEngine before, but you should have a basic understanding of HTML and CSS.
I explain everything thoroughly with lots of screenshots, which is why a pretty simple guide still got big enough to split into four parts. It is well worth it though, as you will be able to create ExpressionEngine-driven sites from any HTML/CSS template when you’re done.
And you will be able to convert existing sites to run under ExpressionEngine because the principles will be the same.
Please make sure you have completed parts one and two before continuing.
Table of Contents
Creating a Channel in ExpressionEngine
We will create a channel in a moment, but let’s briefly look at what a channel is.
Channels store our content, like entries and images. Or they can be used to divide our data or site into logical sections. They are a way of compartmentalizing content and can be thought of as databases or as tables in a single database. They are, in short, extremely flexible.
For example, a company website might have the following channels:
- front_page: Holds the content for the front page of the site.
- employees: A section of the site presenting the employees and making it easy for customers to find e-mail addresses, telephone numbers, and so on.
- blog: Company and product-related blog entries.
- intranet: And finally, you may want to wall off a part of the site that only logged-in users can see. Used for company info, newsletters, service-manuals, lunch orders, or whatever is relevant internally.
However, our site will only use one channel. It’s just one pages so segmenting the content doesn’t make sense.
And that’s the point. You can start with one channel and add more as your site grows. Simply do it the way it makes the most sense to start with.
So, let us add a channel in ExpressionEngine.
Go to the ExpressionEngine Control Panel and then Channels.
Click New Channel.
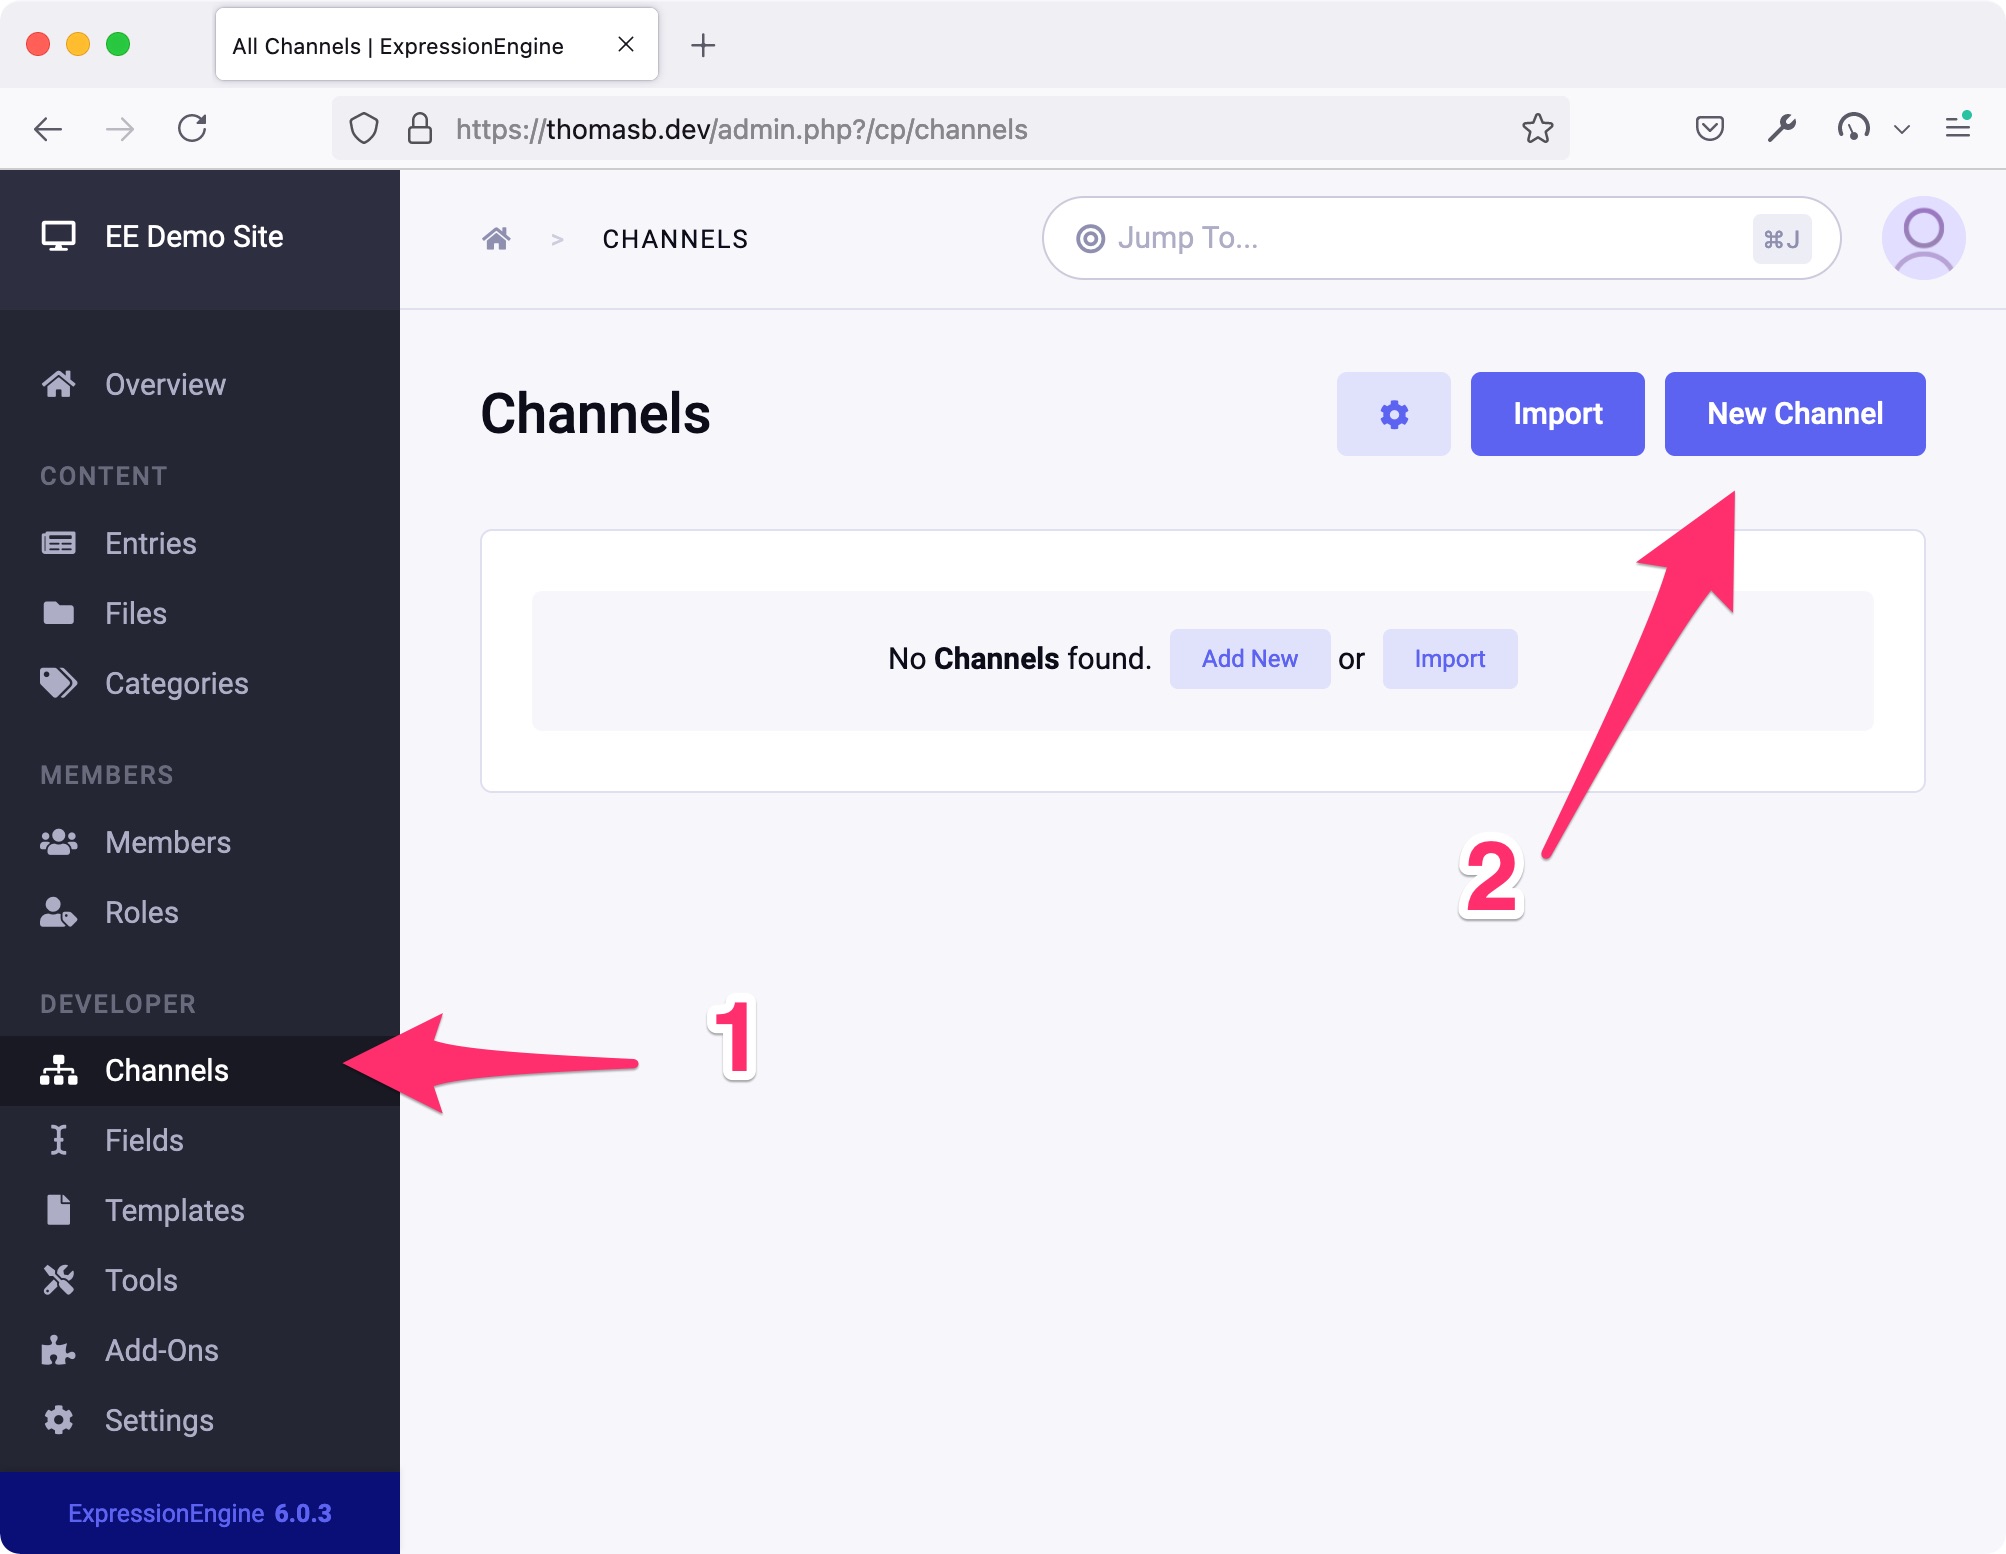
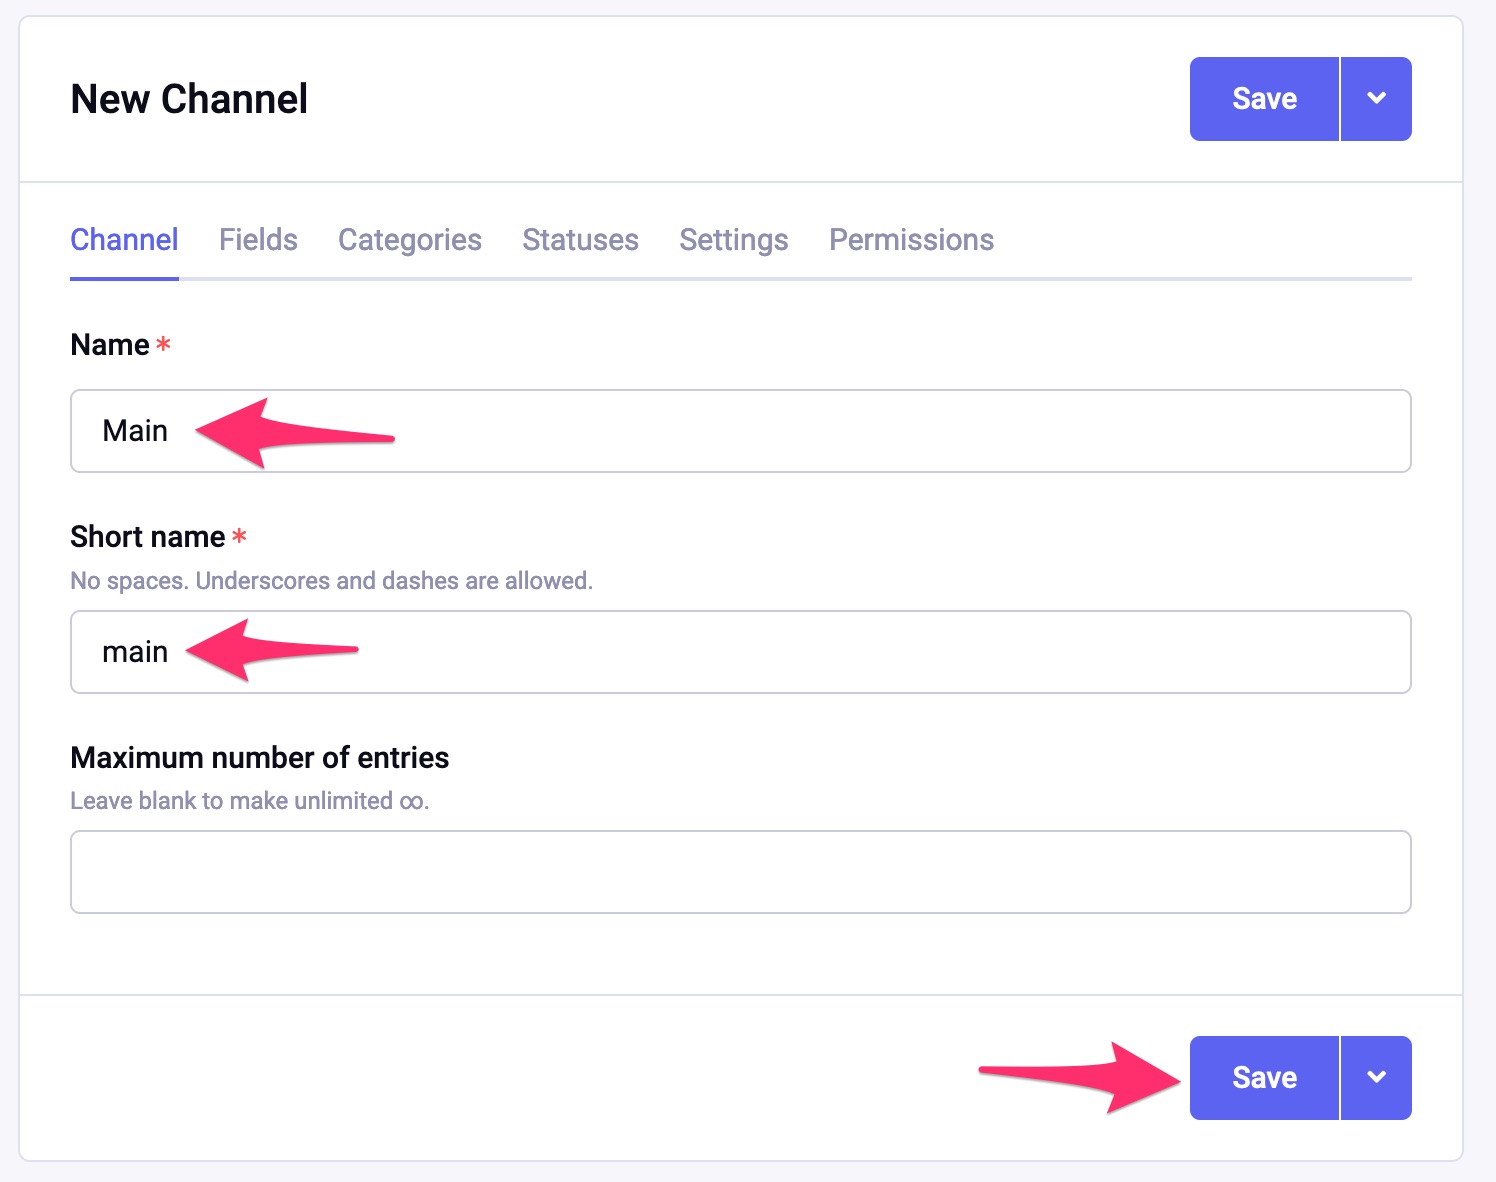
Name the new channel Main with a short name of main as shown below, and click Save.
Creating a Field Group and Fields in ExpressionEngine
Next, we will create a Field Group and some fields to hold the text we want to show on our page. Then we associate the Field Group with our main channel so the fields will be available when we create new entries and write our content.
Note: If you look at the New Channel screenshot above, you can see it has a Fields tab. So you could have created the fields at that point, along with categories, statuses, and settings. It’s just another, but still totally valid, way of creating new fields.
But to make things simple for new users, we will create the fields and Field Group as shown below and then add them to our main channel.
Go to Fields and create a new Field Group and name it Main Field Group and click Save.
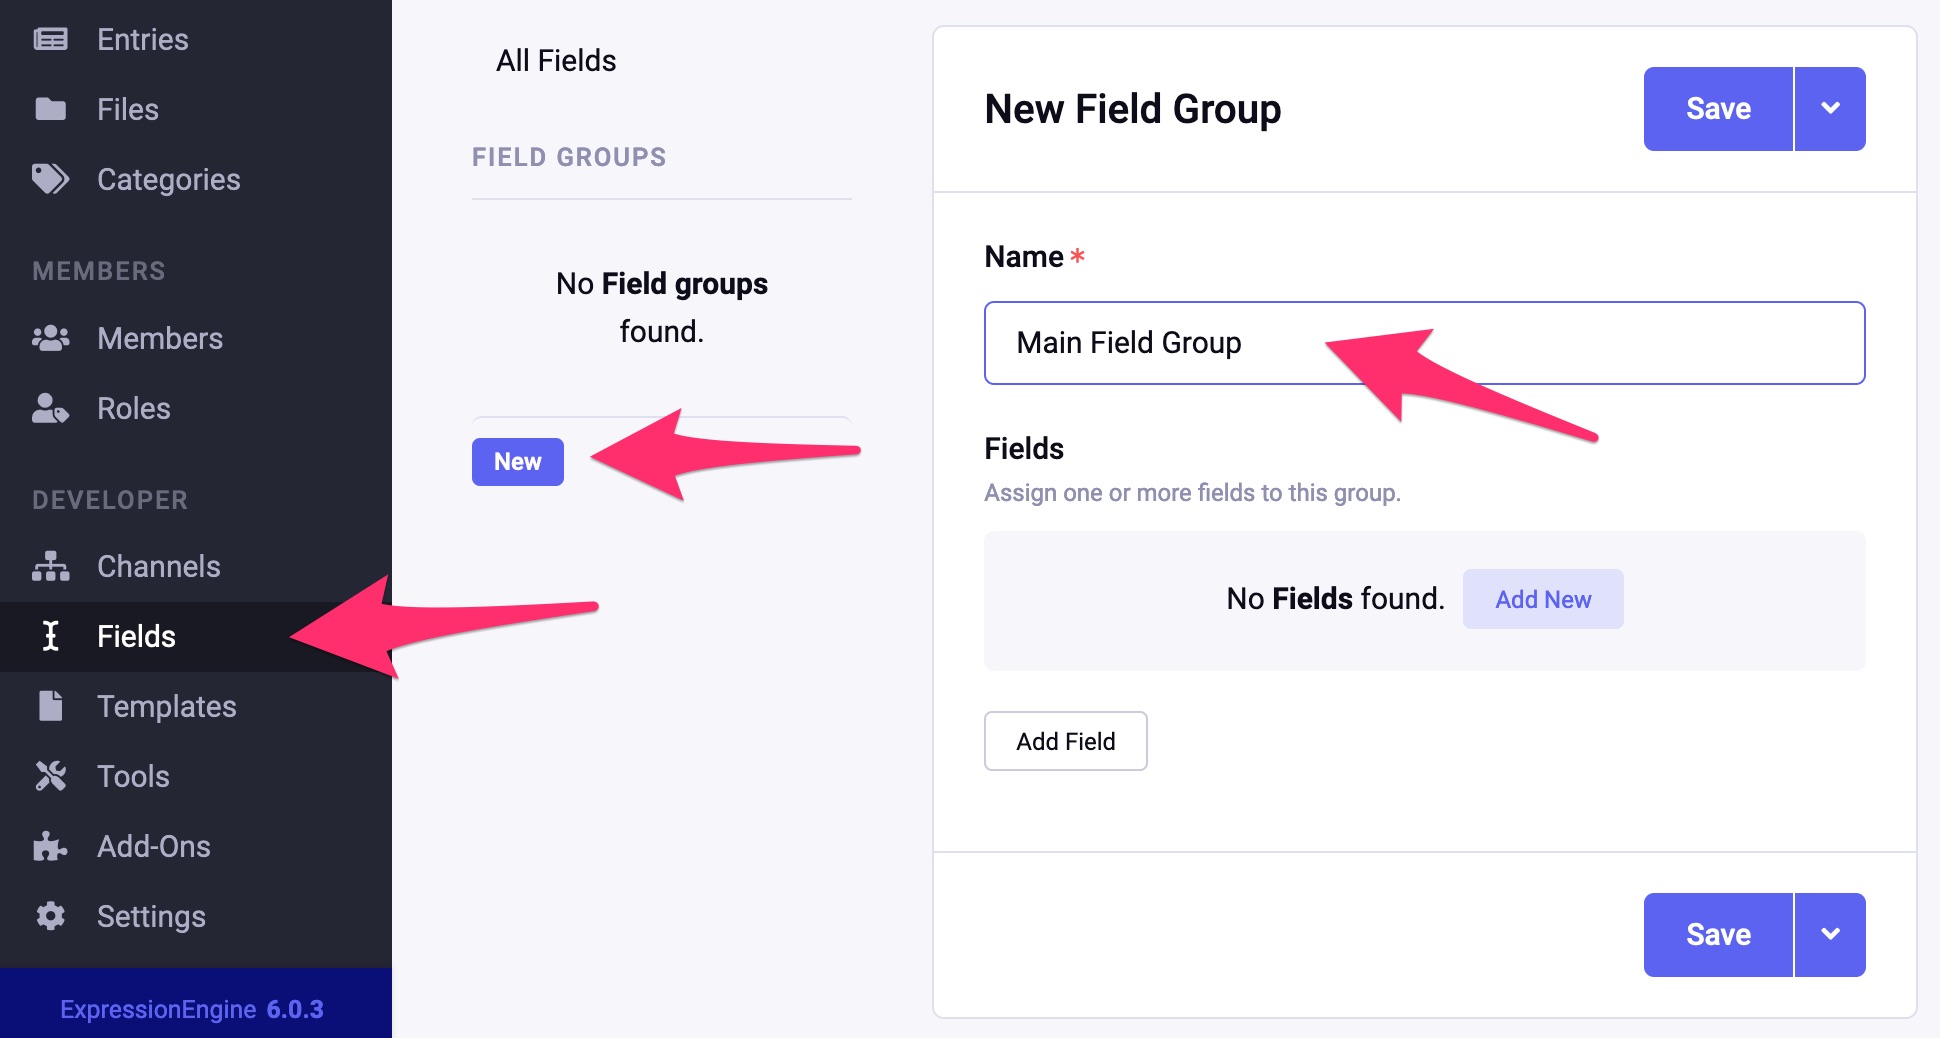
Make sure the newly created field group is selected, and then click New Field.
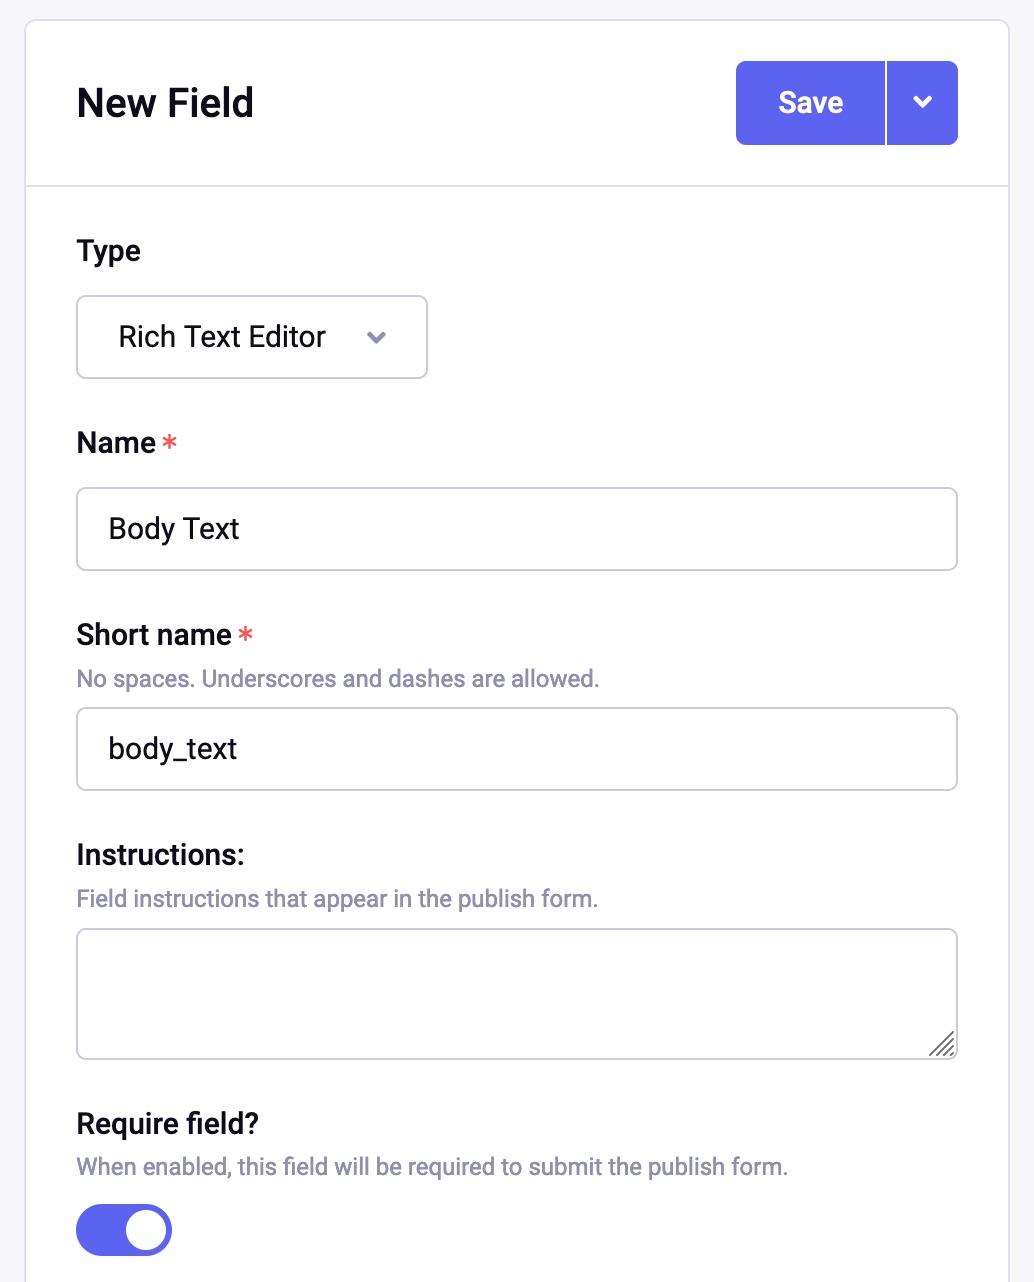
Fill out the New Field section as follows:
Type = Rich Text Editor - If you can’t find this among the options, go to Add-Ons in the sidebar, find Rich Text Editor among the uninstalled Add-Ons, and click Install. It will now be among the field types you can select.
Name = Body Text
Short Name = body_text (this will be auto-filled for us)
Require Field = Yes
Editor Configuration = Full
Leave the rest of the options as they are.
Now let’s create a second field called Intro Text.
- First, make sure Main Field Group is still selected so the new field will be created in this group.
- In the same way as above, create one more field, this time of type Text Input, and name it Intro Text (short name intro_text). Leave the other options as they are.
- Then click Save.
Note: You can learn more about the different field types and their options in the manual here.
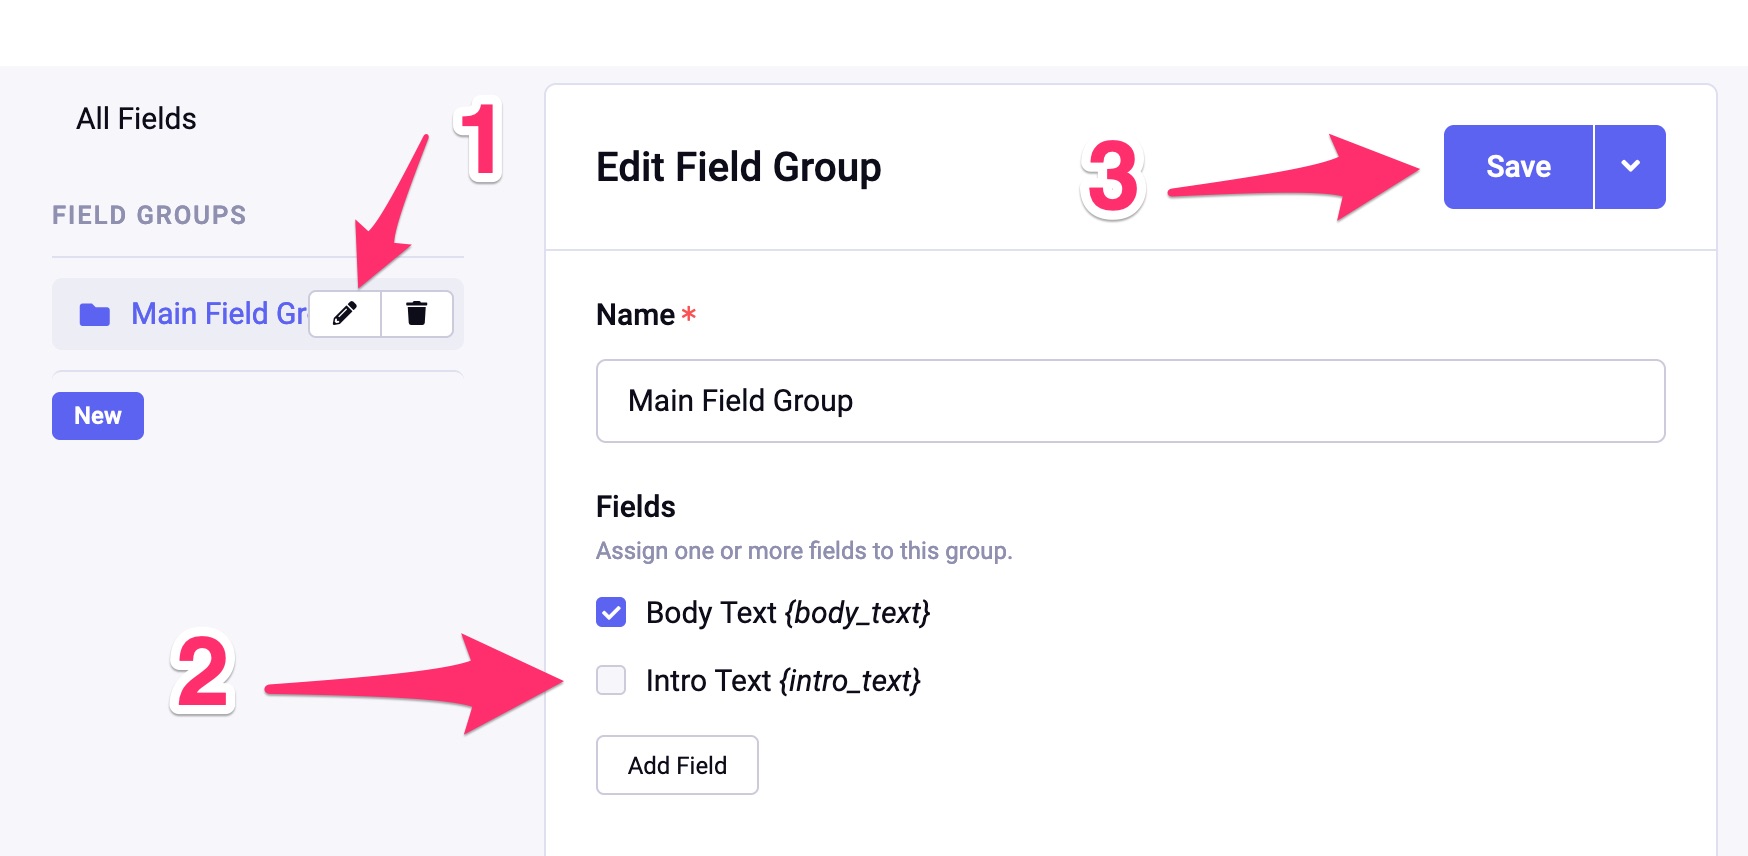
Tip: If you created the new fields without Main Field Group selected, i.e. the fields are not associated with the field group, you can easily fix this. It is a really easy mistake to make:
- Click the pencil icon next to Main Field Group.
- Select the checkbox next to the field(s) created outside the Main Field Group.
- Click Save.
Associate Field Group with Main Channel
Now let us associate the Main Field Group containing the two new fields with our main channel.
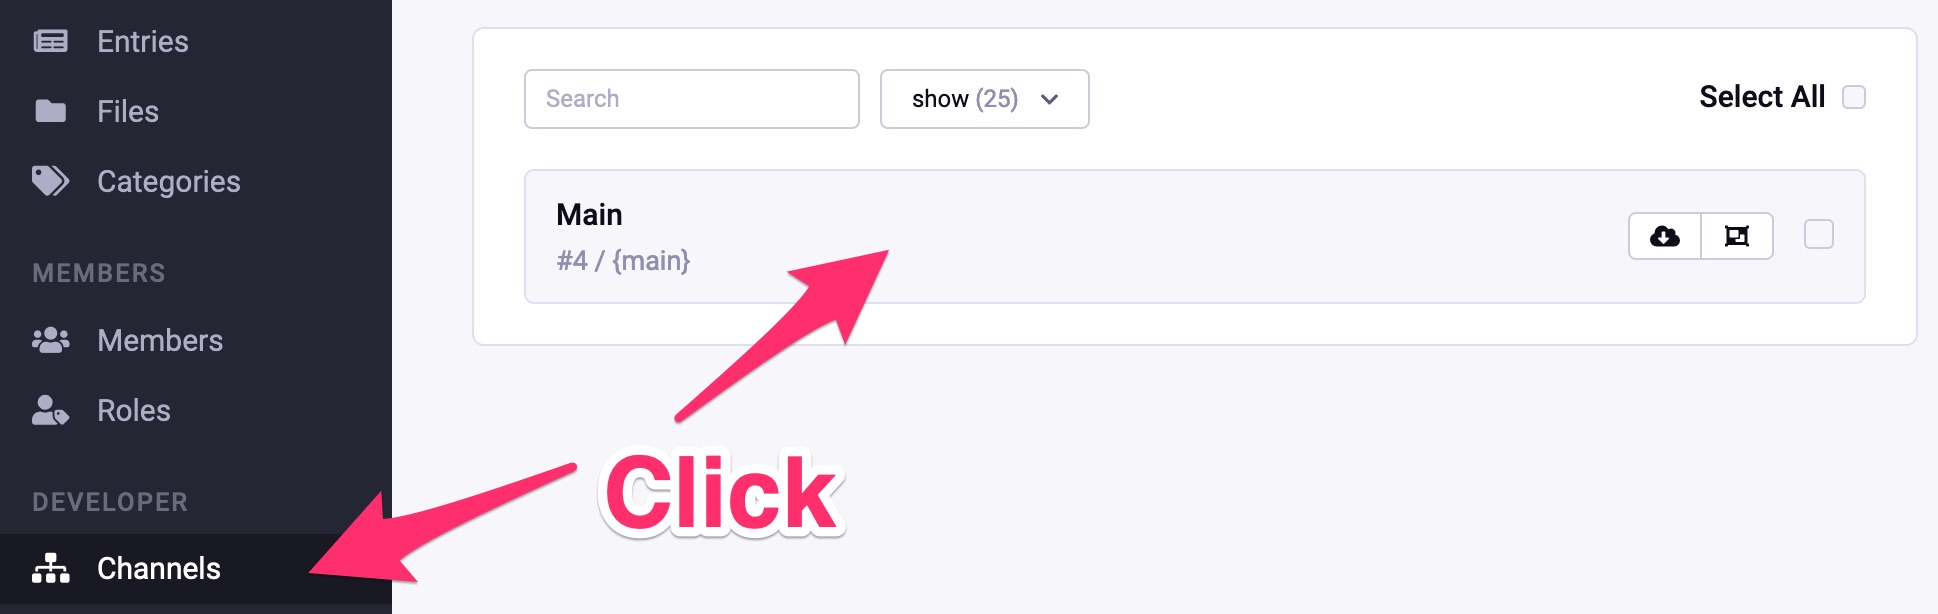
Click Channels in the sidebar and then click on the Main channel.
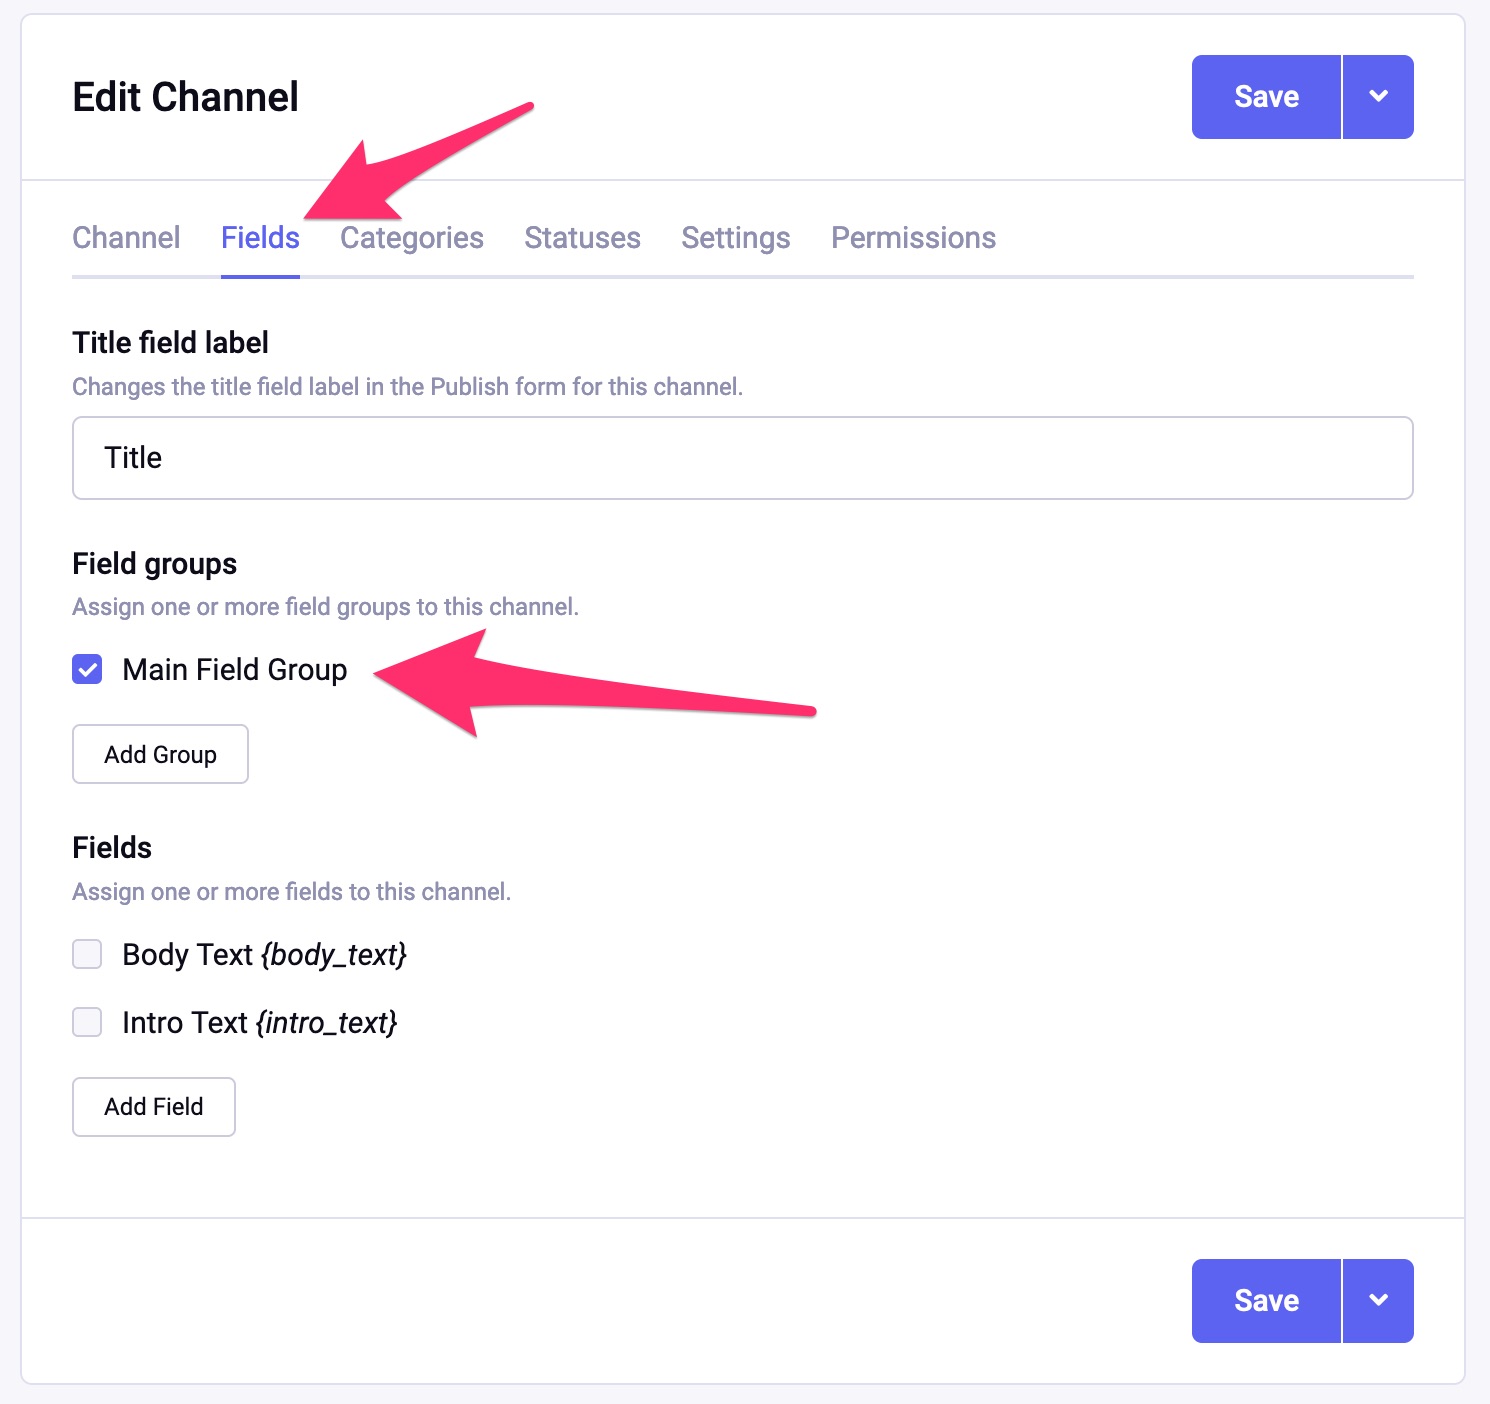
Click on Fields and then add Main Field Group to the Main channel by marking its checkbox, like so:
Excellent, we’re now ready to write some content and add the new fields to our index.html template. And then we’ll get to see our Strata template working with ExpressionEngine data!
Writing content in ExpressionEngine
Let us write a single entry in ExpressionEngine to replace the hard-coded top article on the current site. Then we will edit the index.html template to show the entry we just wrote.
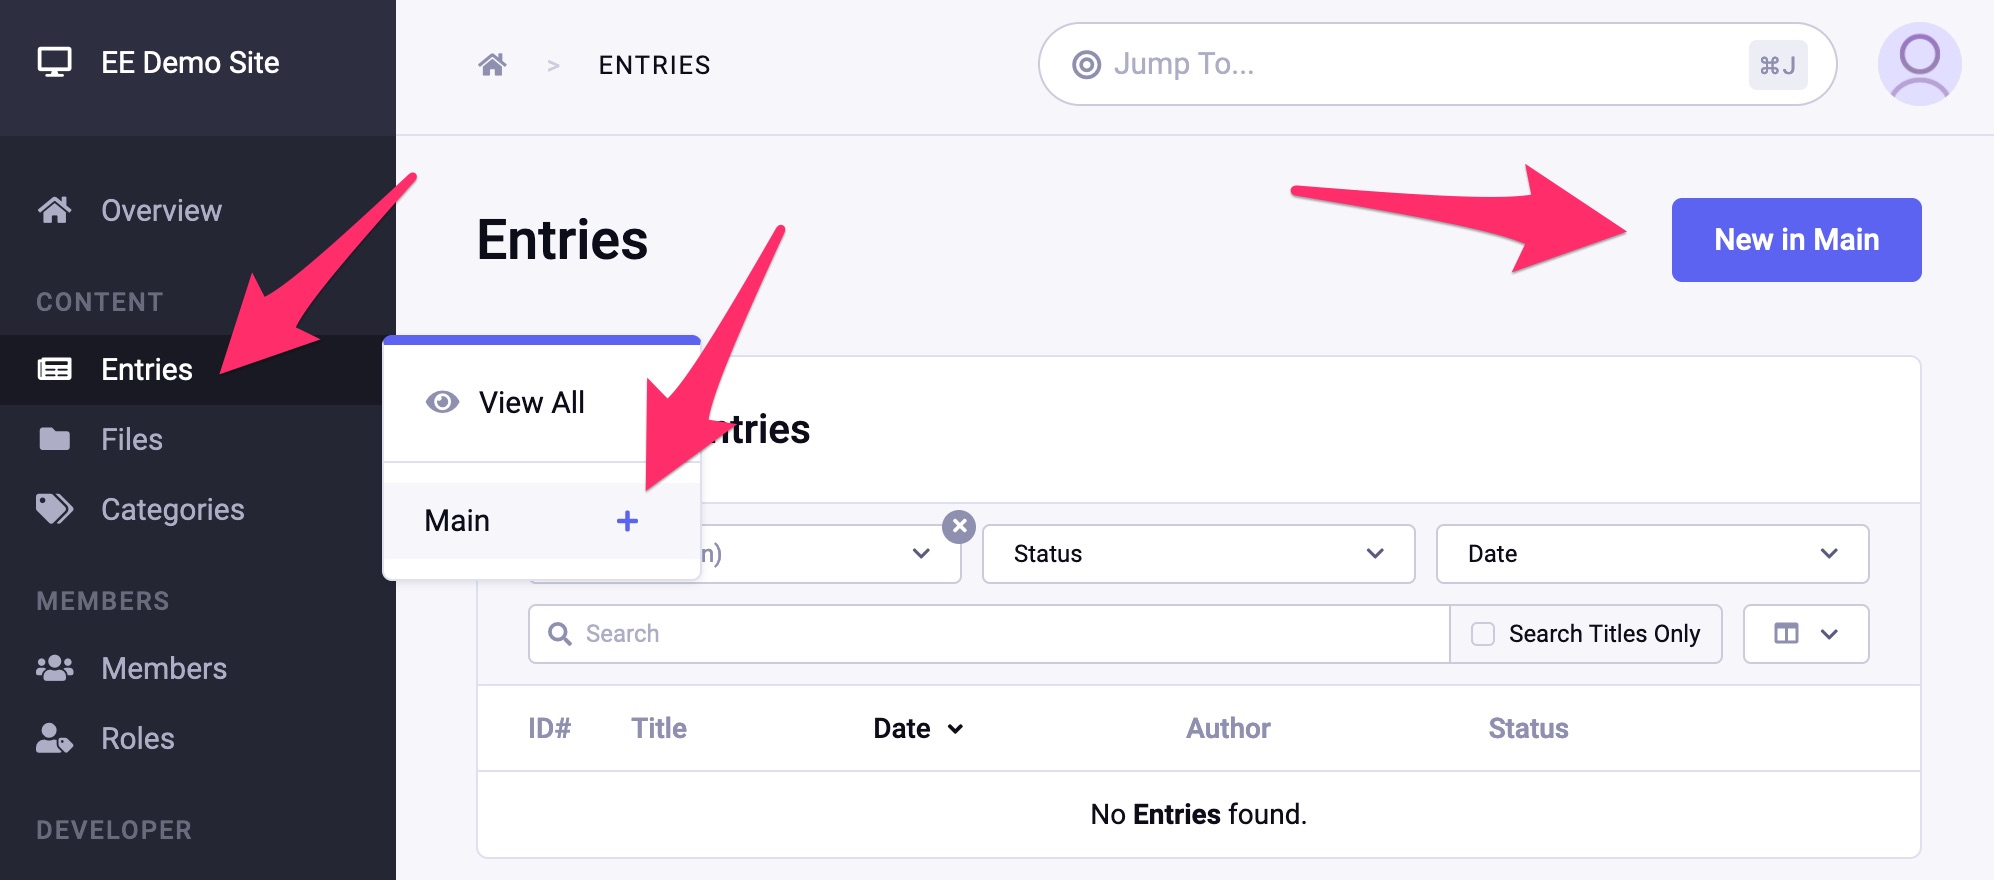
Go to Entries > Main and click New in Main in the ExpressionEngine control panel.
Tip: You can also click the blue plus-sign as shown below, to create a new entry in the Main channel. Whichever you feel is easier.
In the new entry, you can write whatever you like. Because we created the Body Text field as a Rich Text Editor field type, we have the formatting toolbar available to us, as shown below.
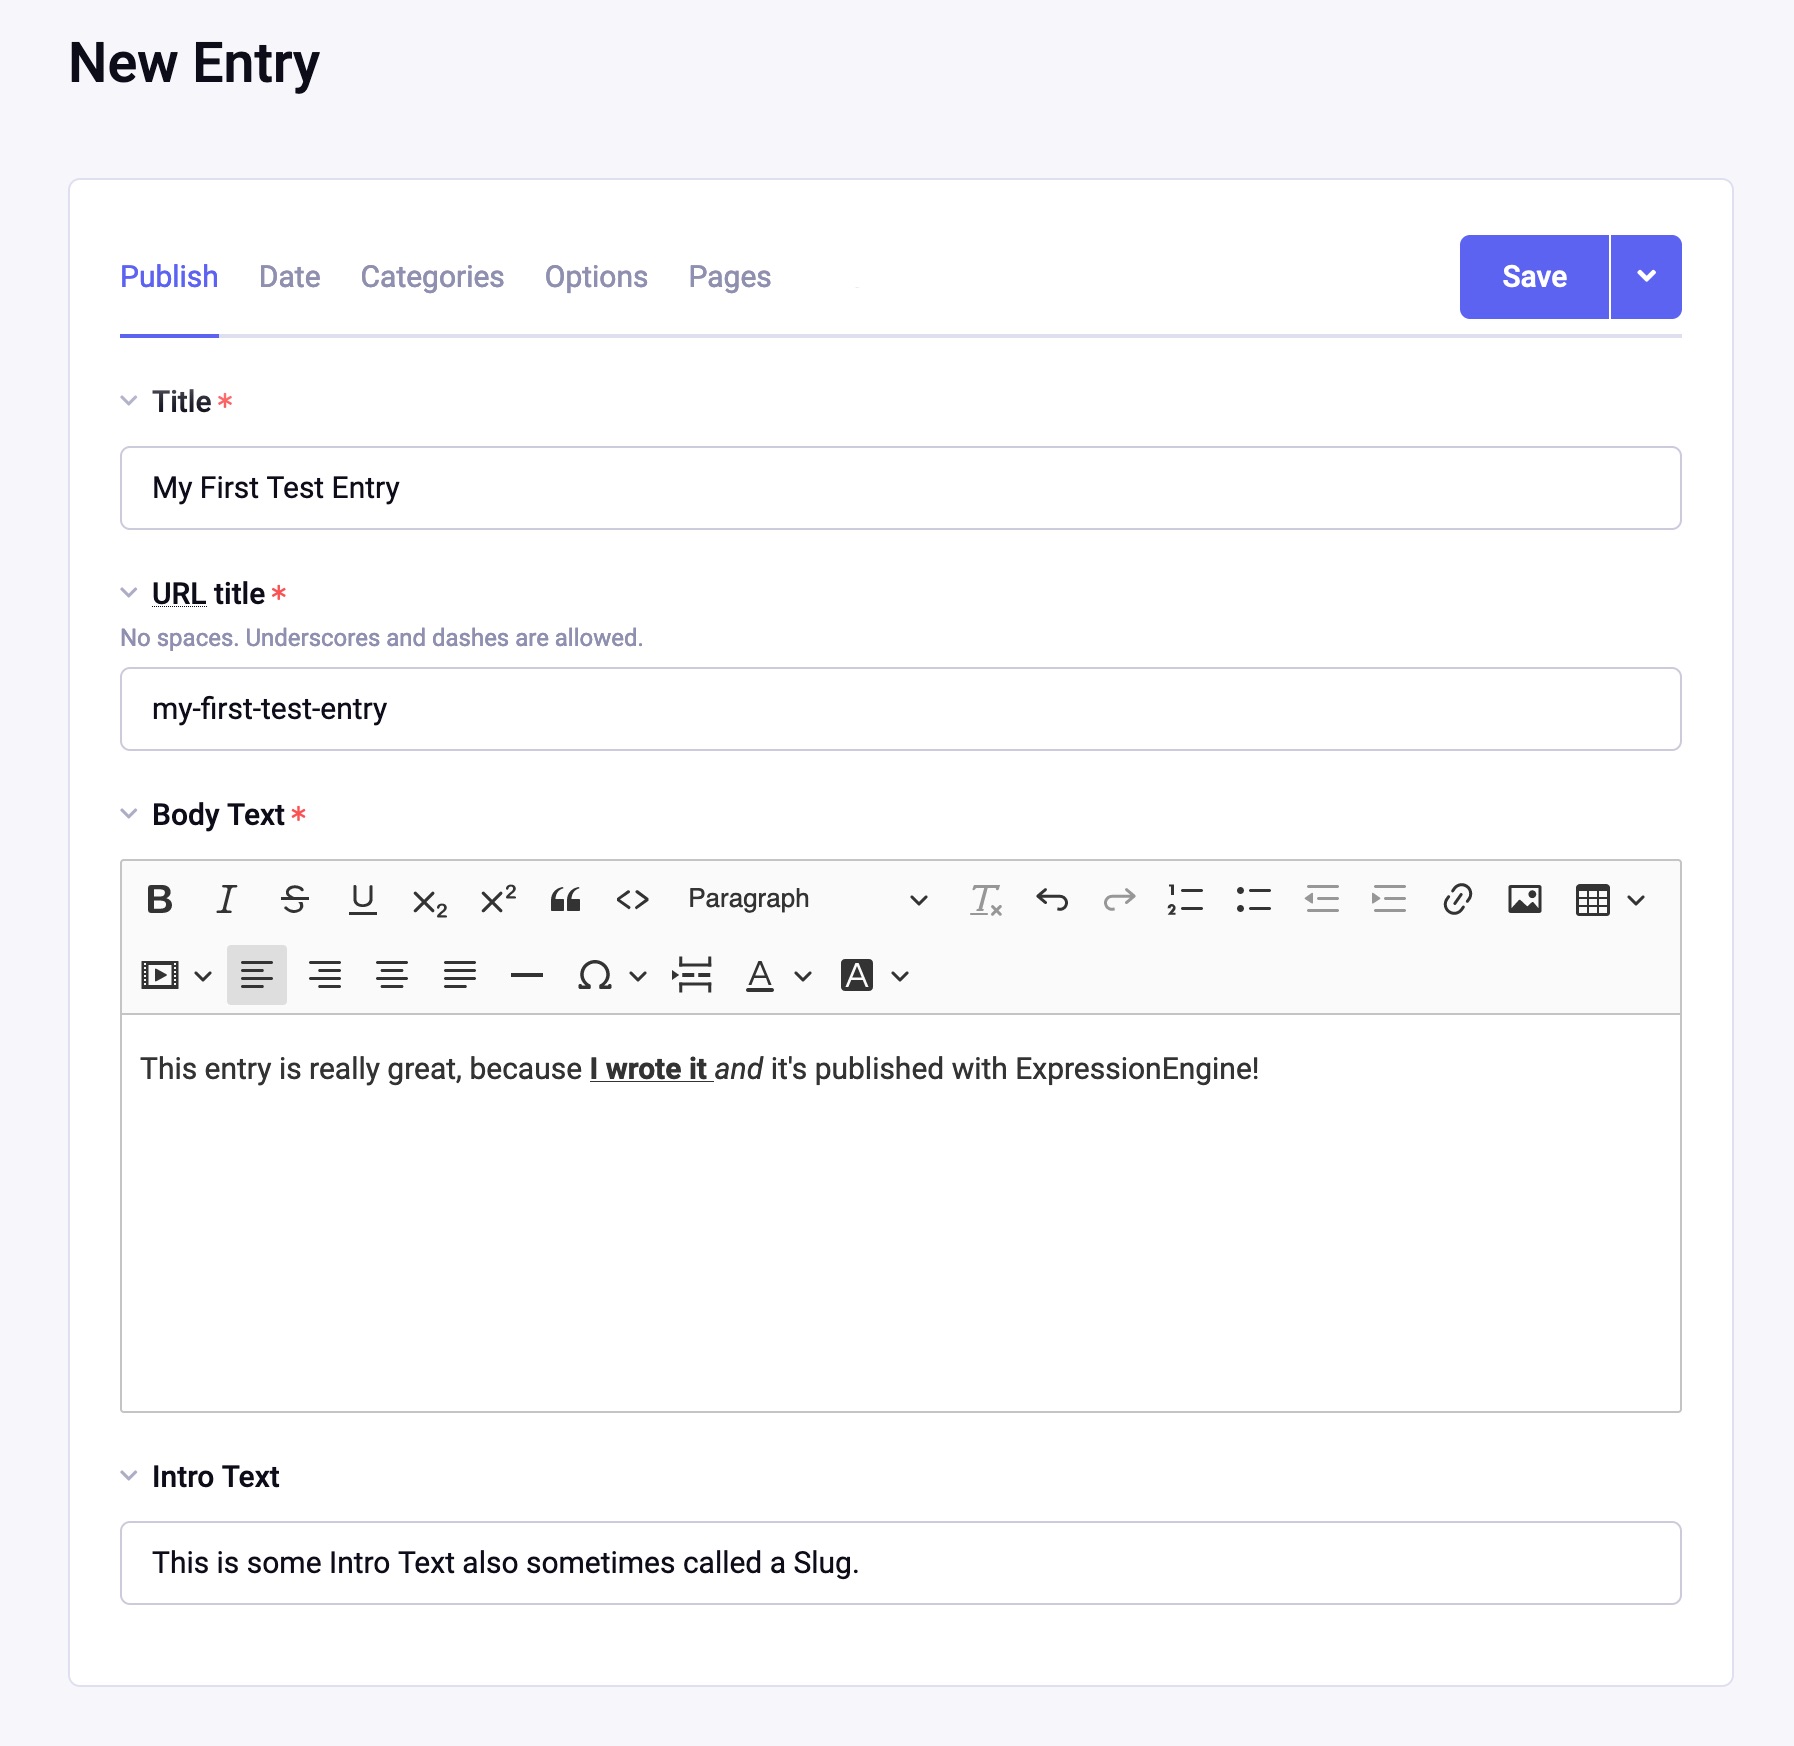
Click Save when you’re done.
Tip: Think the Intro Text field should be moved up over the Body Text field because that would just make more sense?
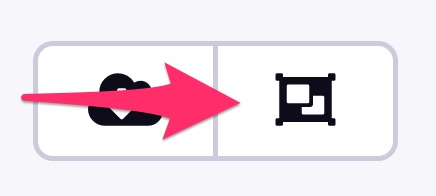
Me too, and luckily the layout of the New Entry Publish Form can easily be customized in ExpressionEngine. Just go to Channels and click the Layouts button as shown below.
We won’t go further into this here and now. But when you have the time, try clicking New Layout and playing with the options yourself.
Tip: If you want to learn more about the different areas of the New Entry Publish Form, check out the docs here.
Making the index template show our fields and entries
Let’s get back to editing our index.html template for a while. We’ll substitute the hardcoded text with the two fields we just created. That way our own content will finally show up on the site.
The tag you will use the most in ExpressionEngine is the {exp:channel:entries} tag, which is used to select and display our channels, entries, and fields.
Note: Technically, the Channel Entries tag is a tag pair because it has an opening and a closing tag. This enables us to pull one or many fields at once, from one or many entries, in one or more channels. In short, it gives us tremendous freedom to display our data any way we want.
The following is from the ExpressionEngine documentation on the Channel Entries tag:
The Channel Entries tag can display both multi-entry and single-entry content. That is several entries on a page or one specific entry.
Take a look at the Channel Entries tag documentation here to learn more.
Let’s go through a small example and then move on to modifying our index.html template.
{exp:channel:entries channel="news" limit="10" orderby="date" sort="desc"}
    <h2>{title}</h2>
    {body}
{/exp:channel:entries}
In this example, the Channel Entries tag pulls the 10 latest entries from a channel called news and displays the {title} and {body} fields of those ten entries. It will be the ten latest entries because we order by date in descending order.
Note: Every tag in ExpressionEngine is surrounded by curly quotes. That is how ExpressionEngine differentiates its own tags from regular HTML code.
Parameters for Channel Entries
You can tailor exactly what you want to show using the many parameters available to the Channel Entries tag. Take a look here and click Show List to see them all. These enable you to completely customize what content you want to show on your site.
Variables for Channel Entries
You can also display all kinds of metadata about your channel entries via the variables listed here and here. So if you need to show from what channel your entries are pulled, their creation or edit dates, status, permalinks, or any other data about your data, you can with variables.
Showing our first entry
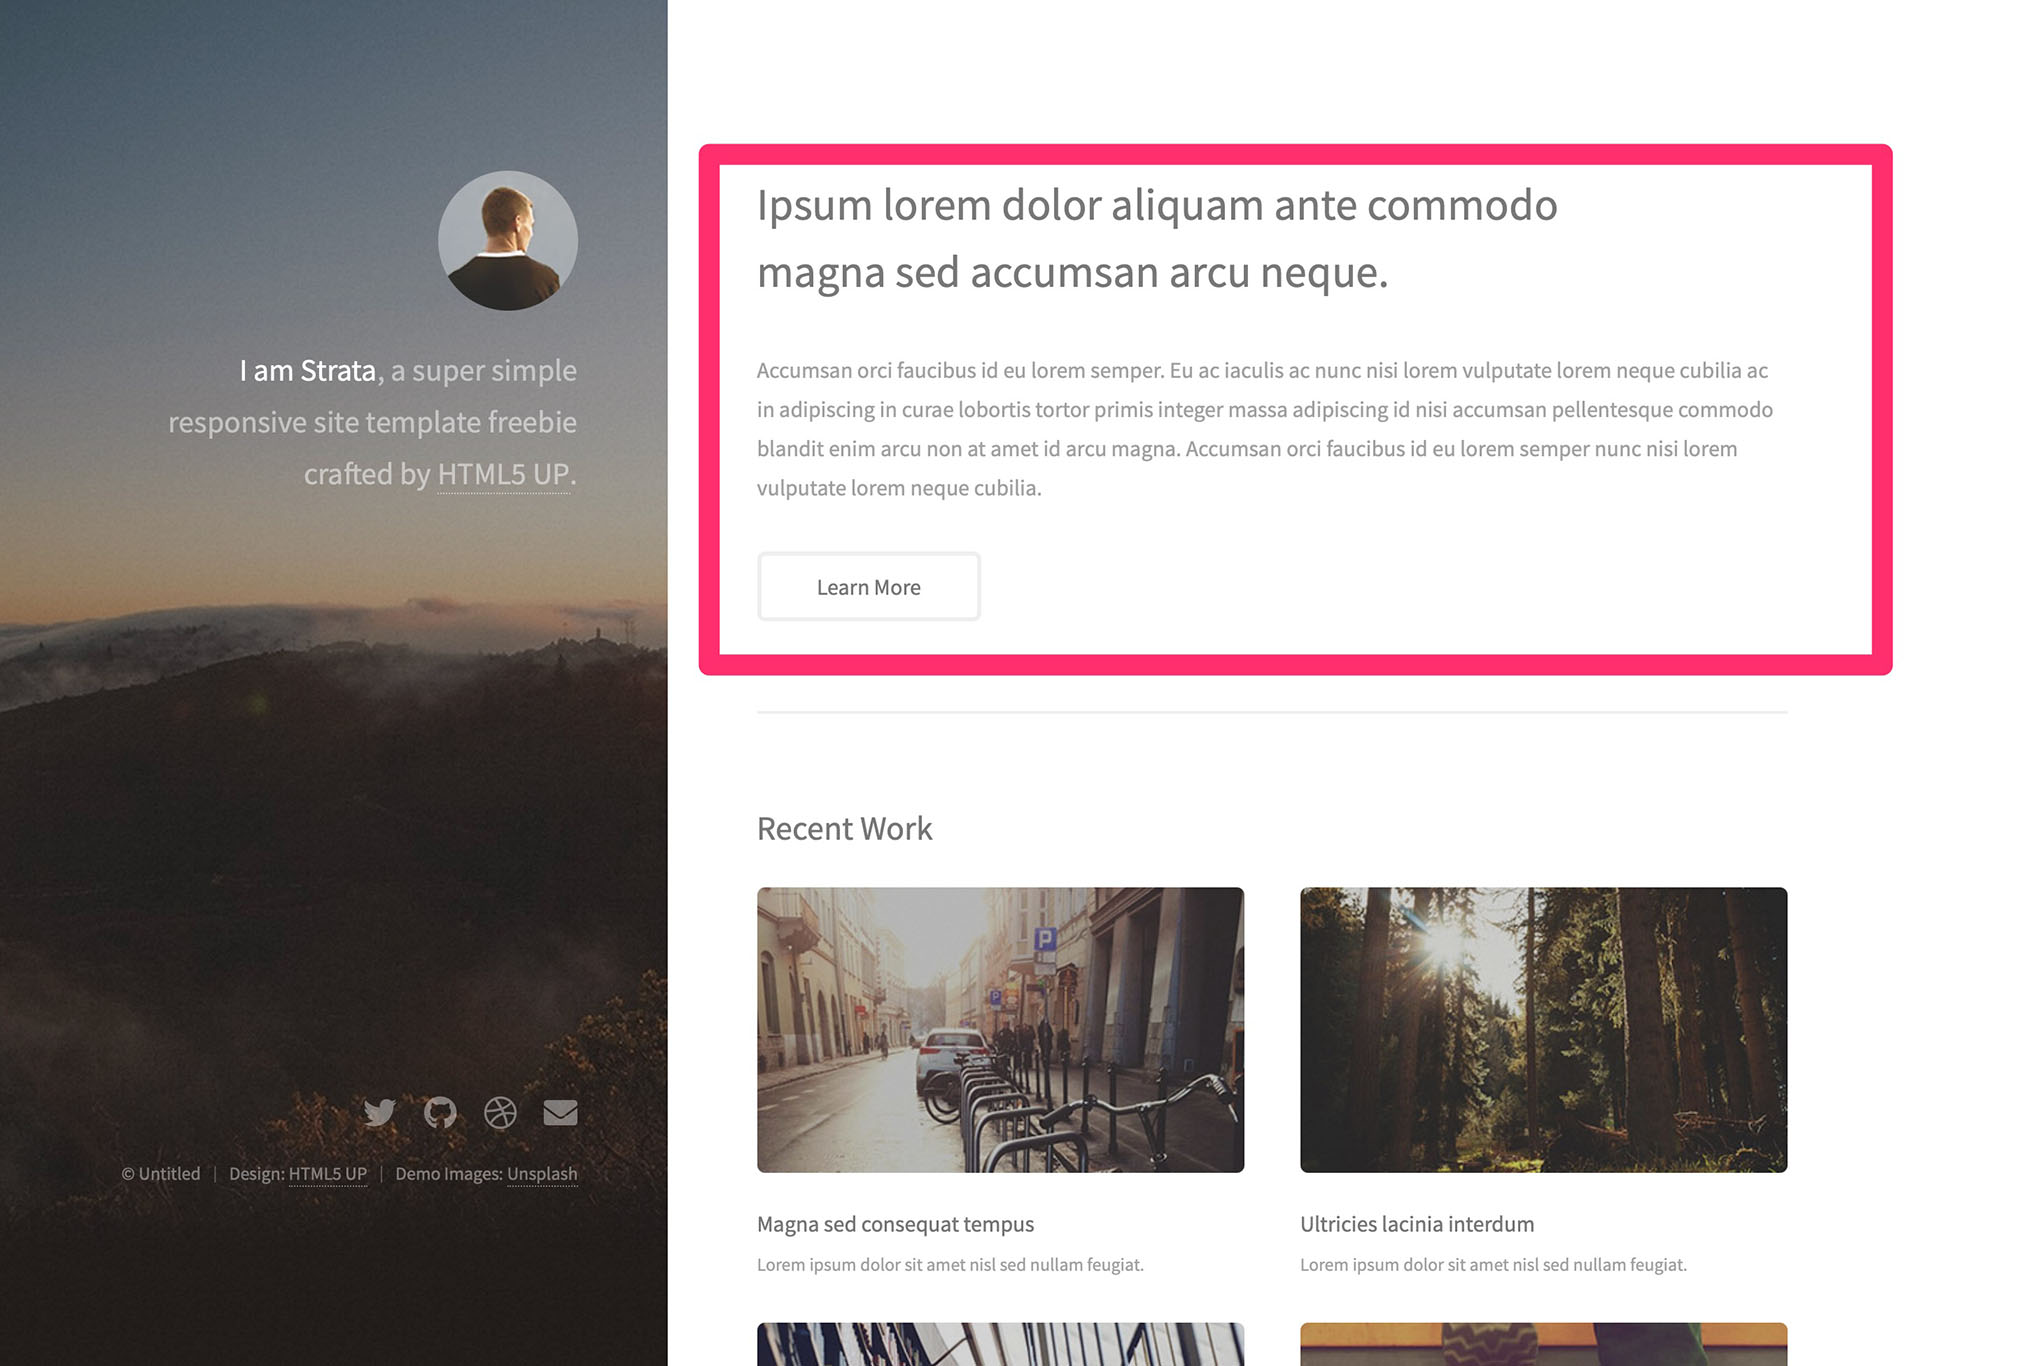
We’ll start by modifying the index.html template to show the entry we just wrote instead of the static text marked on the screenshot below.
In this case we will be pulling the {title} and {body_text} fields from our main channel. Note that we didn’t have to create the title field because every entry in ExpressionEngine has one. It’s the title you gave your entry when you wrote it.
Open index.html in Visual Studio Code and find the code shown below, starting at or around line 29.
<!-- One -->
<section id="one">
    <header class="major">
        <h2>Ipsum lorem dolor aliquam ante commodo<br />
        magna sed accumsan arcu neque.</h2>
    </header>
    <p>Accumsan orci faucibus id eu lorem semper. Eu ac iaculis ac nunc nisi lorem vulputate lorem neque cubilia ac in adipiscing in curae lobortis tortor primis integer massa adipiscing id nisi accumsan pellentesque commodo blandit enim arcu non at amet id arcu magna. Accumsan orci faucibus id eu lorem semper nunc nisi lorem vulputate lorem neque cubilia.</p>
    <ul class="actions">
        <li><a href="#" class="button">Learn More</a></li>
    </ul>
</section>
First, we’ll have to pull the entries we want to show with the Channel Entries tag-pair, and then replace the text with our field tags.
- In this case, we just want a single entry at the top of our page. So we surround the
<section>...</section>block with a Channel Entries tag-pair that we limit to pull one entry from our main channel. - Then we replace the headline text between the
<h2>...</h2>tags with ExpressionEngine’s{title}field-tag. - And finally we replace the body text between the
<p>...</p>tags with our{body_text}field-tag.
- In this case, we just want a single entry at the top of our page. So we surround the
Having done that, the code should now look like this:
{!-- One --}
{exp:channel:entries channel="main" limit="1"}
<section id="one">
    <header class="major">
        <h2>{title}</h2>
    </header>
    <p>{body_text}</p>
    <ul class="actions">
        <li><a href="#" class="button">Learn More</a></li>
    </ul>
</section>
{/exp:channel:entries}
Here is a quick tip: I changed the comment on the first line from a regular HTML comment like this:
<!-- comment -->To an ExpressionEngine style comment like this:
{!-- comment --}.You can, of course, use either or both. But ExpressionEngine style comments are great because, unlike regular HTML comments, these don’t show up in your sites’ source code. That means you can comment your code as much as you want without anyone looking over your shoulder. And without the template engine having to spend resources on them.
Save the file in Visual Studio Code and head to your browser, reload the page and check the site. If all went well, the top part should now look like this:
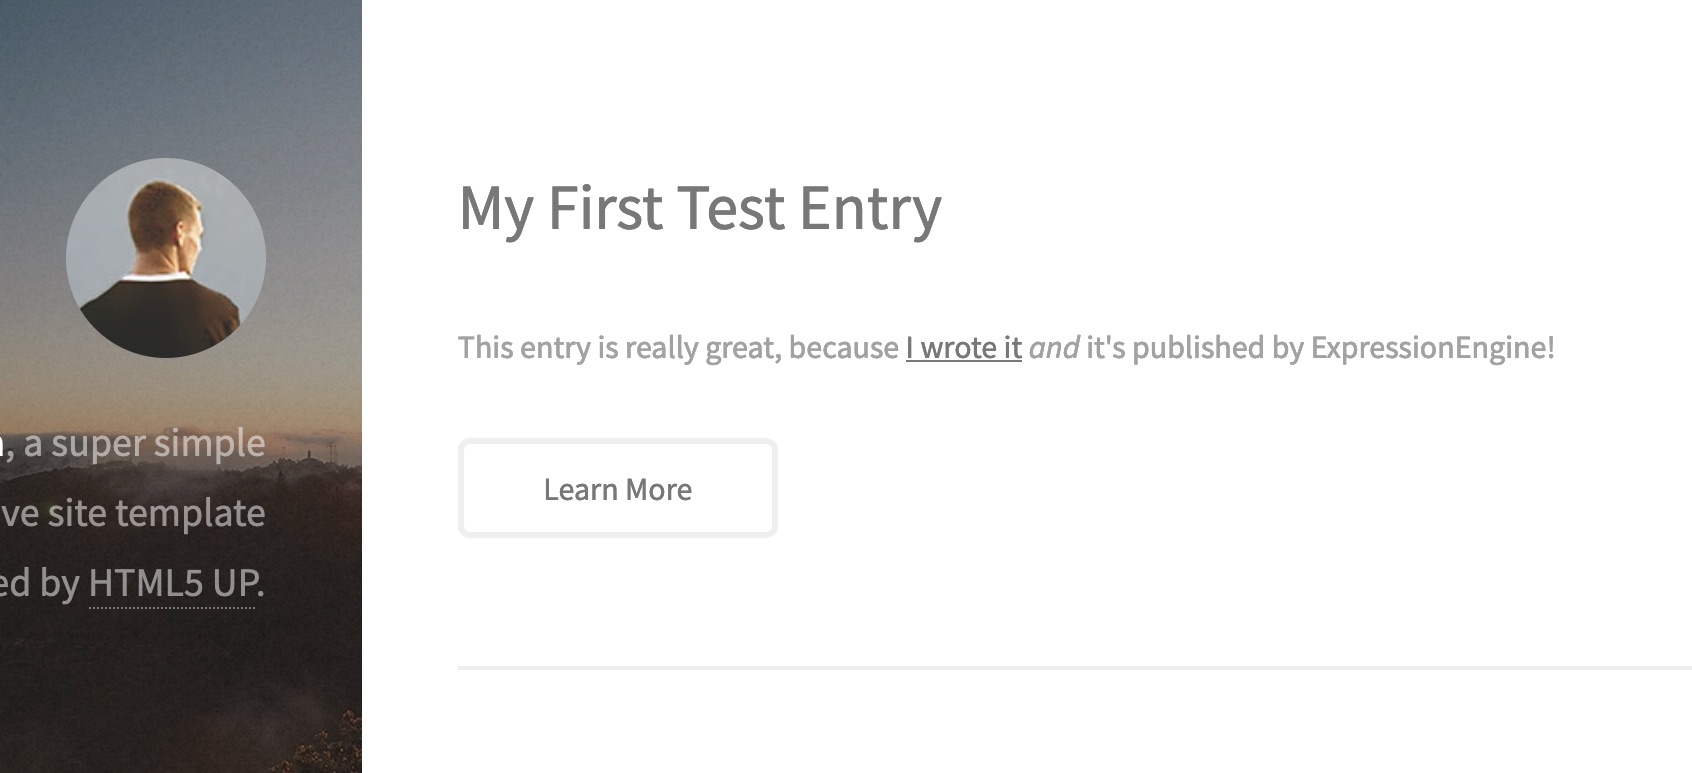
Cool, right?
I know this was a long way to get something real showing in your browser. But I want as many as possible to be able to follow along, even if they never used ExpressionEngine before.
As you can see, it’s pretty trivial to make any design or template fully ExpressionEngine powered. It’s mainly pulling the right data and replacing static text with the tags representing your content.
And modifying your existing site to run under ExpressionEngine, is just as easy.
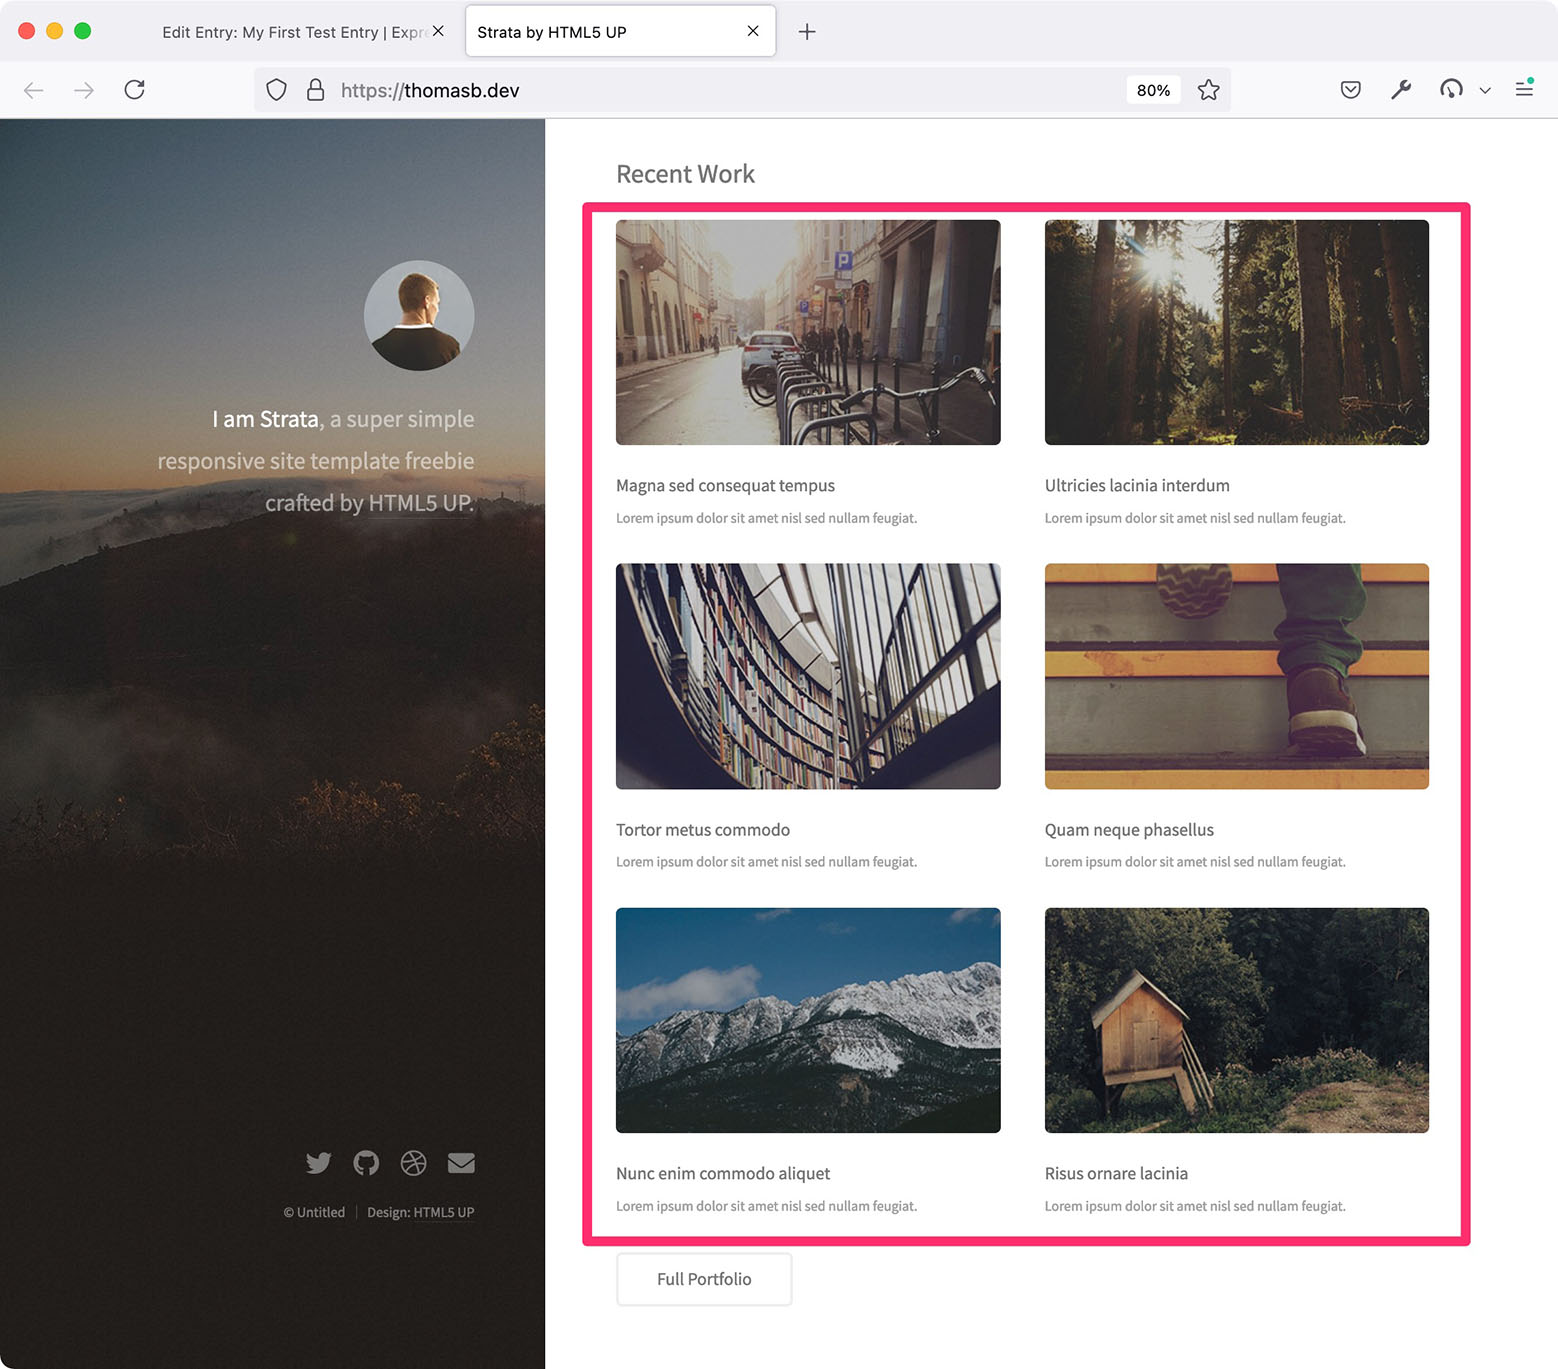
OK, let’s get the six smaller posts on the Strata template working too!
Showing the next six entries
So, let’s get these six entries working:
These entries will be pulled the same way as the one above. We’ll just be modifying the Channel Entries tag-pair to pull six posts instead of one and be using the {intro_text} field-tag instead of {body_text}.
Note: Instead of modifying all six posts in the index.html template, we’ll only keep the code for the first one. Then we’ll use the Channel Entries tag-pair to pull six different entries using the same code.
This is how ExpressionEngine can save us a lot of coding and maintenance, and something you’ll do a lot when modifying existing code to run on ExpressionEngine. And, it’s always a pleasure to be able to delete a lot of redundant code!
Go to the index.html template in Visual Studio Code and find line 42 with the comment
<!-- Two -->.We can see that pretty much the same code repeats six times:
<article class="col-6 col-12-xsmall work-item">
<a href="assets/images/fulls/01.jpg" class="image fit thumb"><img src="assets/images/thumbs/01.jpg" alt="" /></a>
<h3>Magna sed consequat tempus</h3>
<p>Lorem ipsum dolor sit amet nisl sed nullam feugiat.</p>
</article>
Delete the other five code blocks similar to the one above. That will be from about line 51 to 75 as shown here:
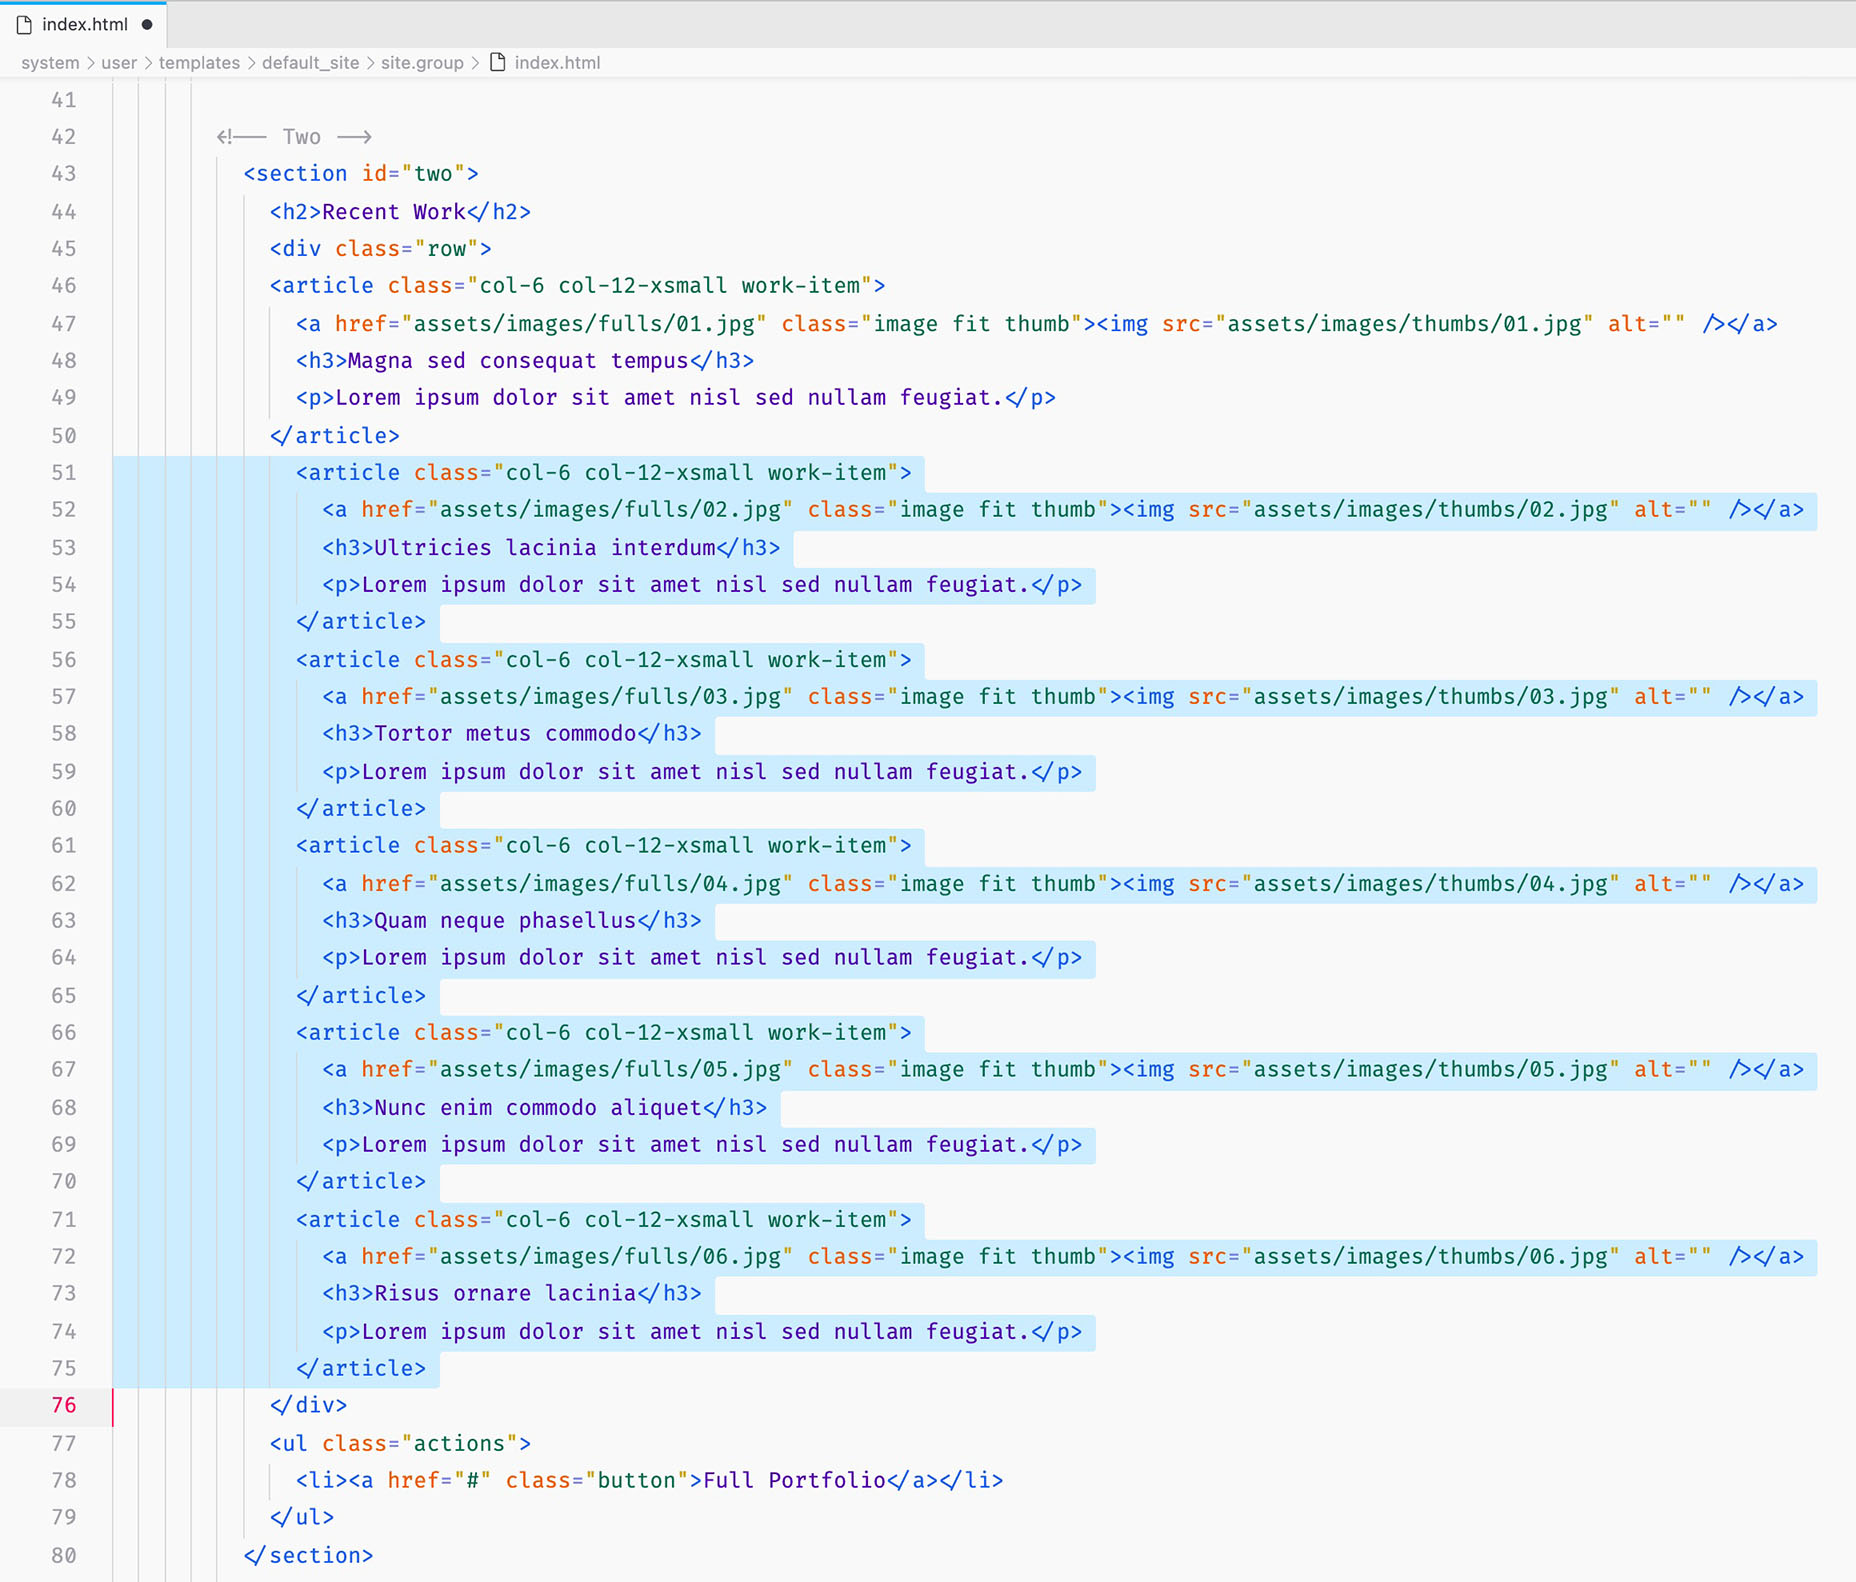
After deleting the above code, this is the code for the entire “Recent Work” section you should be left with:
<!-- Two -->
<section id="two">
    <h2>Recent Work</h2>
    <div class="row">
    <article class="col-6 col-12-xsmall work-item">
        <a href="assets/images/fulls/01.jpg" class="image fit thumb"><img src="assets/images/thumbs/01.jpg" alt="" /></a>
        <h3>Magna sed consequat tempus</h3>
        <p>Lorem ipsum dolor sit amet nisl sed nullam feugiat.</p>
    </article>
    </div>
    <ul class="actions">
        <li><a href="#" class="button">Full Portfolio</a></li>
    </ul>
</section>
If you save index.html and reload your browser, you should now only see one entry under “Recent Work”.
And, as you’ve probably been mumbling to yourself this whole time, we don’t actually have six entries to show on our page. So head back to the ExpressionEngine Control Panel and write six new ones. The title, body, and intro-text are totally up to you.
Now that we have six new entries to show in the “Recent Work” section, let’s make that happen.
First, we add a Channel Entries tag-pair around the
<article>...</article>section that pulls six entries from our main channel.Then we replace the static headline text between the
<h3>...</h3>tags with the{title}tag.And finally we replace the static text between the
<p>...</p>tags with our{intro_text}tag.Having done that, this is how our code should look:
<!-- Two --> <section id="two"> <h2>Recent Work</h2> <div class="row"> {exp:channel:entries channel="main" limit="6"} <article class="col-6 col-12-xsmall work-item"> <a href="assets/images/fulls/01.jpg" class="image fit thumb"><img src="assets/images/thumbs/01.jpg" alt="" /></a> <h3>{title}</h3> <p>{body_text}</p> </article> {/exp:channel:entries} </div> <ul class="actions"> <li><a href="#" class="button">Full Portfolio</a></li> </ul> </section>Note: I have placed a blank line before and after our Channel Entries tag-pair, to show which part is being repeated six times by the tag pair.
You’ve probably already saved index.html, reloaded your browser, and shouted WHAT!? And yes, you’re right, there are a few issues, but these will be fixed shortly, and ExpressionEngine is just doing what we told it to.
The issues are:
- The first entry at the top of the page is now the last one we wrote and thus belongs down in the “Recent Work” section.
- The first entry we wrote — the one that should be at the very top — is now gone.
- And the images are all the same now.
All true and all as it should be … well, as ExpressionEngine has been told it should be.
- The reason is that we’re not telling our two Channel Entries tags exactly which entries should be pulled, so they just show us the most recent ones. So we need a way to differentiate our top post from the six others.
- The images are still being pulled from the template’s
/assets/images/folder on the server, not from images associated with our entries in ExpressionEngine (we’ll learn how to add images to entries soon).
Luckily these are easy fixes which we’ll tackle in part four of this guide.
Continue to part 4
That’s it for part three of this guide. Please click here, to continue with part four, which will also conclude this guide.
If you have any comments, corrections, or tips, please post them in the comments section of part one. We would love to hear from you!
Comments
Write a Comment:
Commenting is not available in this channel entry.