Adding a sitemap to your ExpressionEngine site

Any site needs a sitemap these days. It acts as a blueprint of your website that helps search engines find, crawl, and index its content. It’s both a starting point for them when they first index your site and a mechanism to discover any new content you add.
Once you have your sitemap set up you can let ExpressionEngine take care of updating it for you, so you can get on with more fun things on your site.
There are actually two kinds of sitemaps: XML sitemaps like the one we’re creating here, and “regular” sitemaps sometimes called “HTML sitemaps”. Regular sitemaps are meant as an easy way for your visitors to find content on your website, XML sitemaps are an aid for search engines.
If you’re new to ExpressionEngine
If you’re new to ExpressionEngine you should check out the following guides to learn the basics:
Also check out the guide below where we go through everything from setting up Visual Studio Code, editing templates, creating templates, channels, fields, and more in greater detail:
If you just want to get on with it!
If you don’t need to know what a sitemap is or how it works, but just want to get on with creating one, you can skip to Adding a sitemap to your ExpressionEngine site below.
You can find the source code for the finished ExpressionEngine template on our GitHub repository here.
Table of Contents
What is a sitemap and why do I need one?
It is just what it sounds like: A map or blueprint of your website that helps search engines find, crawl, and index it more intelligently. A sitemap is normally an XML file located at the root of your website.
Though there are ExpressionEngine add-ons that will create one for you, doing it yourself is pretty easy if you follow this guide. And, you’ll only have to do it once.
Take a look at our sitemap here: https://greycells.net/sitemap.xml
It lists all pages like Categories, Links, and About, plus all our articles and guides.
As mentioned, search engines like Google and Bing use the sitemap to crawl and index your site. Of course, this will be done even if you don’t provide a sitemap, but having one gives you control over how and what is indexed.
As Google writes in Learn about sitemaps:
Using a sitemap doesn’t guarantee that all the items in your sitemap will be crawled and indexed, as Google processes rely on complex algorithms to schedule crawling. However, in most cases, your site will benefit from having a sitemap, and you’ll never be penalized for having one.
Example of sitemap.xml file
Let’s go through our own sitemap here on Greycells section by section and look at the code that created it. As mentioned, you can find the source code for the finished ExpressionEngine template here.
The XML Header
An XML file must begin with an XML header, like so:
<?xml version="1.0" encoding="UTF-8"?>
The header tells the search engine that this is an XML file, that its content is structured according to the XML standard, and that this content is UTF-8 encoded which a sitemap must always be.
Note: A sitemap is almost always in the form of an XML file because it’s a very convenient standard. There are others, but we’re focusing on XML sitemaps in this guide!
The URL Set Definition
Next, we must have an opening <urlset> and closing </urlset> tag that encapsulates the sitemap contents and describe which version of the XML sitemap standard is used.
<urlset
  xmlns="http://www.sitemaps.org/schemas/sitemap/0.9"
  xmlns:xsi="http://www.w3.org/2001/XMLSchema-instance"
  xsi:schemaLocation="http://www.sitemaps.org/schemas/sitemap/0.9 http://www.sitemaps.org/schemas/sitemap/0.9/sitemap.xsd">

--- CONTENTS OF SITEMAP HERE ---

</urlset>
Don’t worry too much about these, they just need to be there. Actually, we probably only need the first xmlns=... line — it has to do with validating the sitemap against certain schemas — but this is way beyond the scope of this guide. Also, we don’t quite understand it all ourselves :-)
But if you want to dive deeper into this you can look here and here.
Note: The sitemap must always end with a closing </urlset> tag as shown above.
The URL Definition
Finally, we get to the business part of the sitemap. This is where we list the parts of our site that we want search engines to index.
Every page we want search engines to know about must have a URL definition like the one shown below.
Let’s look at the URL definition for the page you’re reading right now:
<url>
  <loc>
    https://greycells.net/news/adding-a-sitemap-to-your-expressionengine-site/
  </loc>
  <lastmod>2021-06-21T13:38:30+02:00</lastmod>
  <changefreq>daily</changefreq>
  <priority>0.8</priority>
</url>
These are the parts that make up our URL definition. You can read more about the different tag definitions here.
<url> ... </url>: A URL definition tag pair. The parent tag for each URL entry. The remaining tags are children of this tag. Every page we want the search engines to index must have one of these.
<loc> ... </loc>: A location tag pair that holds the URL of the page. Every URL definition must contain at least this but can have others as our example does.
<lastmod> ... </lastmod>: lastmod holds the date that the page or entry was last updated or modified. Search engines use this in their search results. The date should be in WC3 Datetime format.
<changefreq> ... </changefreq>: changefreq is how often the page or entry is likely to change. This is a piece of general information for the search engine and does not guarantee the page will be reindexed this often.
<priority> ... </priority>: The priority of the page relative to the other parts of your site. The default priority is 0.5 within a range of 0.0 to 1.0. So a page with a priority of 0.2 is one you feel is less vital than one with a 0.8 priority.
Note: Assigning a higher priority to a page — or all pages — won’t get you a higher position on the SERP (Search Engine Result Page). Search engines use the priority when selecting between URLs on the same site, not when ranking sites against other sites. So you can use this tag to increase the likelihood that your most important pages are present in the search results, not as part of a SEO strategy.
Adding a sitemap to your ExpressionEngine site
Now let’s create a sitemap and have ExpressionEngine fill out as much as possible for us. That way the sitemap is always up-to-date, with new entries added and dates changed automatically.
Creating an XML file in ExpressionEngine
First, we’ll create a template group and template for the sitemap in ExpressionEngine:
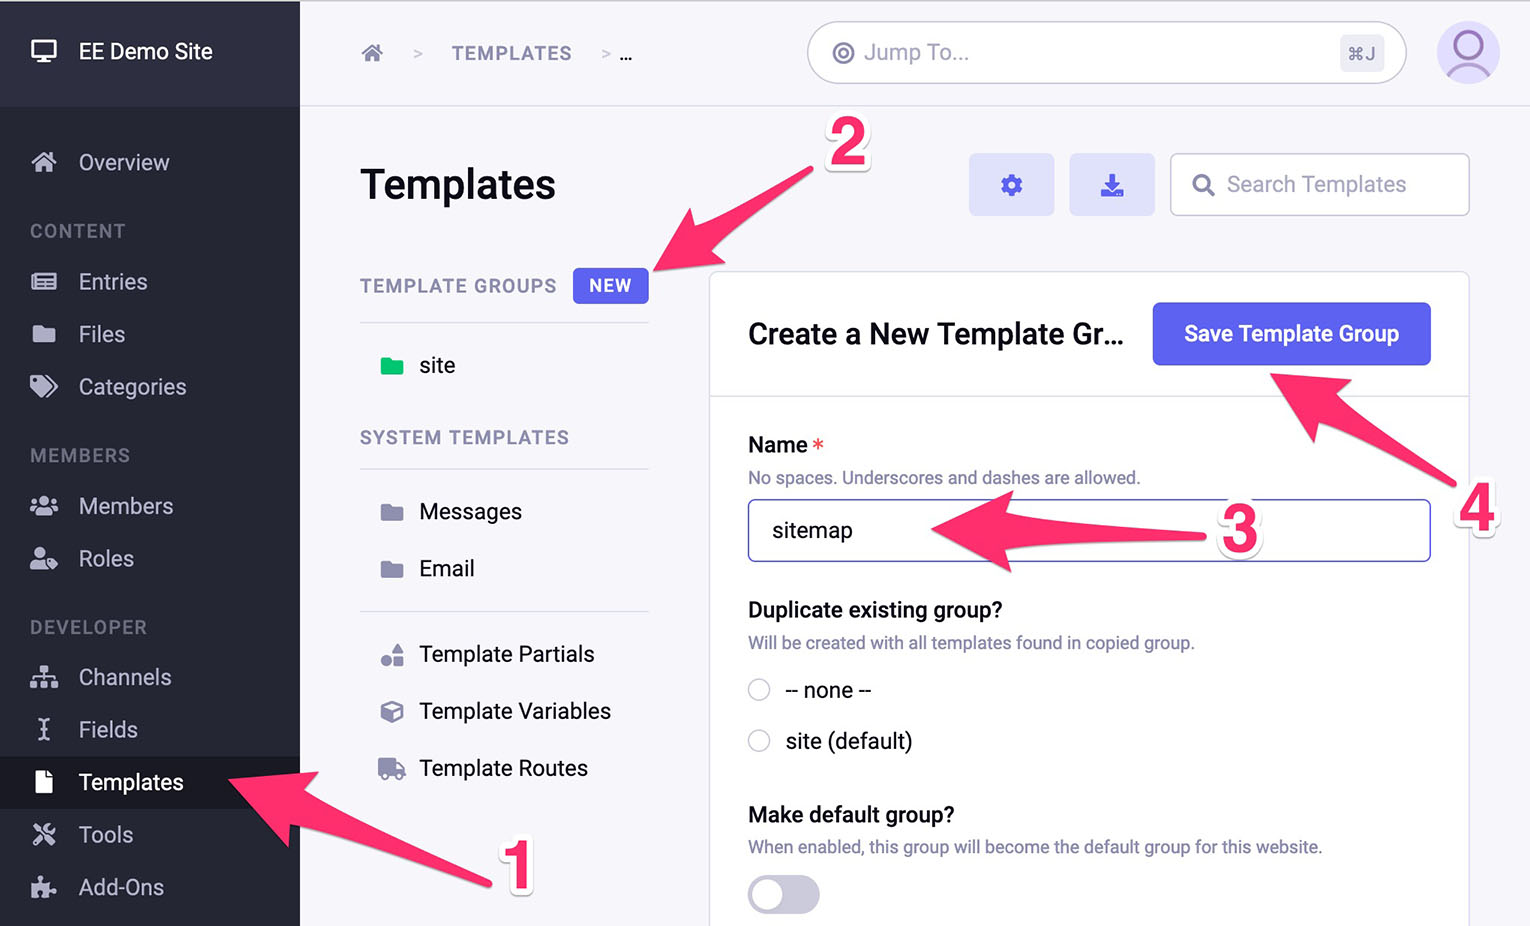
- Start by logging in to ExpressionEngine and then in the Control Panel choose Templates from the sidebar.
- Click the New button next to Template Groups.
- Name the group sitemap.
- And then click Save Template Group.
- The sitemap template group, along with an empty index template, is now created and ready for use.
Changing the file type and Template Route
We need to change two things about this template:
- First, the index template inside sitemap is an HTML file, and we need it to be an XML file.
- Second, if we created the sitemap in the index template right now, its URL would be
www.example.com/sitemap/and notwww.example.com/sitemap.xml.
Luckily it’s easy to change both:
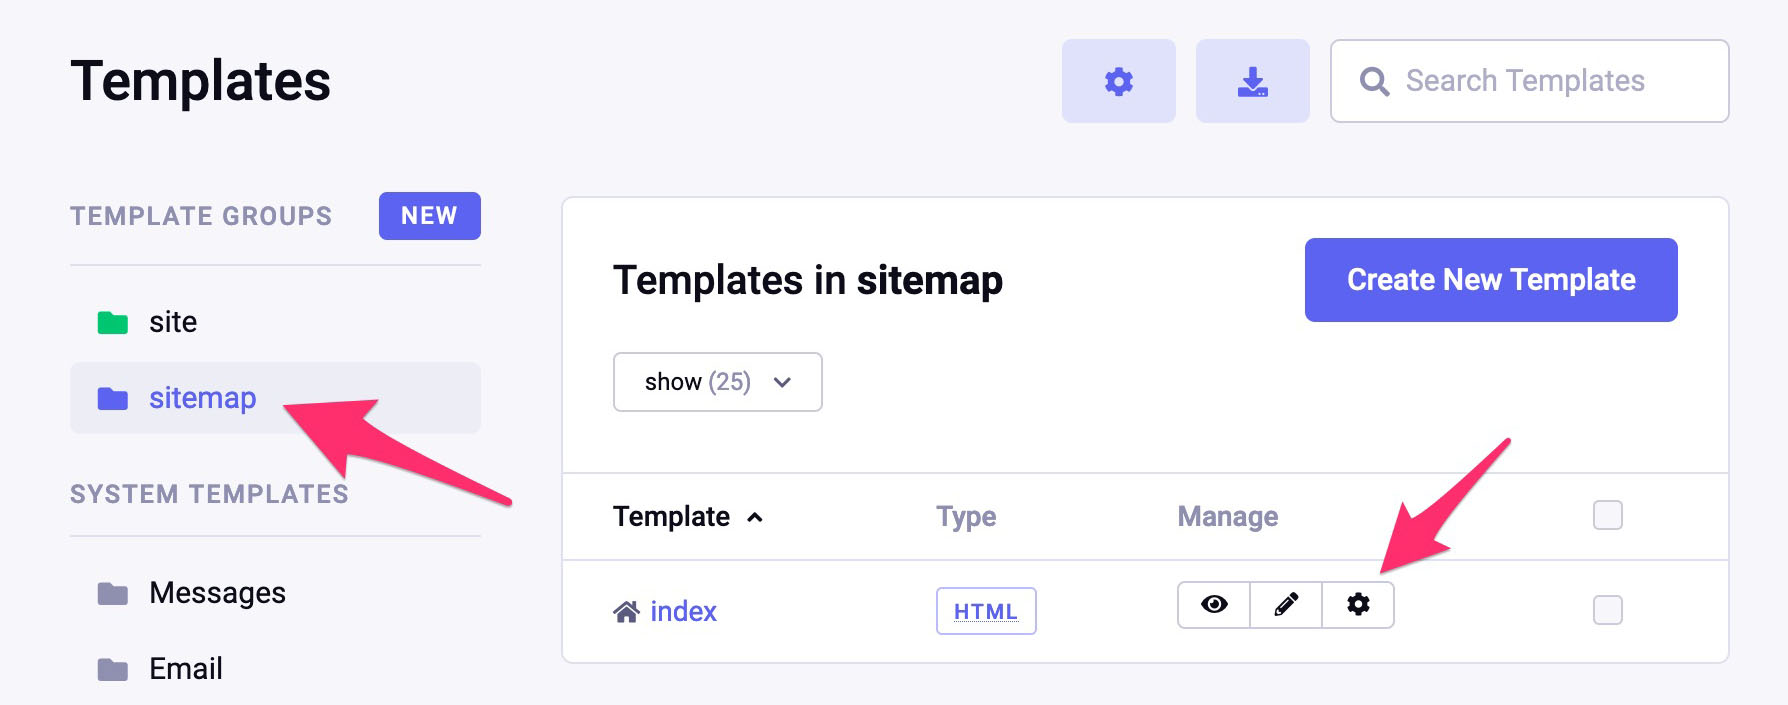
In the Template Manager, click on the sitemap group and then the cog icon for the index template:
Under Settings > Type change the filetype from HTML to XML.
Under Access > Template route override type:
sitemap.xml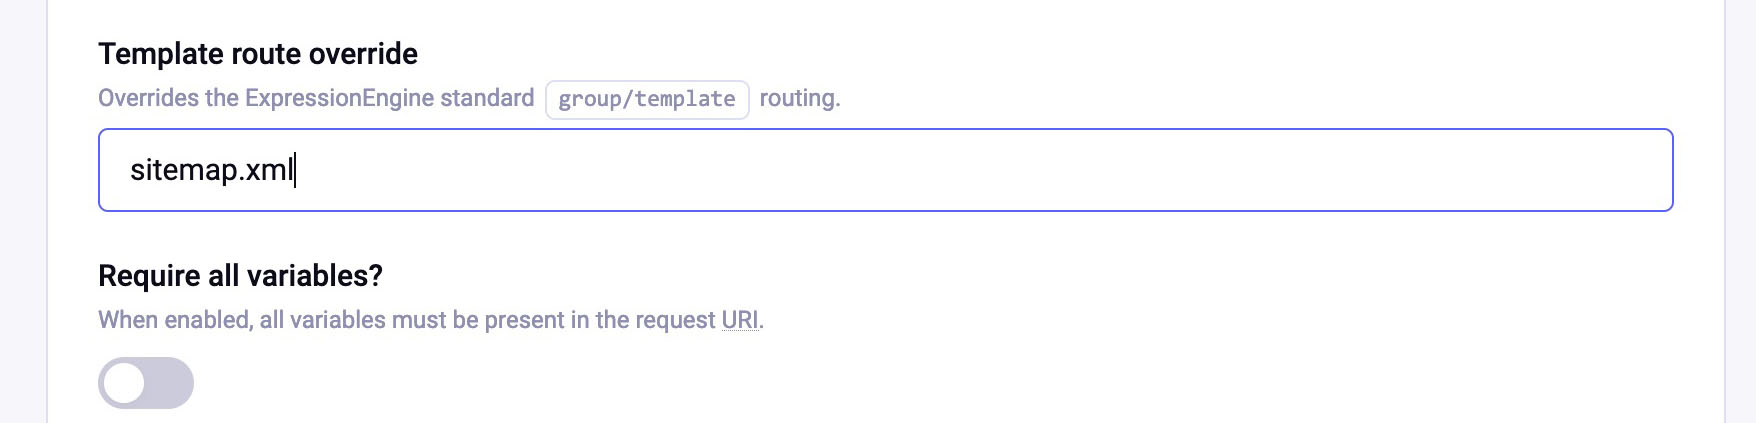
Click Save Settings
A Template Route Override is a very clever thing. Now, our sitemap/index template is available at www.example.com/sitemap.xml.
Template Routes can be a lot more advanced and complex than this. You can read more about Template Routes in the documentation here and here.
Note: You don’t have to add a Template Route. It just makes the sitemap available at a standardized URL. If you decide not to add a Template Route, you can tell the search engines where to find it by changing the location in the robots.txt file we’ll create at the end of this guide.
OK, let’s get editing some code!
Creating the skeleton of our sitemap
Let’s edit the sitemap template we just created, add the static parts, and then make it pull the data needed from ExpressionEngine.
Editing ExpressionEngine Templates
- While you can use ExpressionEngine’s built-in editor to edit your templates, I recommend a “real” text/code editor like Visual Studio Code, for example. So, when I mention Visual Studio Code in this guide, just substitute your own if you use another.
- If you want to know more about connecting to your server and editing ExpressionEngine templates with Visual Studio Code, check out this section from one of our other guides.
Open your editor of choice and then open the sitemap.group/index.xml template.
We’ll start by adding the skeleton to the sitemap template, so copy this code and paste it into the template in Visual Studio Code:
<?xml version="1.0" encoding="UTF-8"?>
<urlset
 xmlns="http://www.sitemaps.org/schemas/sitemap/0.9"
 xmlns:xsi="http://www.w3.org/2001/XMLSchema-instance"
 xsi:schemaLocation="http://www.sitemaps.org/schemas/sitemap/0.9 http://www.sitemaps.org/schemas/sitemap/0.9/sitemap.xsd">

=== CODE FOR EACH SECTION OF THE SITE GOES HERE ===

</urlset>
Note: Delete the comment line I made after you paste the code.
Adding the rest and making ExpressionEngine update it!
Now let’s add the URL definitions for each section of our site. Remember, you can refer to the finished code from our sitemap.xml template here.
Look at your site and decide which parts you want to include in the sitemap. For Greycells.net, we chose the following parts/pages:
- The Front Page.
- The Articles by Category page.
- The Links to Other Resources page.
- The About This Site page.
- And the Single Entry Page section, like the one you’re on right now.
So we’ll add a <url> ... </url> section for each of these parts, in our case five.
The Front Page
First, we’ll add the code for the front page. Again this is for our site, so you’ll have to adjust the code to fit yours.
At line 7 we find in the following code:
{!-- HOMEPAGE --}
{exp:channel:entries channel="greycells" dynamic="no" status="open" orderby="entry_date" limit="1" sort="desc" disable="member_data|pagination|categories|custom_fields|relationships"}
<url>
 <loc>{site_url}</loc>
 <lastmod>{entry_date format='%Y-%m-%dT%H:%i:%s+02:00'}</lastmod>
 <changefreq>daily</changefreq>
 <priority>0.9</priority>
</url>
{/exp:channel:entries}
{!-- HOMEPAGE --}: First, we have a comment, so we’ll know what the code is for when we return to the code months later.Note: A great feature of ExpressionEngine is the
{!-- comments --}tag that, unlike normal HTML<!-- comments -->, don’t show up in the source of the rendered template and thus won’t mess up our XML stylesheet. These work in any template, so you can comment your code without anyone looking over your shoulder.{exp:channel:entries}: Next, we have a Channel Entries tag that pulls data about the latest entry we created. We’ll use that in section 4 below.Note: You can learn more about the other parameters used in the Channel Entries tag in the docs here.
<url>...</url>: And then we have our URL tag pair, which encloses the rest of our tag pairs.<loc>...</loc>: We fill out the<loc>tag-pair with the{site_url}Global Variable. Since this part of the sitemap refers to the front/home page of our site, we just use this since it’s rather unlikely to change. We could even have hardcoded it, but if we ever want to move our site or reuse the code, this ensures it’s always up to date.Note: There’s more on ExpressionEngine’s Global Variables in the docs here.
<lastmod>...</lastmod>: Here, we use the{entry_date}tag, which gives us the date the newest entry was created. This value was pulled as part of the{exp:channel:entries}tag covered in section 2 above.Note: If we want the date for
<lastmod>to change every time we edit an entry, not just when we create new ones, we would insteadorderby="edit_date"in{exp:channel:entries}and then pull{edit_date}instead.<changefreq>...</changefreq>: We hardcode this value since all our sections change at a predictable and static rate. The front page very often, the others less so.<priority>...</priority>: This value is also hardcoded since the “importance” of our sites’ sections doesn’t change.And finally, we close the URL and Channel Entries tag pairs.
The Articles by Category page
In this section of the sitemap, we do almost the same as above, except for two things:
{!-- ARTICLES BY CATEGORIES PAGE --}
{exp:channel:entries channel="greycells" dynamic="no" status="open" orderby="entry_date" limit="1" sort="desc" disable="member_data|pagination|categories|custom_fields|relationships"}
<url>
 <loc>{site_url}all-categories/</loc>
 <lastmod>{entry_date format='%Y-%m-%dT%H:%i:%s+02:00'}</lastmod>
 <changefreq>daily</changefreq>
 <priority>0.7</priority>
</url>
{/exp:channel:entries}
<loc>...</loc>: For this tag pair, we first pull the{site_url}Global Variable but then we addall-categories/to get the correct URL:<loc>https://greycells.net/all-categories/</loc>And second, we lower the hardcoded value in
<priority>...</priority>a little.
The Links to Other Resources page
This one is a little special:
{!-- LINKS PAGE --}
<url>
 <loc>{site_url}links/</loc>
 <lastmod>{template_edit_date format='%Y-%m-%dT%H:%i:%s+02:00'}</lastmod>
 <changefreq>monthly</changefreq>
 <priority>0.5</priority>
</url>
First, we change the URL as before.
But then we call the
{template_edit_date}Global Variable. This variable gives us the date that the template that creates our Links to Other Resources page was last changed.Now, why would we use that instead of
{entry_date}?Because the content of this page is not an entry in ExpressionEngine. The template instead imports a markdown file on our server with the content. We maintain this page in Typora, and when we save the file, it updates the template. And thus, it is the template’s edit date that changes!
You can read more about how this works in our GitHub repo here.
Why do it this way? Because we love experimenting, and we wanted to play with different ways of maintaining content.
Lastly, we again set the hardcoded value in
<priority>...</priority>.
The About This Site page
Again we have something that differs a bit from the other sections. This reflects the great joy we had creating this site, testing different ways of creating and updating content.
Let’s take a look:
{!-- ABOUT PAGE --}
{exp:channel:entries channel="greycells" dynamic="no" status="open" entry_id="59" limit="1" disable="member_data|pagination|categories|custom_fields|relationships"}
<url>
 <loc>{site_url}about/</loc>
 <lastmod>{edit_date format='%Y-%m-%dT%H:%i:%s+02:00'}</lastmod>
 <changefreq>monthly</changefreq>
 <priority>0.2</priority>
</url>
{/exp:channel:entries}
This time we did the opposite of the Other Resources section above and created an entry in ExpressionEngine for the content. We then pick out the entry-id in the Channel Entries tag, and use that to update our
<lastmod>...</lastmod>date.The reason is that this entry is both the About This Site link in the sidebar and a regular article called Welcome to Greycells!. We know it’s lazy, but if we ever wanted this site to launch, we needed to cut a few corners. We’ll make it two separate things at some point :)
And we change the priority once again for this section.
The Single Entry Page section (article & guides links)
Finally, we have the section of our sitemap that create one <url>...</url> section per article/guide:
{!-- ENTRIES --}
{exp:channel:entries channel="greycells" dynamic="no" status="open" orderby="edit_date" sort="desc" disable="member_data|pagination|categories|custom_fields|relationships"}
<url>
 <loc>{url_title_path='news/index'}/</loc>
 <lastmod>{edit_date format='%Y-%m-%dT%H:%i:%s+02:00'}</lastmod>
 <changefreq>daily</changefreq>
 <priority>0.8</priority>
</url>
{/exp:channel:entries}
</urlset>
We again start with a Channel Entries tag, but this time it’s not limited to the latest entry or a single entry-id. It pulls everything with a status of open, meaning all active articles and guides.
As you can see this creates one
<url>...</url>section per article/guide on our site.This location tag pair is different from the others because now the last section of the URL will change for every
<url>...</url>tag pair.Luckily ExpressionEngine has a great shortcut to this URL, the
{url_title_path}Single Variable:<loc>{url_title_path='news/index'}/</loc>Here we just provide the template group and template
news/indexas parameters, and we get back the correct URLs.Using the guide you’re reading right now as an example, this will render as:
<loc>https://greycells.net/news/adding-a-sitemap-to-your-expressionengine-site/</loc>Note: If for some reason you need more control over your URLs, you can always piece them together manually like so:
<loc>{site_url}news/{url_title}/</loc>And since this is the end of our sitemap, we close the XML with
</urlset>.
Adding the Sitemap to robots.txt
Next, we need to add the location of our sitemap.xml file to a robots.txt file at the root of our site.
For this site our robots.txt file has only one line and looks like this:
Sitemap: https://greycells.net/sitemap.xml
So simply create an empty file named
robots.txtat the root of your site.Then add this code, changing
example.comto the URL of your site of course! :)Sitemap: https://example.com/sitemap.xmlAnd finally, save the file.
Note: A robots.txt file will also let you control what parts of your site you want to allow search engines to crawl and index. Check out this article at Google Search Central for further information.
Validating and submitting our sitemap to Search Engines
Finally, we’re ready to check our hard work and make Google and Bing know that our site now has a sitemap.
Validating our sitemap
First, you should check that your sitemap is reachable at its correct URL. Remember we set a Template Route for
sitemap/index.xmlthat ensures the sitemap is available athttps://example.com/sitemap.xmlwhich is the standard location. So you should check that you can load it in your browser from this location.Next, run the sitemap through a validator that will catch any errors you may have made. There are many of these, just google “sitemap validator” and there will be plenty to choose from.
We used this one to check ours.
Submitting our sitemap to search engines
And finally, you should let Google and Bing know about your new sitemap. The search engines will look for - and find - your sitemap during their regular crawl schedule. But you might as well proactively let them know about it, now that you have one.
Submitting to Google:
- Log in to Google Search Console.
- Find Sitemaps in the sidebar and then add the URL to your sitemap.
Submitting to Bing
- Log in to Bing Webmaster Tools.
- Find Sitemaps in the sidebar and then add the URL to your sitemap.
Submitting to DuckDuckGo, Yahoo! and Baidu
- DuckDuckGo doesn’t have a feature to add sites or sitemaps. They do however use Bing for some indexing so you can ensure your sitemap is added to Bing.
- Yahoo! is powered by Bing, so again, add your sitemap there, and all is well.
- Baidu only needs your site/sitemap added if your site target people in China. It’s quite a feat to add a site to Baidu but if you need to, there’s an excellent guide here.
You did it, congratulations! I hope this guide was helpful, and as always if you have corrections, comments, or need help, please let us know in the comments.
Comments
Write a Comment:
Previous Comments:
Very thorough and very clear! Thank you so much
By Anoop on Thu, January 13, 2022