Duplicating your site: Local Test & Development server
Any web developer has tried making a tiny change to their live site that ended up breaking something. And reverting the change did not fix things but broke something else — and that’s when panic sets in.
Having an up-to-date duplicate of a site to test on will save a lot of headaches, flop-sweat, and angry customers and bosses.
This guide will show how to duplicate your existing ExpressionEngine site and its server and run it locally under MAMP Pro. That way, you can go nuts, testing even the most outlandish features and code changes, knowing you won’t affect your actual site.
Table of Contents
Prerequisites & Assumptions
Your current site
We’ll assume that the site you want to create a copy of — your “real” site, so to speak — is running ExpressionEngine under Apache or Nginx. Whether it’s on ExpressionEngine 6 or a lower version won’t matter, but we used EE 6.1 for the examples and screenshots in this guide.
You will also need FTP access to your server because we need to download its database, files, and folders.
If you run into issues, just drop a note in the comments, and I will do my best to help.
MAMP Pro
We will use MAMP Pro to run the duplicate of the site on our PC or Mac.
MAMP Pro is a fantastic piece of software for any web developer that enables you to have an unlimited number of hosts, sites, and servers running locally on your computer.
With MAMP Pro, you can run sites using the same technologies as your existing site. Hosts can use Apache or Nginx with full MySQL and PHP support. And technologies such as Redis, Memcached, MailHog, Python, Ruby, Perl, and more, are all available.
In this guide, we’ll be using MAMP Pro to duplicate your existing site, as example.test (you can use another name if you like). And show screenshots and examples from our own test site as well.
MAMP Pro costs $79, €70, or £69, but there is a trial you can download. There are also free alternatives, which you can read more about below.
MAMP Pro alternatives
MAMP Free
If you don’t have MAMP Pro or feel like paying for it, you can perhaps get by with the free version. However, you won’t get SSL/HTTPS support, and there are only two versions of PHP available. You’re also limited to one active host at a time, and there is no Dynamic DNS, Memcached, or Redis.
So you may or may not be able to run a true duplicate of your site with the free MAMP. Take a look at this MAMP vs. MAMP Pro Comparison Matrix to see if you can live with its limitations. And please note that we haven’t tested the free version with this guide.
Important: If you’re duplicating a site to run under MAMP free, please read this HTTPS workaround from the troubleshooting section first.
Other alternatives
But MAMP is, of course, not the only game in town. If you want some alternatives, here is an excellent review of MAMP, MAMP Pro, XAMPP, Local, and DesktopServer. Including some that run under Linux, which MAMP Pro does not. The ExpressionEngine documentation also contains some recommendations here.
I have been using MAMP Pro since 2006, so that’s what I’ll be using for this guide. But the principles will be the same whichever local development environment/server/stack you choose.
If you need help “translating” some of the steps below to a platform other than MAMP Pro, feel free to post in the comments, and I will try my best to help.
If you already know MAMP Pro
If you already know MAMP Pro, there will be a lot here you don’t need me to tell you. So feel free to skip parts of this guide, as we will be going into some detail to help as many people as possible.
About example.test
For this guide, I will be creating a copy of the site you’re on now, greycells.net, and run it under MAMP Pro using the domain example.test. You will, of course, be creating a copy of your own site.
You can either stay with example.test or replace it with your own .test domain when following the guide.
Example: If your current site is at my-awesome-moneymaker.com, you can either:
- Name your MAMP Pro test site my-awesome-moneymaker.test
- Or stay with example.test as this guide does.
So, just choose what you’re most comfortable with.
What we’ll be doing
Now, let’s get to the meat of this guide. Here is what we’ll be doing:
- Setup a new host and database in MAMP Pro.
- Dump and download the existing site’s database and import it into MAMP Pro’s database.
- Download the existing site’s files to MAMP Pro’s document root.
- Edit config.php so the test site will use the correct paths and database.
- [Optional] Make some visual changes so we can quickly tell the two sites apart.
- [Optional] Look at snapshots and blueprint hosts in MAMP Pro. Two excellent and helpful features that can save a lot of time and trouble.
Creating a new host in MAMP Pro
I’ll assume you have MAMP Pro installed already, so let’s create a new host.
Open MAMP Pro and click Add Host in the toolbar:

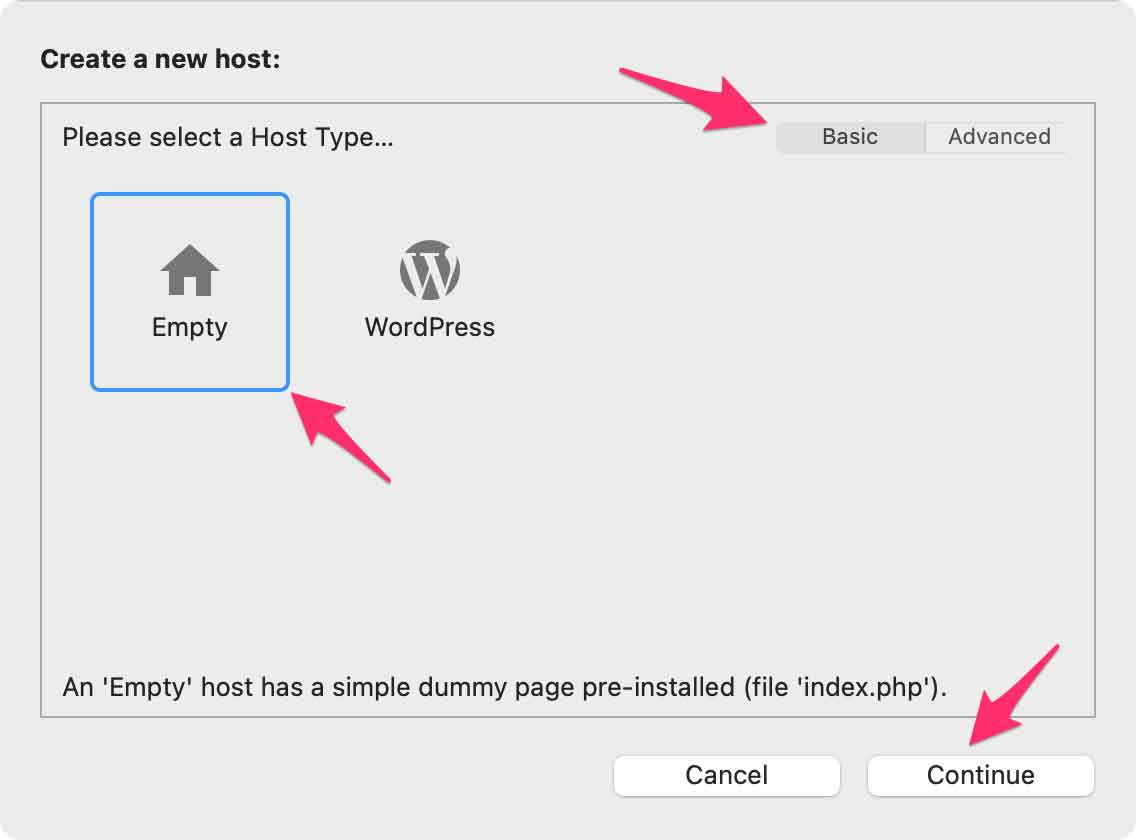
Select Empty under the Basic tab and click Continue:
Under Name type your chosen domain — as mentioned, I’ll use example.test in this guide:
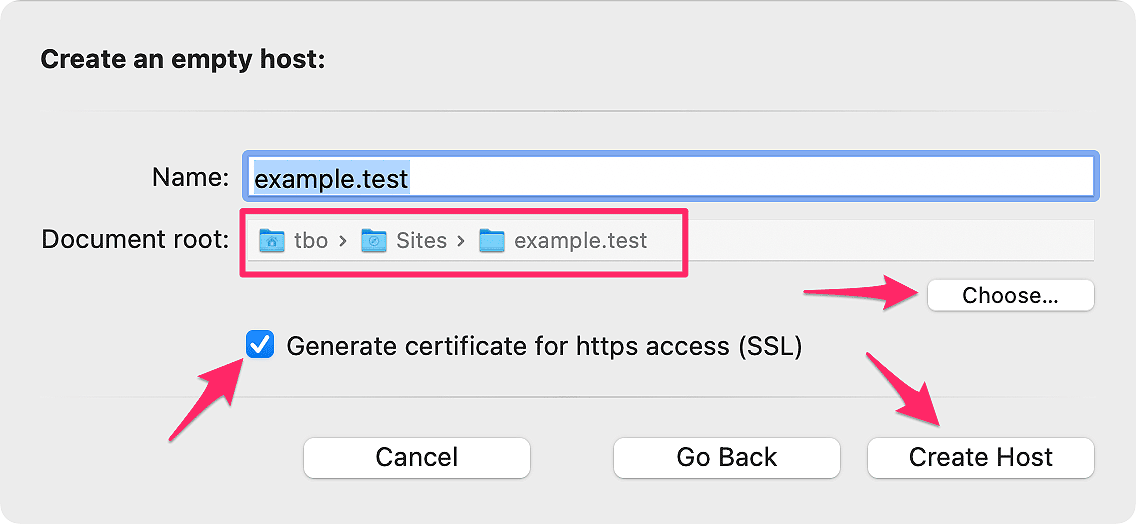
Click Choose… and create a folder that will become your site’s document root. Then select this folder.
- macOS: For macOS, it’s recommended that you create your host folders under
~/Sites. That way, your hosts and data are separate from MAMP Pro’s application data found in/Applications/MAMP. You can read more about this here. - Windows: For Windows, it’s recommended that you create your host folders under
\Users\MyUserName\SitesorUsers\MyUserName\WebSites. That way, your hosts and data are separate from MAMP Pro’s application data found inC:\MAMP. You can read more about this here. - Since I will name my test site example.test in this guide and I’m using a Mac, for me, that would be:
/Users/tbo/Sites/example.test/as you can see in the screenshot above.
- macOS: For macOS, it’s recommended that you create your host folders under
Make sure Generate certificate for https access (SSL) is checked.
Click Create Host.
Click Save in the lower right corner of MAMP Pro’s main window.
Finding your local document root
We will often need to locate and interact with the folder we just created above. We’ll refer to it as document root since that’s what it’s called in MAMP Pro, but it’s also often called docroot or webroot.
In those cases where we need to interact with it, and you forgot what it is or how to find it, I will link to this section and the description below.
The easiest way to find and open MAMP Pro’s document root is:
- Open MAMP Pro, click on your host, and look under the General tab.
- In the Document root section, click the Open In pup-up menu and select Finder (macOS) or click the Open button (Windows):
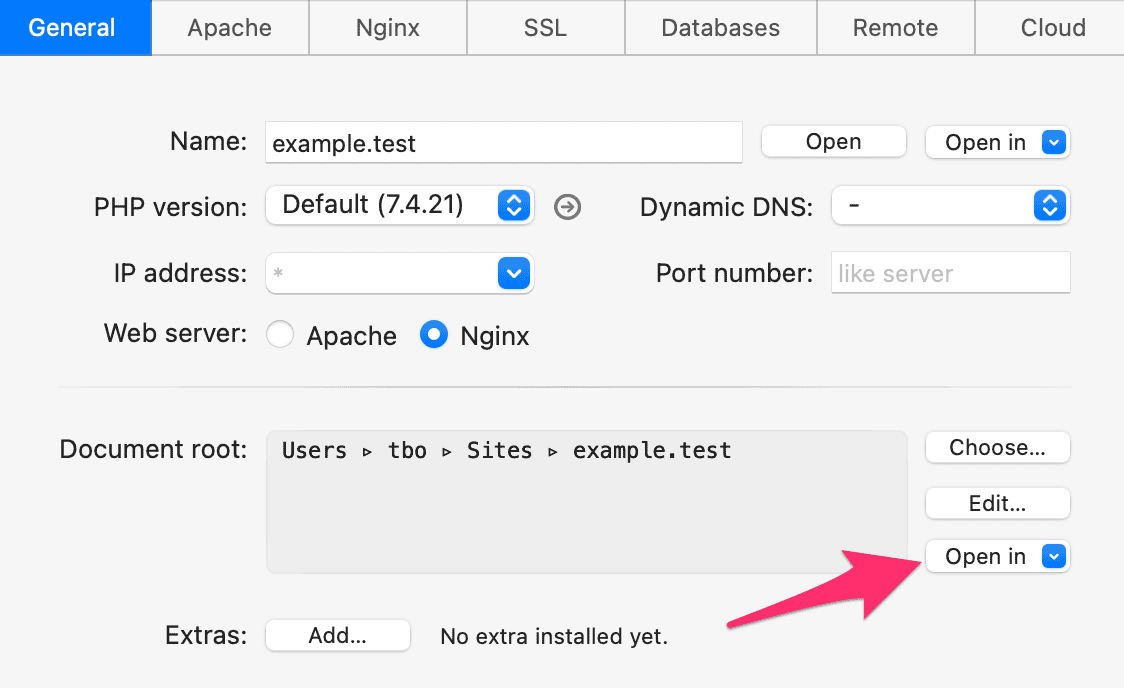
This will open document root for you.
Setting up the new host
Next, we need to do a couple of things to make sure example.test in MAMP Pro is technically similar to our real site’s server:
- Since our Greycells.net site runs under the Nginx web server, we will change MAMP Pro’s server from Apache to Nginx. If your site runs under Apache, you won’t have to change anything.
- Verify that MAMP Pro is using the correct ports.
Changing the web server from Apache to Nginx
Because Greycells.net runs under Nginx, we will change the server our MAMP Pro host uses.
Note: Only change this if your real site runs under Nginx!
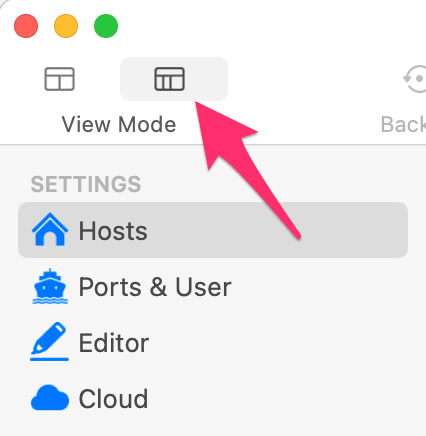
First, let’s make sure we have all settings available to us. In MAMP Pro, in the top left corner under View Mode, click the Expert View button:
Make sure example.test (or the hostname you chose) is selected and then under General change Web server to Nginx:
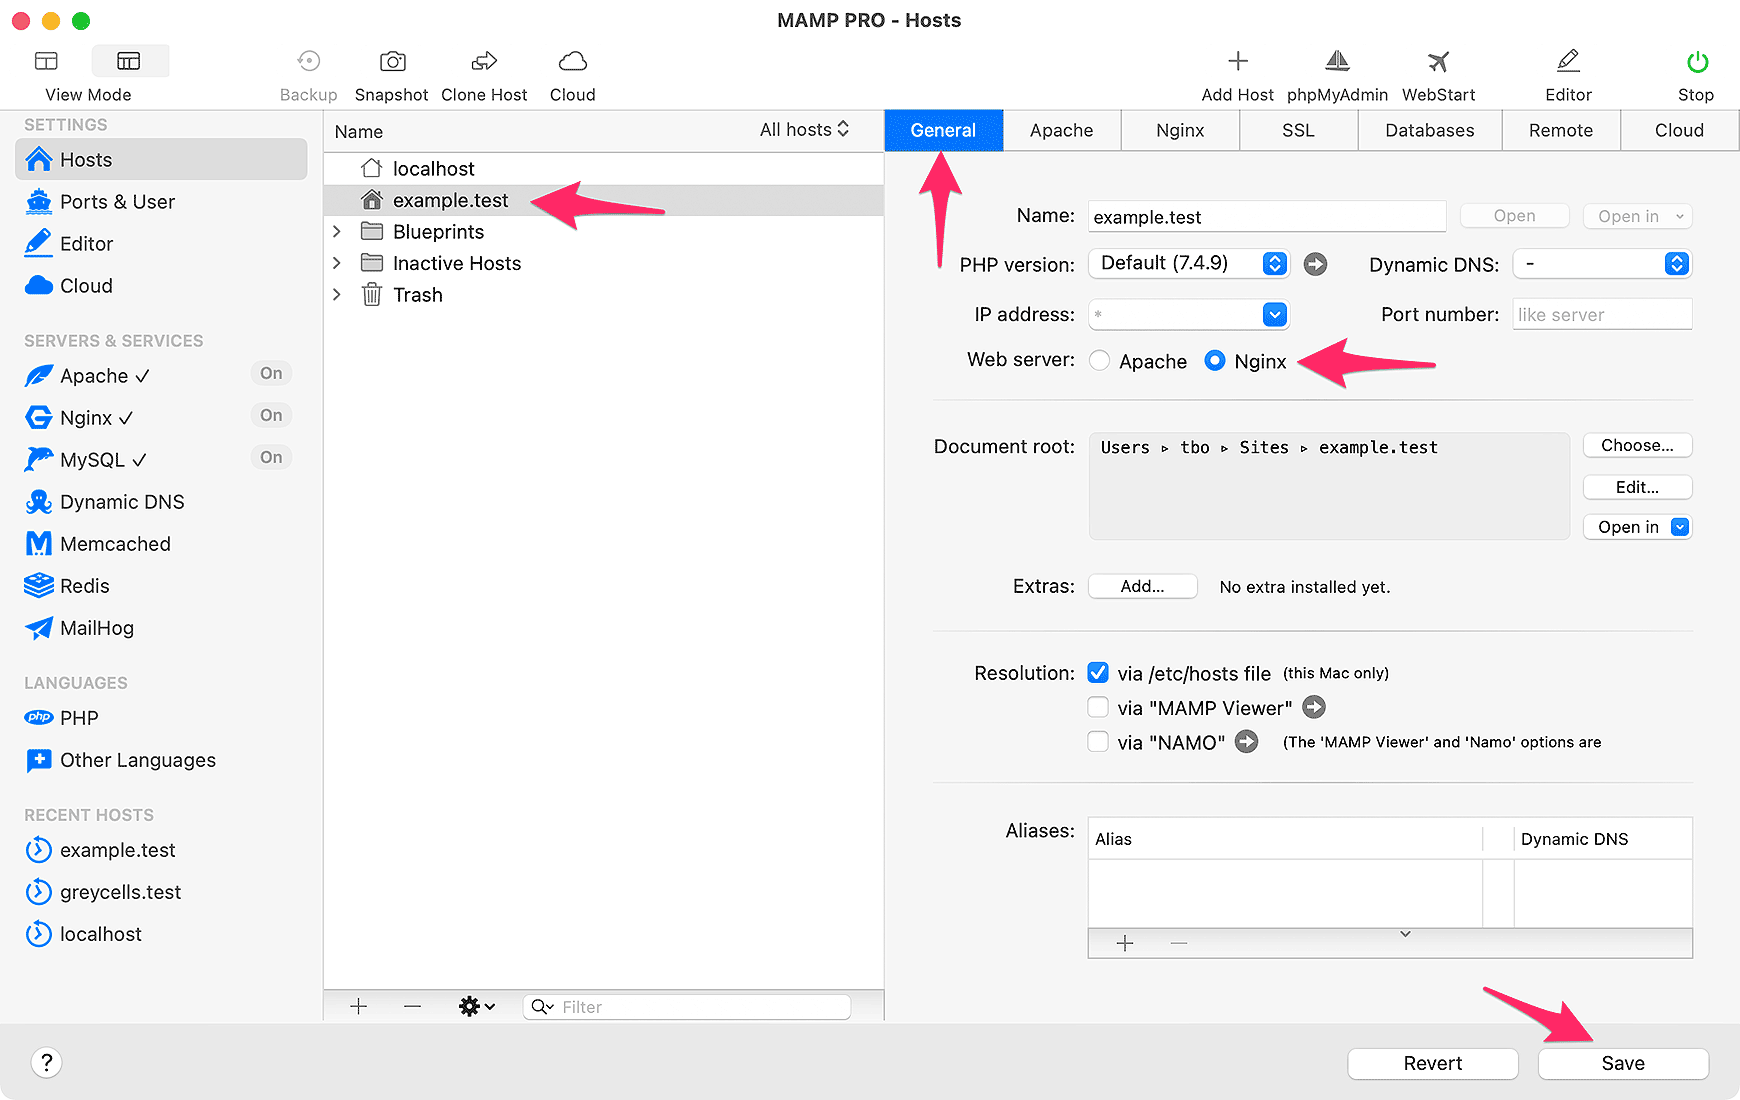
Then click Save to commit the changes and restart the servers.
Setting the correct ports
Next, we’ll make sure our MAMP Pro host is running on the correct ports. This will almost certainly be 80 for HTTP, 443 for HTTPS, and 3306 for MySQL on your existing server, so we’ll mirror those here.
Note: In the event, your server uses different ports, use those below instead.
Click Ports and User in the sidebar. If you don’t see the sidebar check section 1.1 above to enable Expert View.
If you’re running Apache, make sure the Apache ports are set to 80 and 443.
Conversely, if you’re running Nginx, make sure the Nginx ports are set to 80 and 443 instead.
Note: You can click the double arrow to switch the Apache and Nginx ports for you.
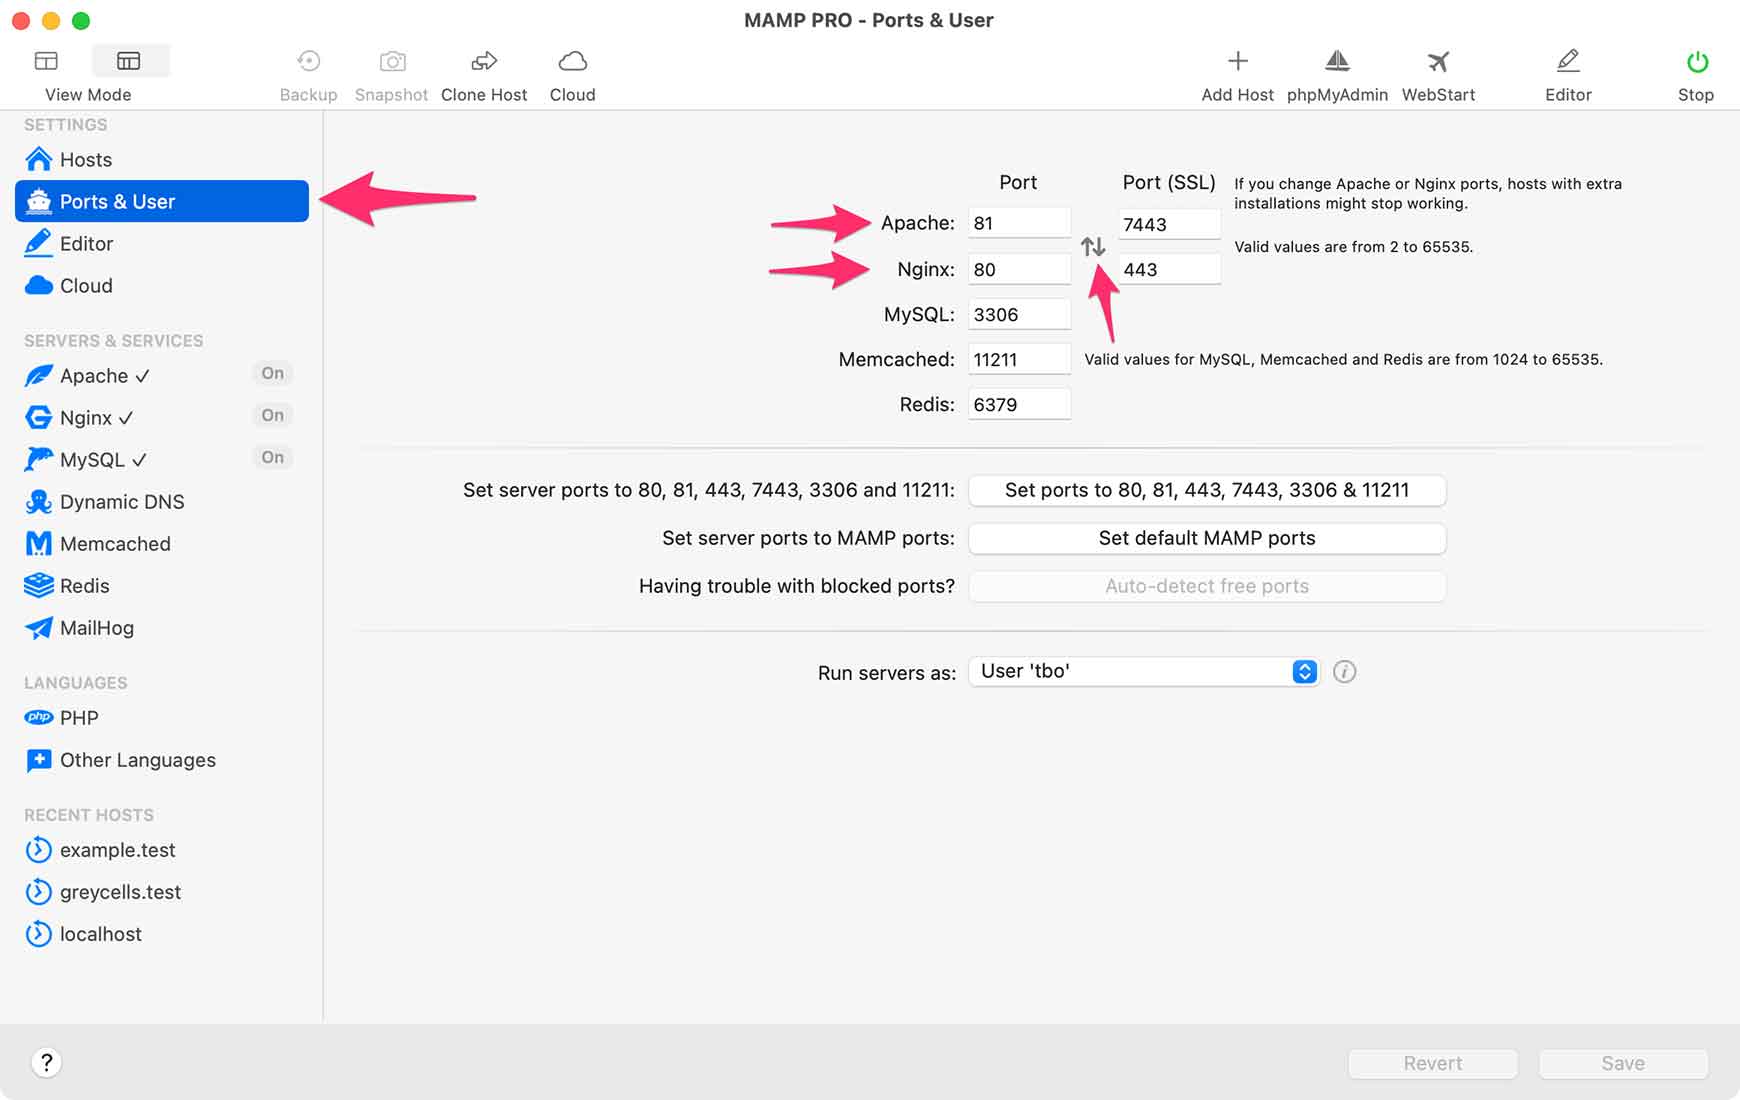
And click Save again to apply any changes made.
Testing the server: Host Info-page, WebStart & phpMyAdmin
Now, let’s check the server is working before we transfer our database and ExpressionEngine installation.
We will check that our local example.test domain is active and the web server can load a page. Plus, we’ll see how we can get some server information and access phpMyAdmin.
Host Info-page
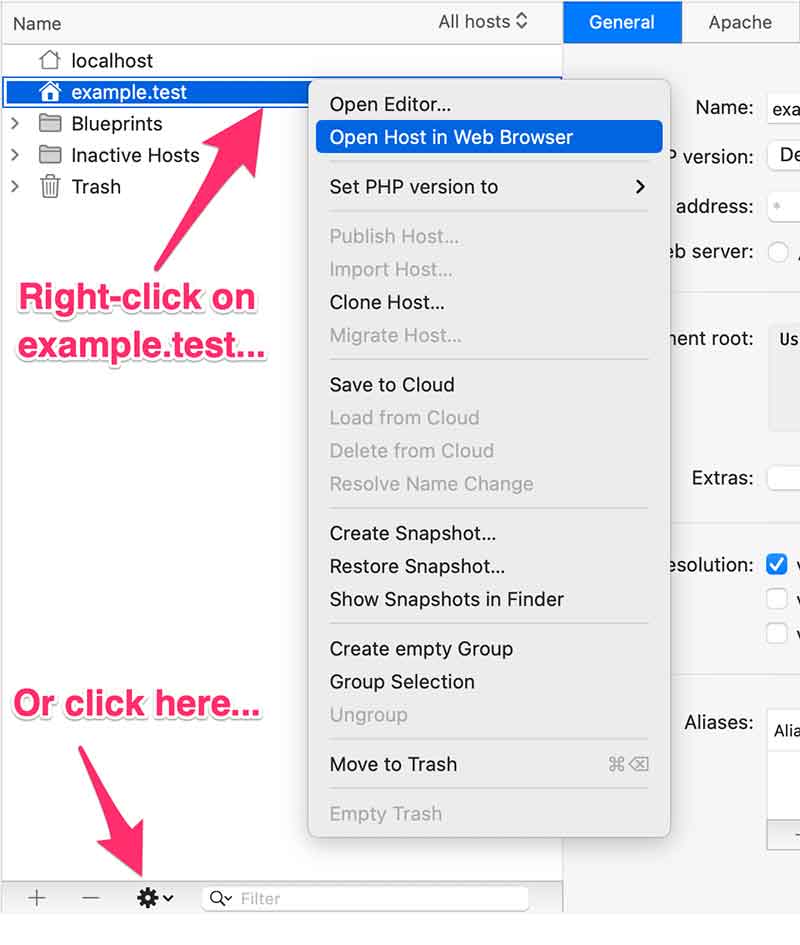
Make sure example.test is selected in MAMP Pro, then right-click on it (or click the cog icon) and select Open Host in Web Browser.
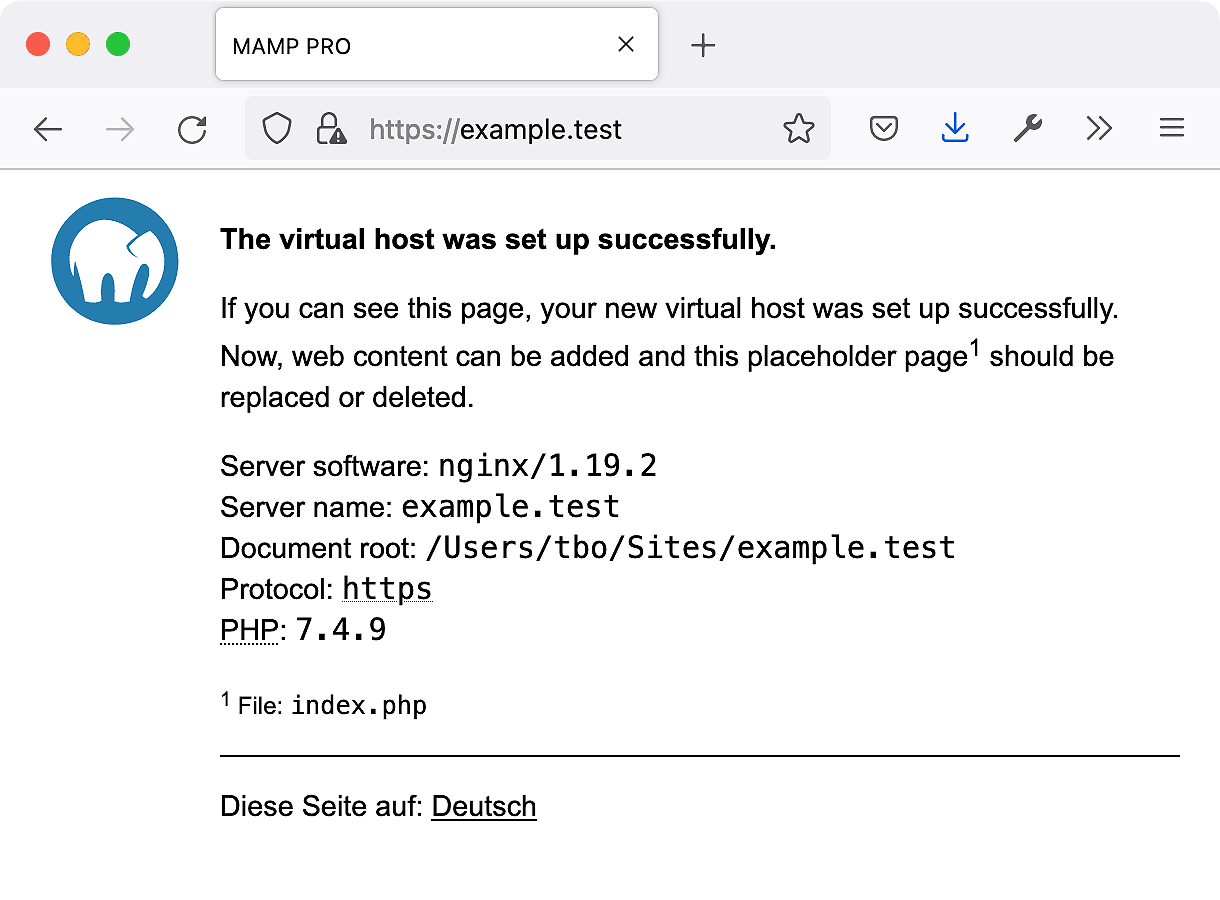
This will open a placeholder web page with some server info. If you don’t see the page, make sure the servers are started in MAMP Pro. If not, click the Start button in MAMP Pro’s toolbar. This is the page you should see:
Note: If you’re using Firefox, you may get a warning about a Potential Security Risk Ahead with an error of SEC_ERROR_UNKNOWN_ISSUER.
This is because we’re using self-signed certificates for SSL in MAMP Pro. I got this in Firefox Developer Edition but not in Safari or Chrome Developer. Just be aware that this is not an issue — there is no danger ahead :)
Simply click Advanced and then Accept the risk and continue…
With the placeholder page open, we can see we’re running Nginx (or Apache) on example.test with HTTPS enabled. We can also see that PHP is active and where our document root is located. In short, everything is sweet and as expected.
WebStart Tools & Info-page
MAMP Pro has one more very useful info page called WebStart. This has information common to all hosts.
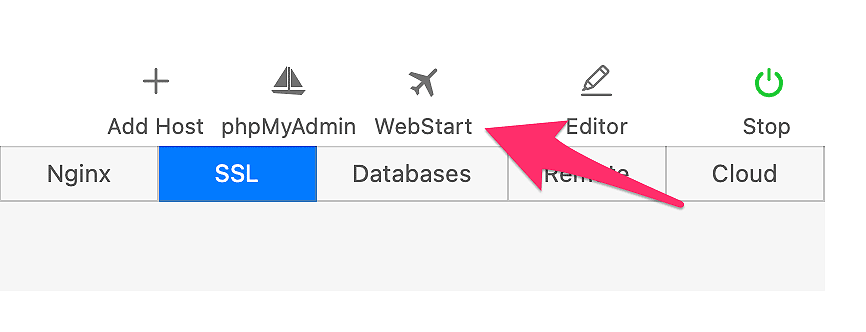
To open WebStart, click its button in MAMP Pro’s toolbar:
This will open a page with a plethora of useful information.
In the Tools menu, we find a link to phpMyAdmin:
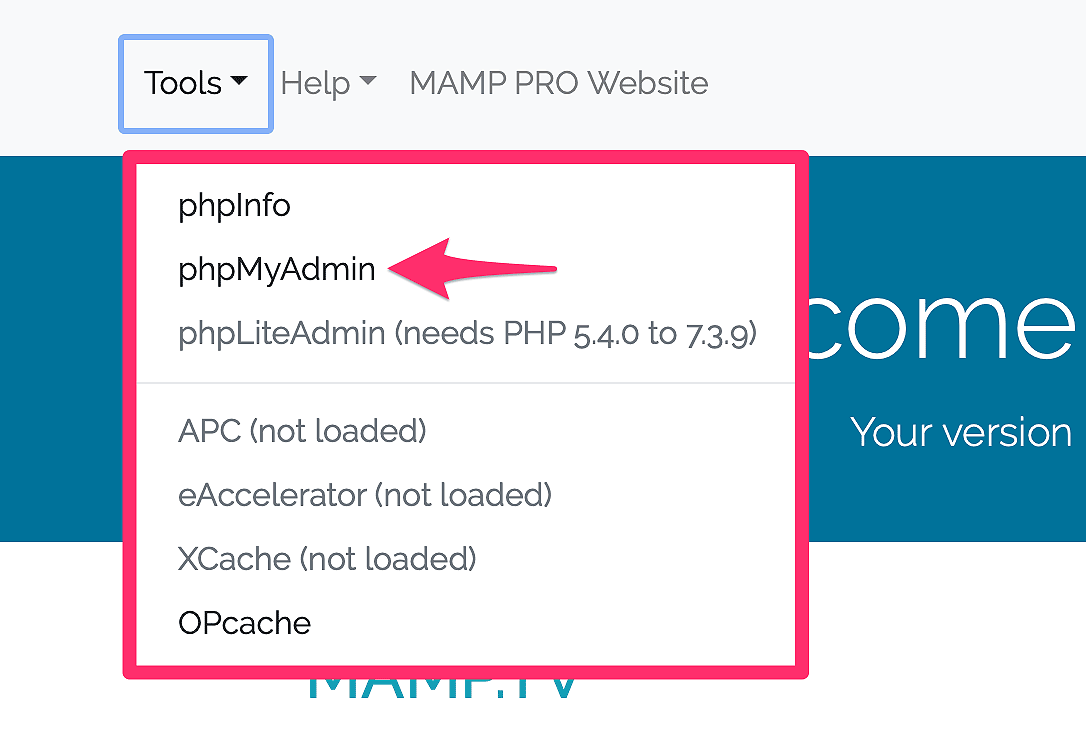
phpMyAdmin can also be launched from MAMP Pro’s toolbar. We will use phpMyAdmin later when uploading our site’s database to the test server.
Further down the page, we find information about PHP, MySQL, Redis, and SQLite. For example, under MySQL, we can see some helpful information:
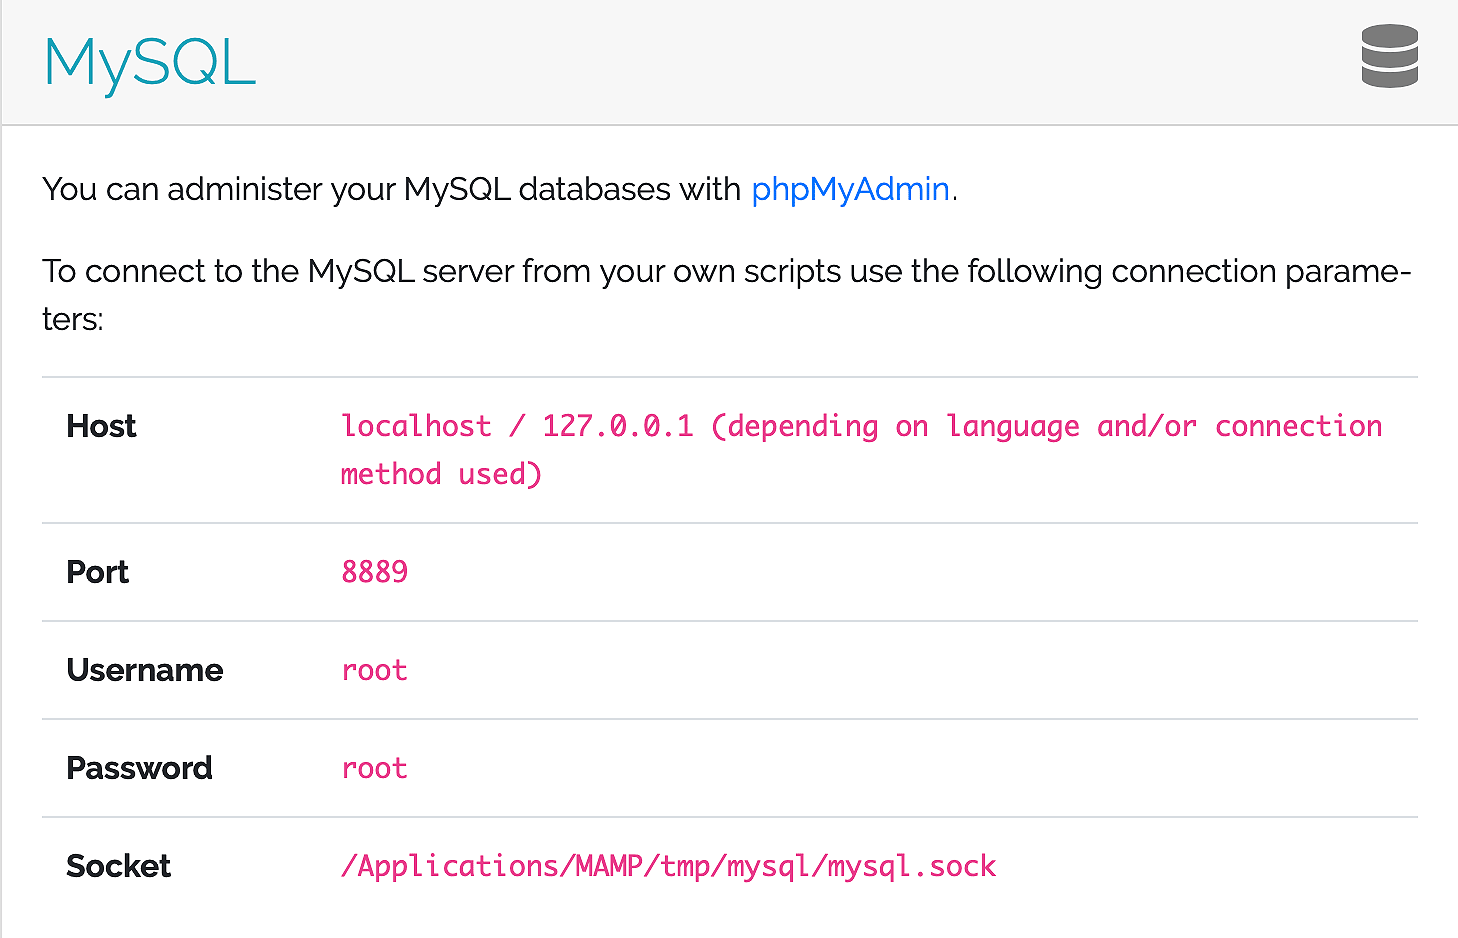
We’ll need this information to update config.php after we download ExpressionEngine to the test server. Unless changed, the username and password for MySQL under MAMP Pro is always root. This keeps things simple and since the site is not online or reachable from the outside, what would otherwise be a massive lapse in security is OK :)
For MySQL, Redis, and SQLite, there is also plenty of example code — very handy when developing sites:
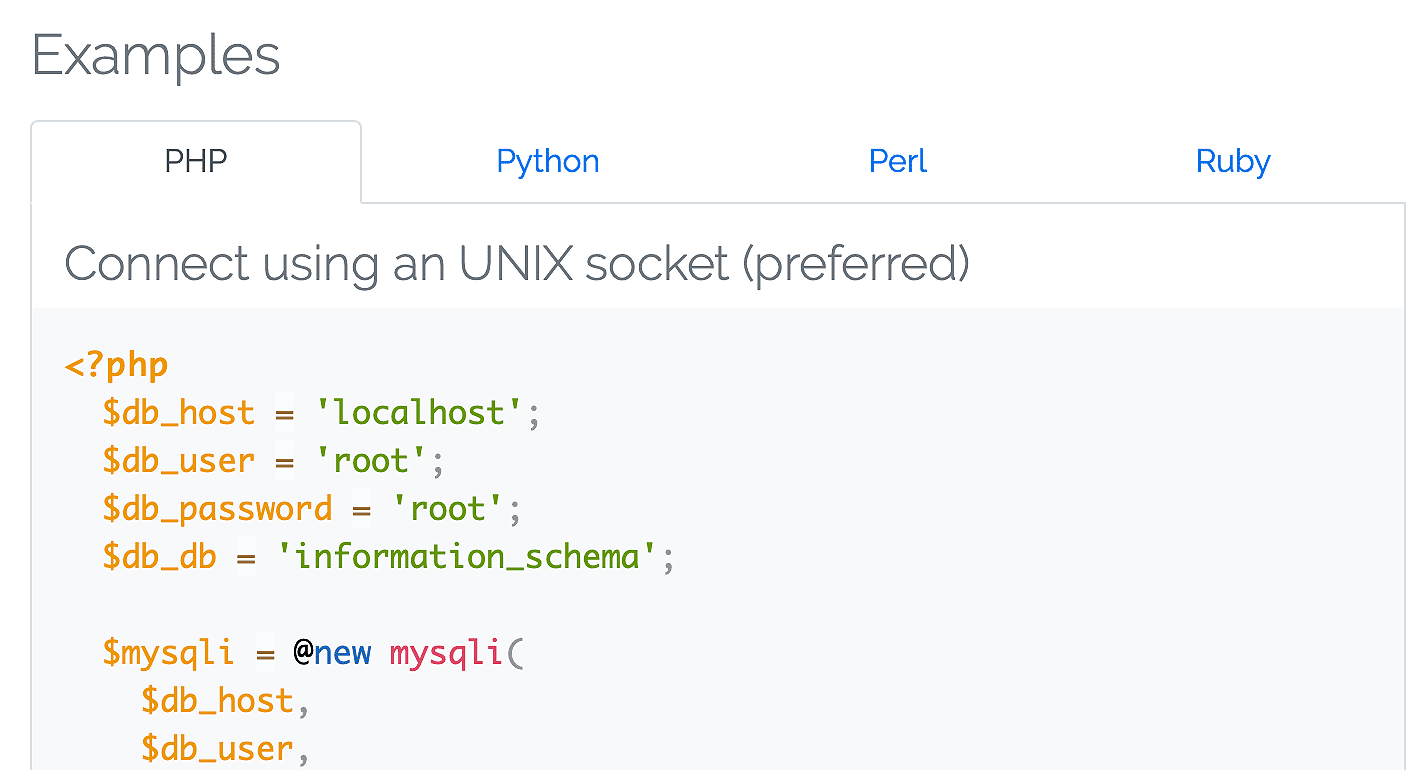
Note: If the WebStart page doesn’t load, you may simply have to click Stop and then Start in the MAMP Pro toolbar.
We’re now ready to download our real site’s database and files.
Creating a database dump/backup in ExpressionEngine
We’re going to keep things simple here, so the most people can benefit from this guide.
That’s why we will use ExpressionEngine’s built-in Database Backup Utility. This is by far the easiest way to dump/backup the existing site’s database — it’s literally a one-click affair.
Start by logging in to your site’s ExpressionEngine control panel.
Then click Tools → Utilities → Backup Database and click the Backup Database button, as shown here:
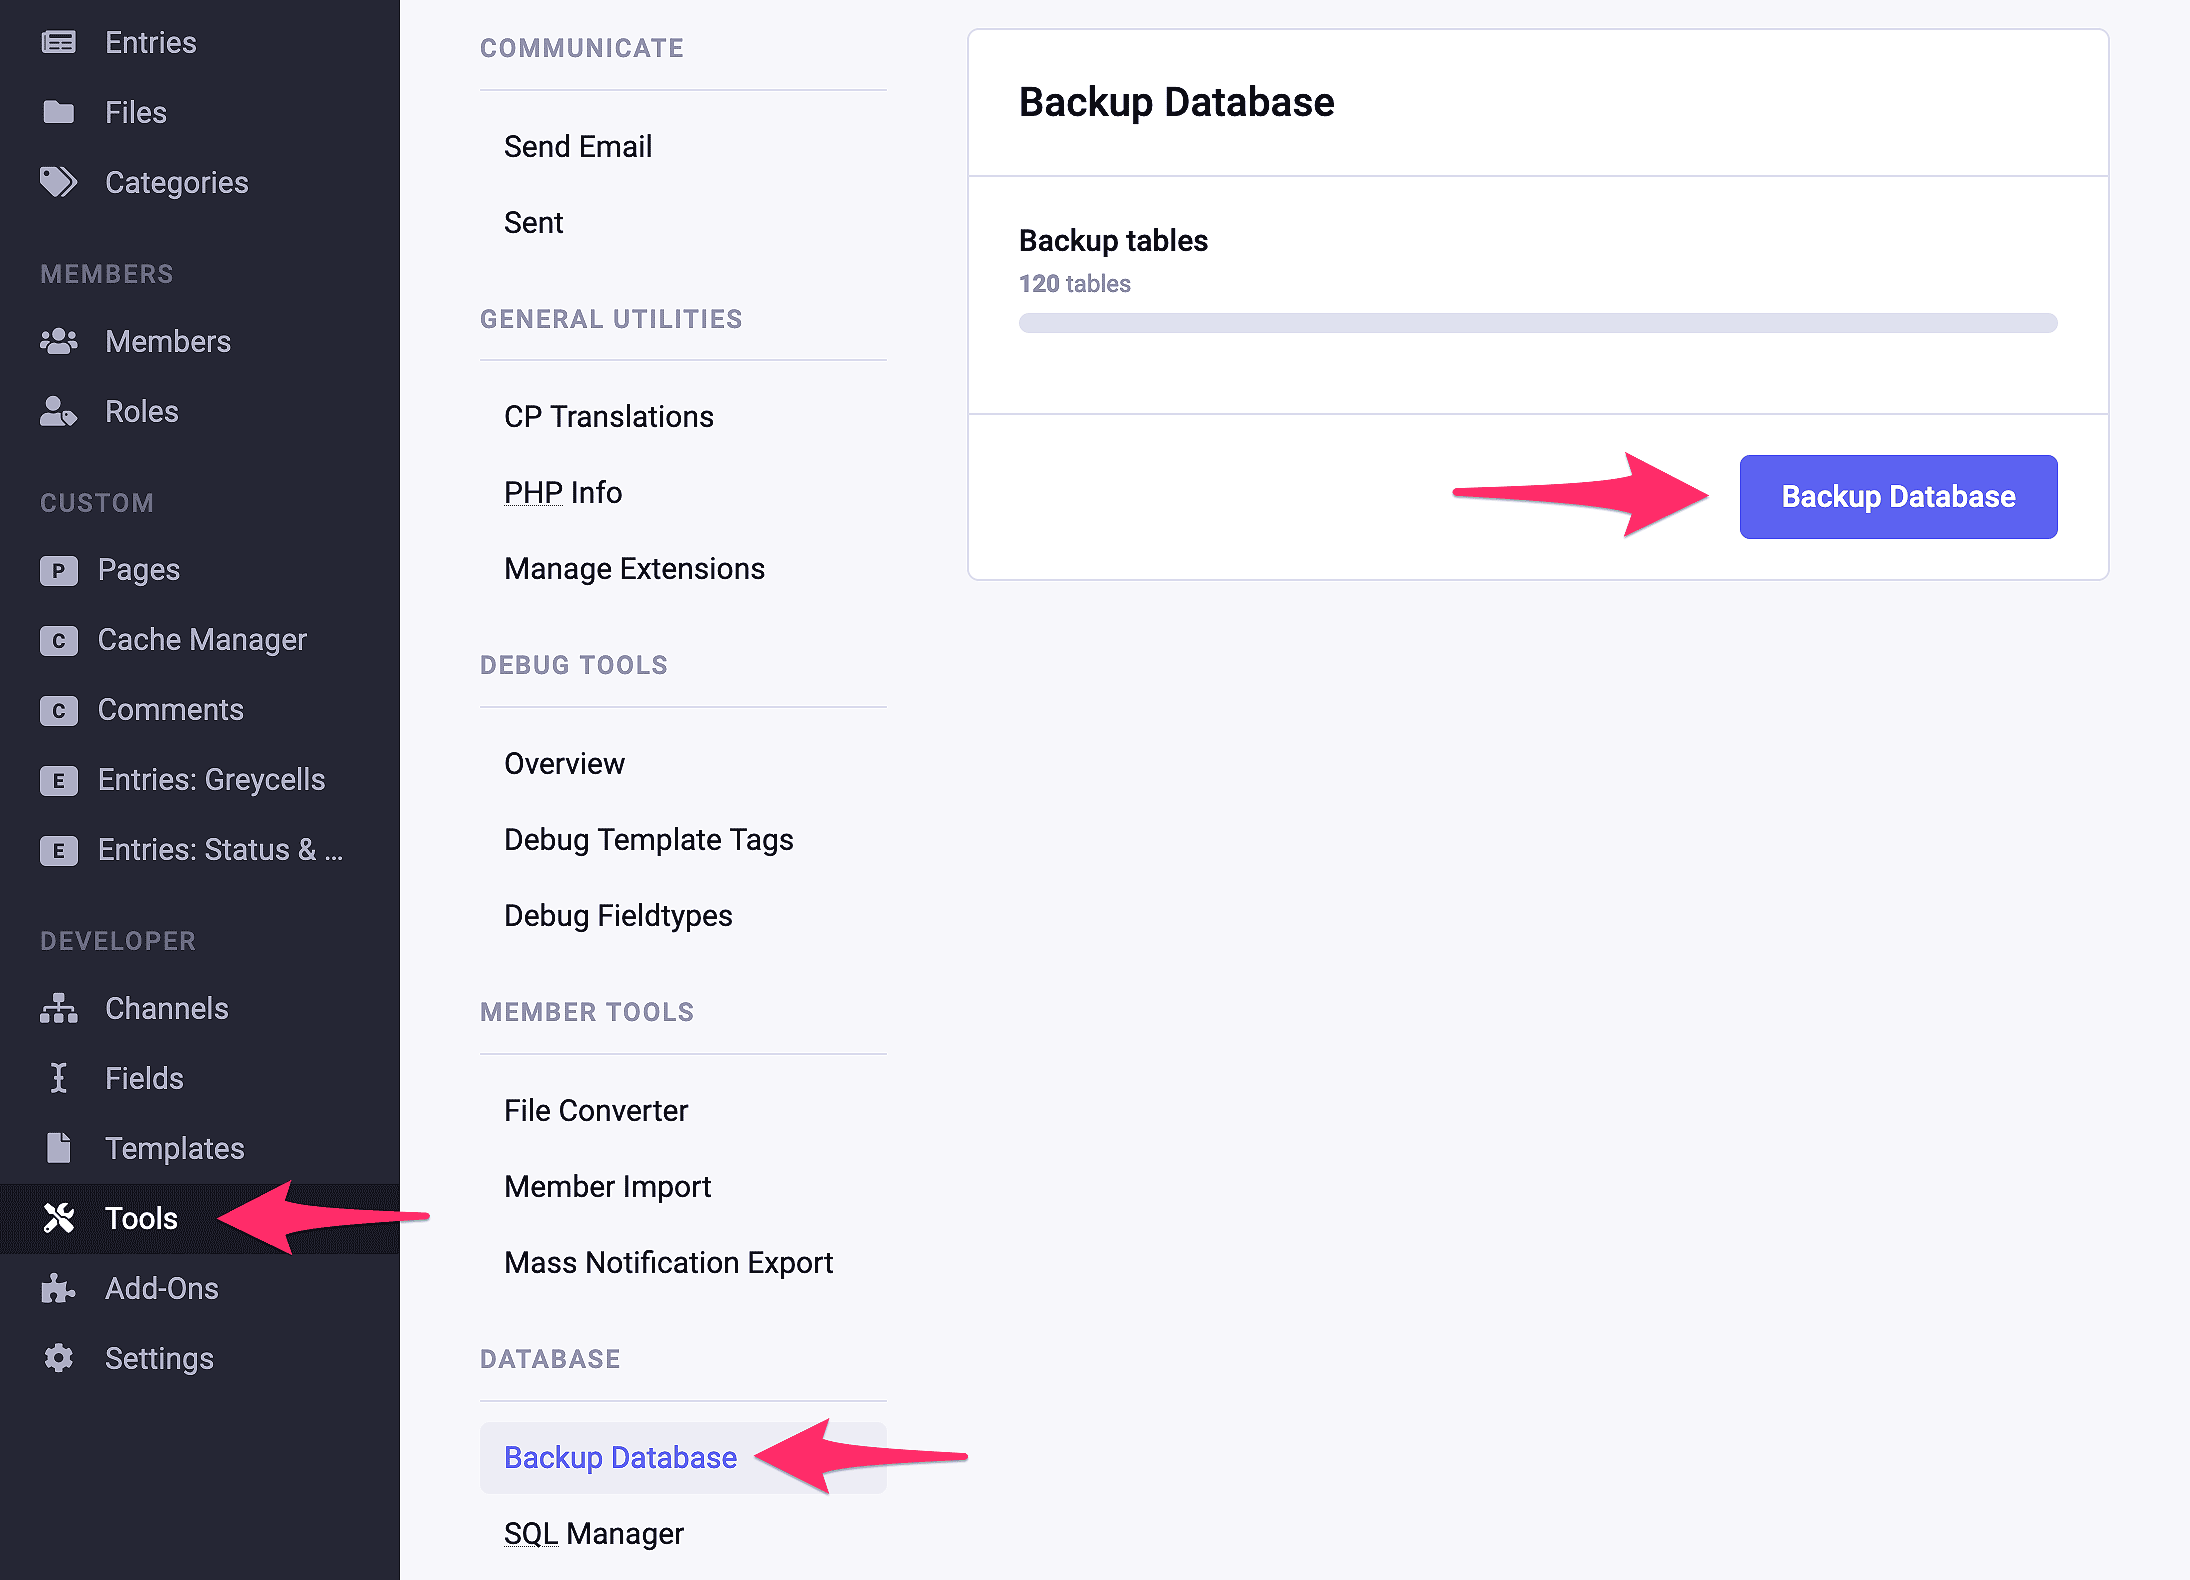
This will generate a dump of the ExpressionEngine database, place it in
/system/user/cache/on the server, and show this message: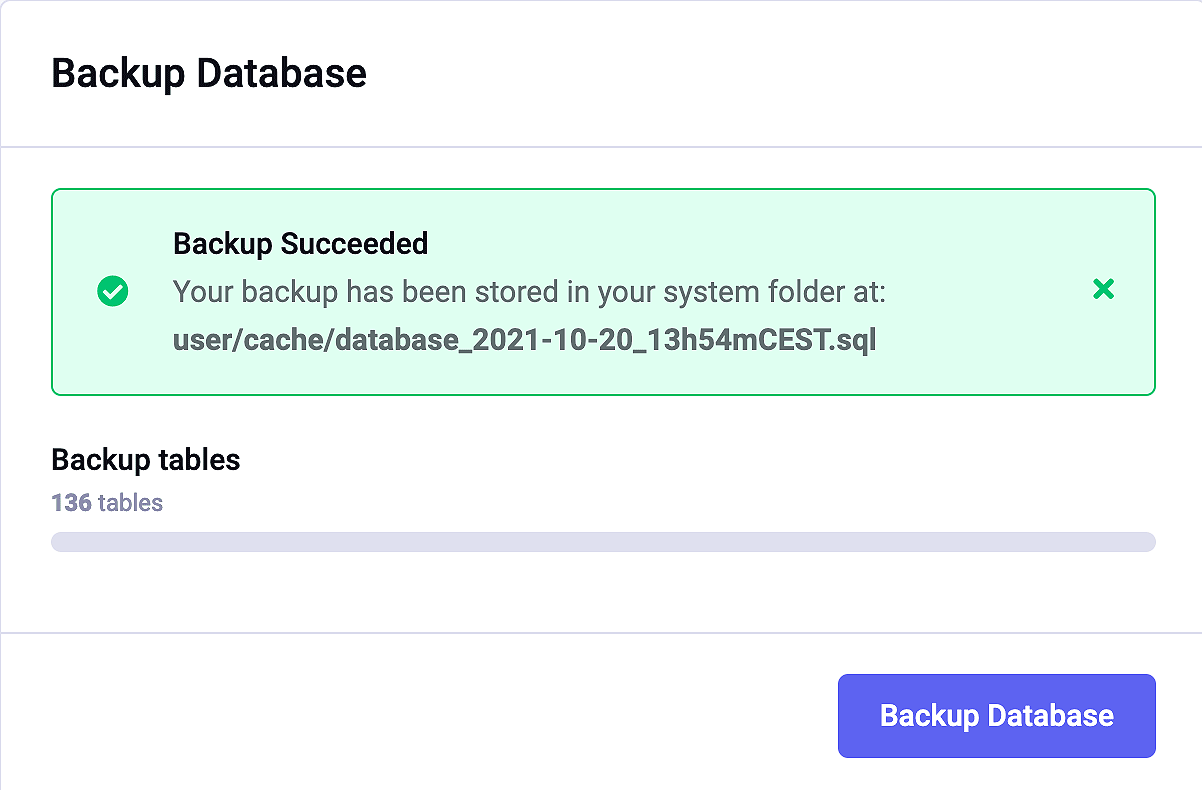
Why not use rsync and mysqldump?
Some may wonder why we don’t use rsync and mysqldump for these tasks? Well, I had started writing sections on both. But they just kept growing and branching into several sub-sections that got more and more complicated.
I kept getting lost in all the details, and if I couldn’t even figure out the instructions, how would anyone else? So I ended up deleting it all and starting over.
Those who know how to dump a database with mysqldump and transfer files with rsync can do it that way. You don’t need me to show you what you already know.
And since everyone can access their web server via FTP, we’ll keep things nice and simple. That way, this guide will help as many people as possible. Which coincidentally is the whole goal of this site :)
Renaming a single file
Before we do anything else, we need to rename one file in document root.
Remember under Testing the server: Host Info-page, WebStart & phpMyAdmin when we opened a page with info about our host? This page comes from an index.php file in the document root folder. But ExpressionEngine also has an index.php file, so we need to rename the existing file before downloading anything.
We could also delete it, but maybe we would like to access it in the future. So instead, we’ll rename it to index-mamp.php:
- Find the file in your document root. For me, it’s placed here:
/Users/tbo/Sites/example.test/index.php - Rename
index.phptoindex-mamp.php— that way, we can always open it again in our browser at: https://example.test/index-mamp.php
Next, we’ll download the entire document root directory from our server. Handily, this will include the database dump we created earlier.
Downloading all ExpressionEngine files and folders with FTP
Now it’s time to download everything from your web server’s document root. This is where ExpressionEngine is installed on your live server — the same place you uploaded files to when you installed ExpressionEngine for the first time.
The placement of document root on a web server can vary, but in most cases it will be in one of three locations:
/var/www/html/site-name.com/public_html/
/var/www/html/public_html/
/var/www/html/
Note: You can see what your server’s document root should look like in the screenshots below.
So, let’s download everything from here to our MAMP Pro document root. If you already know how to do this, you can skip this section, download the files, and continue to Putting it all together below.
Below, we’re using Cyberduck because it’s a free and very capable FTP client that runs under Windows and macOS. If you already have a favorite client, just use that.
Log on to your web server and navigate to its document root, where your ExpressionEngine files and folders are located:
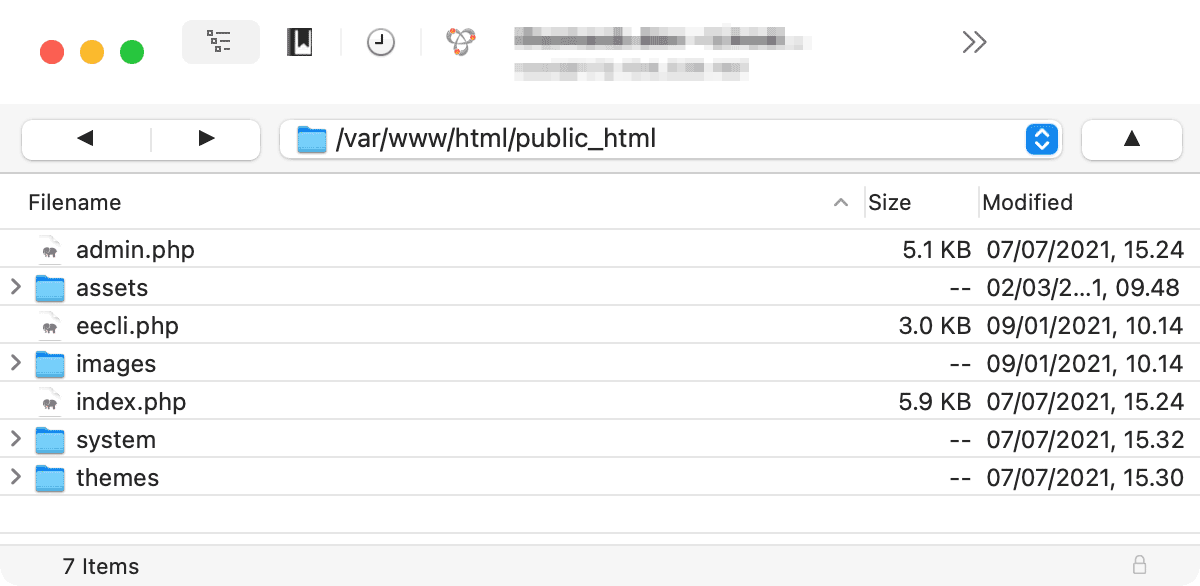
Note: This is the document root from one of our servers.
Here, we simply need to download everything:
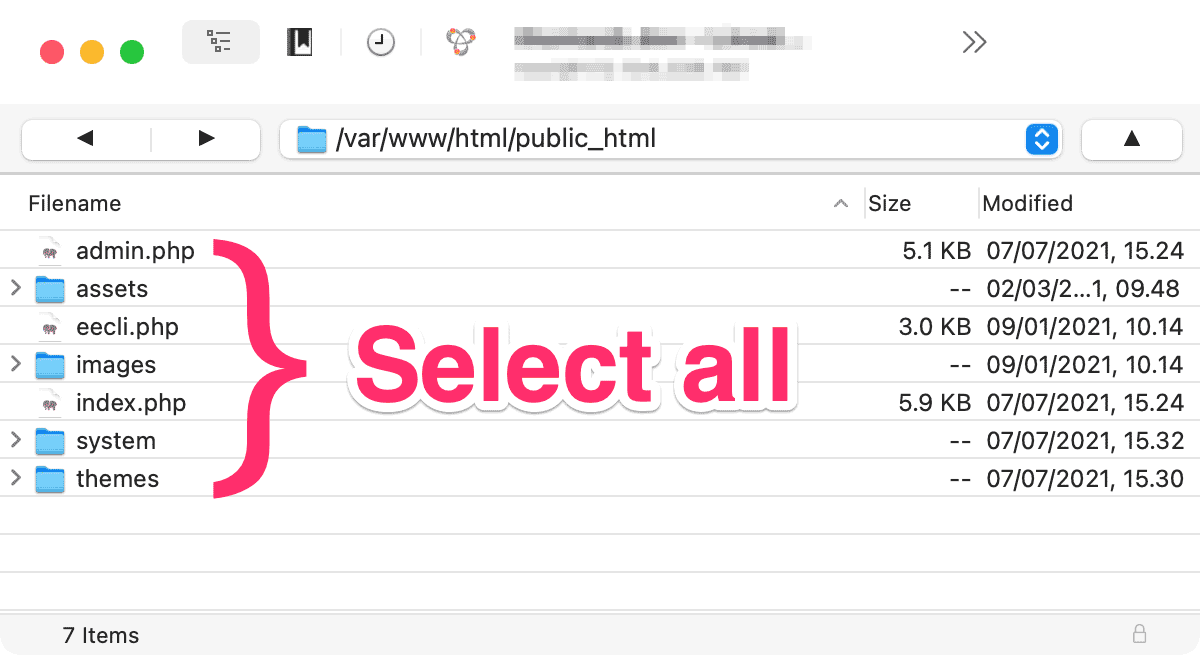
Note: You may not have the assets folder, or you may have more files and folders than shown above. Just be sure to select everything.
So, using Cyberduck, we select all with Ctrl-A or Cmd-A, then right-click and choose Download To…
Then, find and select your MAMP Pro document root so the files will download into that. On my machine, that would be inside the
/Users/tbo/Sites/example.test/folder, as shown here: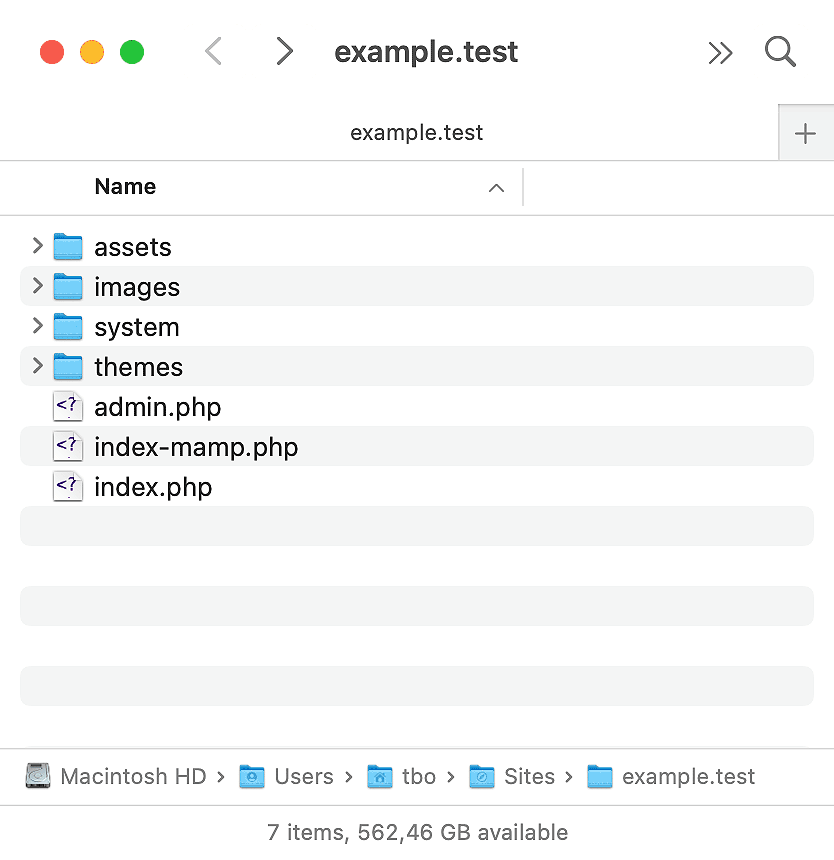
Here the files have been downloaded to their correct location. Note the
index-mamp.phpfile we renamed previously. If you’re using another FTP client, you can use its Download To… function, or use drag-and-drop.As we saw in Creating a database dump/backup above, ExpressionEngine creates database backups in
/system/user/cache/database-name_date_and_time.sql. So by downloading everything as we just did, we also captured that file.
Important note for Apache users
Please note that if:
- You’re running your real site under Apache, and therefore also in MAMP Pro, and…
- You’re removing
index.phpfrom your URLs.
…you will also need to download the file named .htaccess from your web server. This file is responsible for removing index.php from your site’s URLs and may be hidden in Cyberduck and other FTP apps.
The file is located in your web server’s document root, as shown below.
To show hidden files in Cyberduck, choose View → Show Hidden Files:
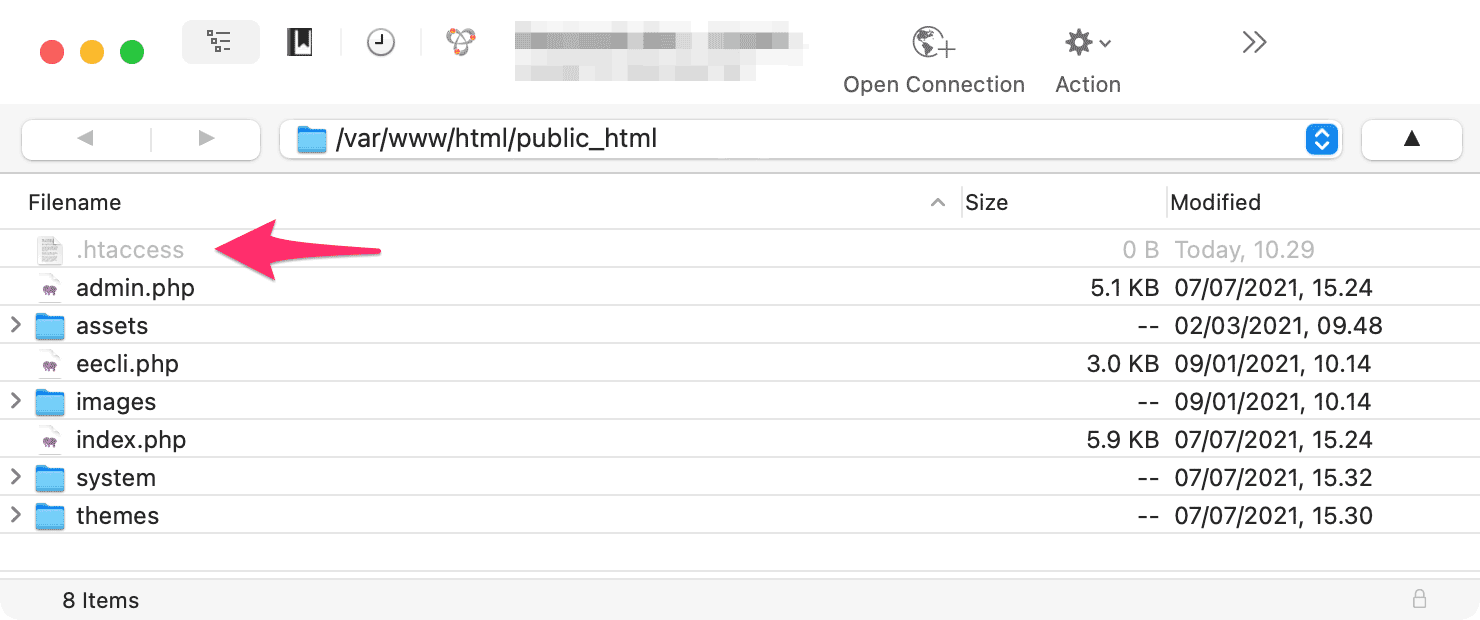
Download
.htaccessto the same location in MAMP Pro’s document root on your hard drive.Click Stop, then Start in MAMP Pro to reload its servers.
Skip the next section (for those running Nginx) and continue with Putting it all together below.
Important note for Nginx users
Please note that if:
- You’re running your real site under Nginx, and therefore also in MAMP Pro, and…
- You’re removing
index.phpfrom your URLs.
…you will need to set this up in MAMP Pro. Nginx, unlike Apache, does not use .htaccess files, so the removal of index.php from URLs is accomplished in another way. With Nginx, you edit the .conf file for your site instead.
Below is an easy way to add the necessary configurations to Nginx in MAMP Pro:
Start by finding the two lines below in your Nginx .conf file on your live server. These are responsible for removing
index.phpand will look like this:try_files $uri $uri/ /index.php; rewrite ^/index\.php(.*) $1 permanent;Copy the first line, select your host in MAMP Pro, and paste it into the try_files section of the Nginx tab.
Copy the second line and paste that into the Custom section.
Check that things look like this:
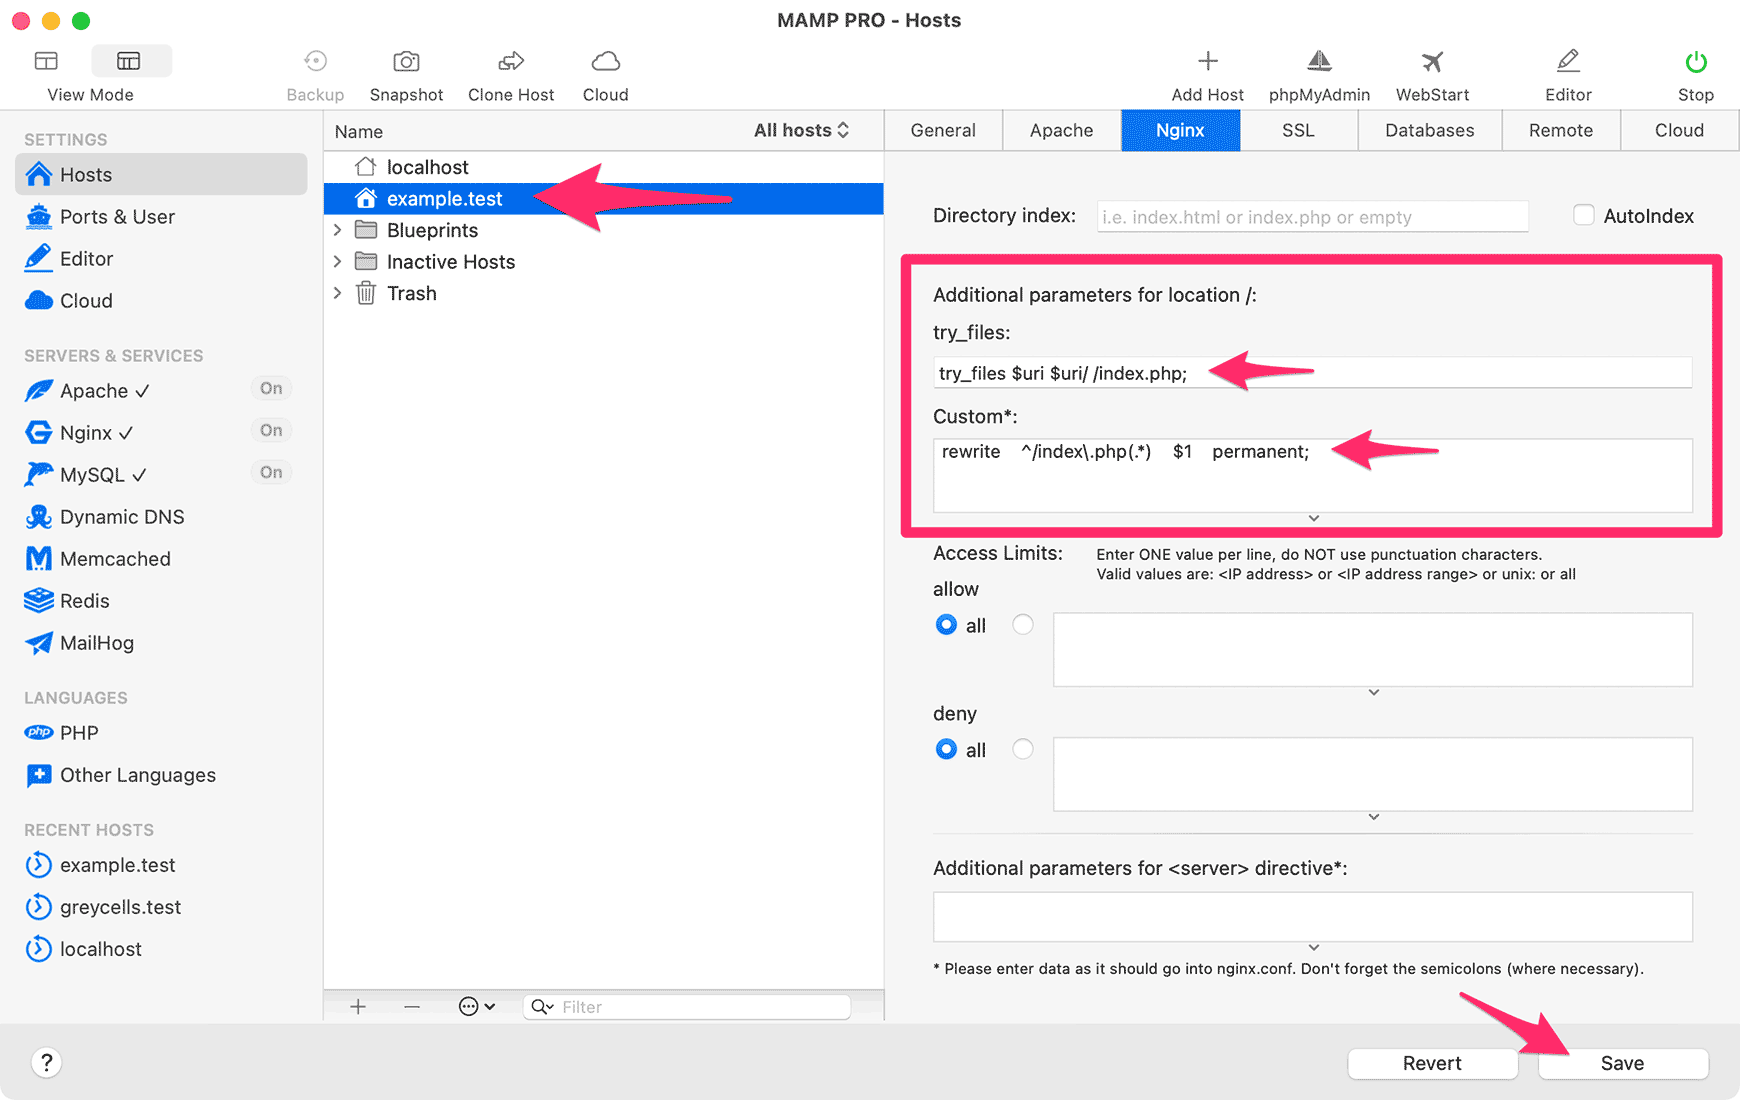
Click Save to activate the changes.
Putting it all together
Now we’re ready to merge all our efforts, ensuring the test site runs off our MAMP Pro server and database. Here’s what we’ll do:
- First, we create a new, empty MySQL database in MAMP Pro for ExpressionEngine to use.
- Next, we update this with the database dump from the live server, using phpMyAdmin.
- Then we’ll update ExpressionEngine’s config.php with the correct settings for the MAMP Pro host.
- And finally, we log in to the ExpressionEngine control panel to change or verify a few paths.
Then we’ll be in business, running a local copy of our site, ready for all the testing and abuse we can throw at it.
Creating an empty database in MAMP Pro
First, let’s create a MySQL database and then import the dump from our real site into this.
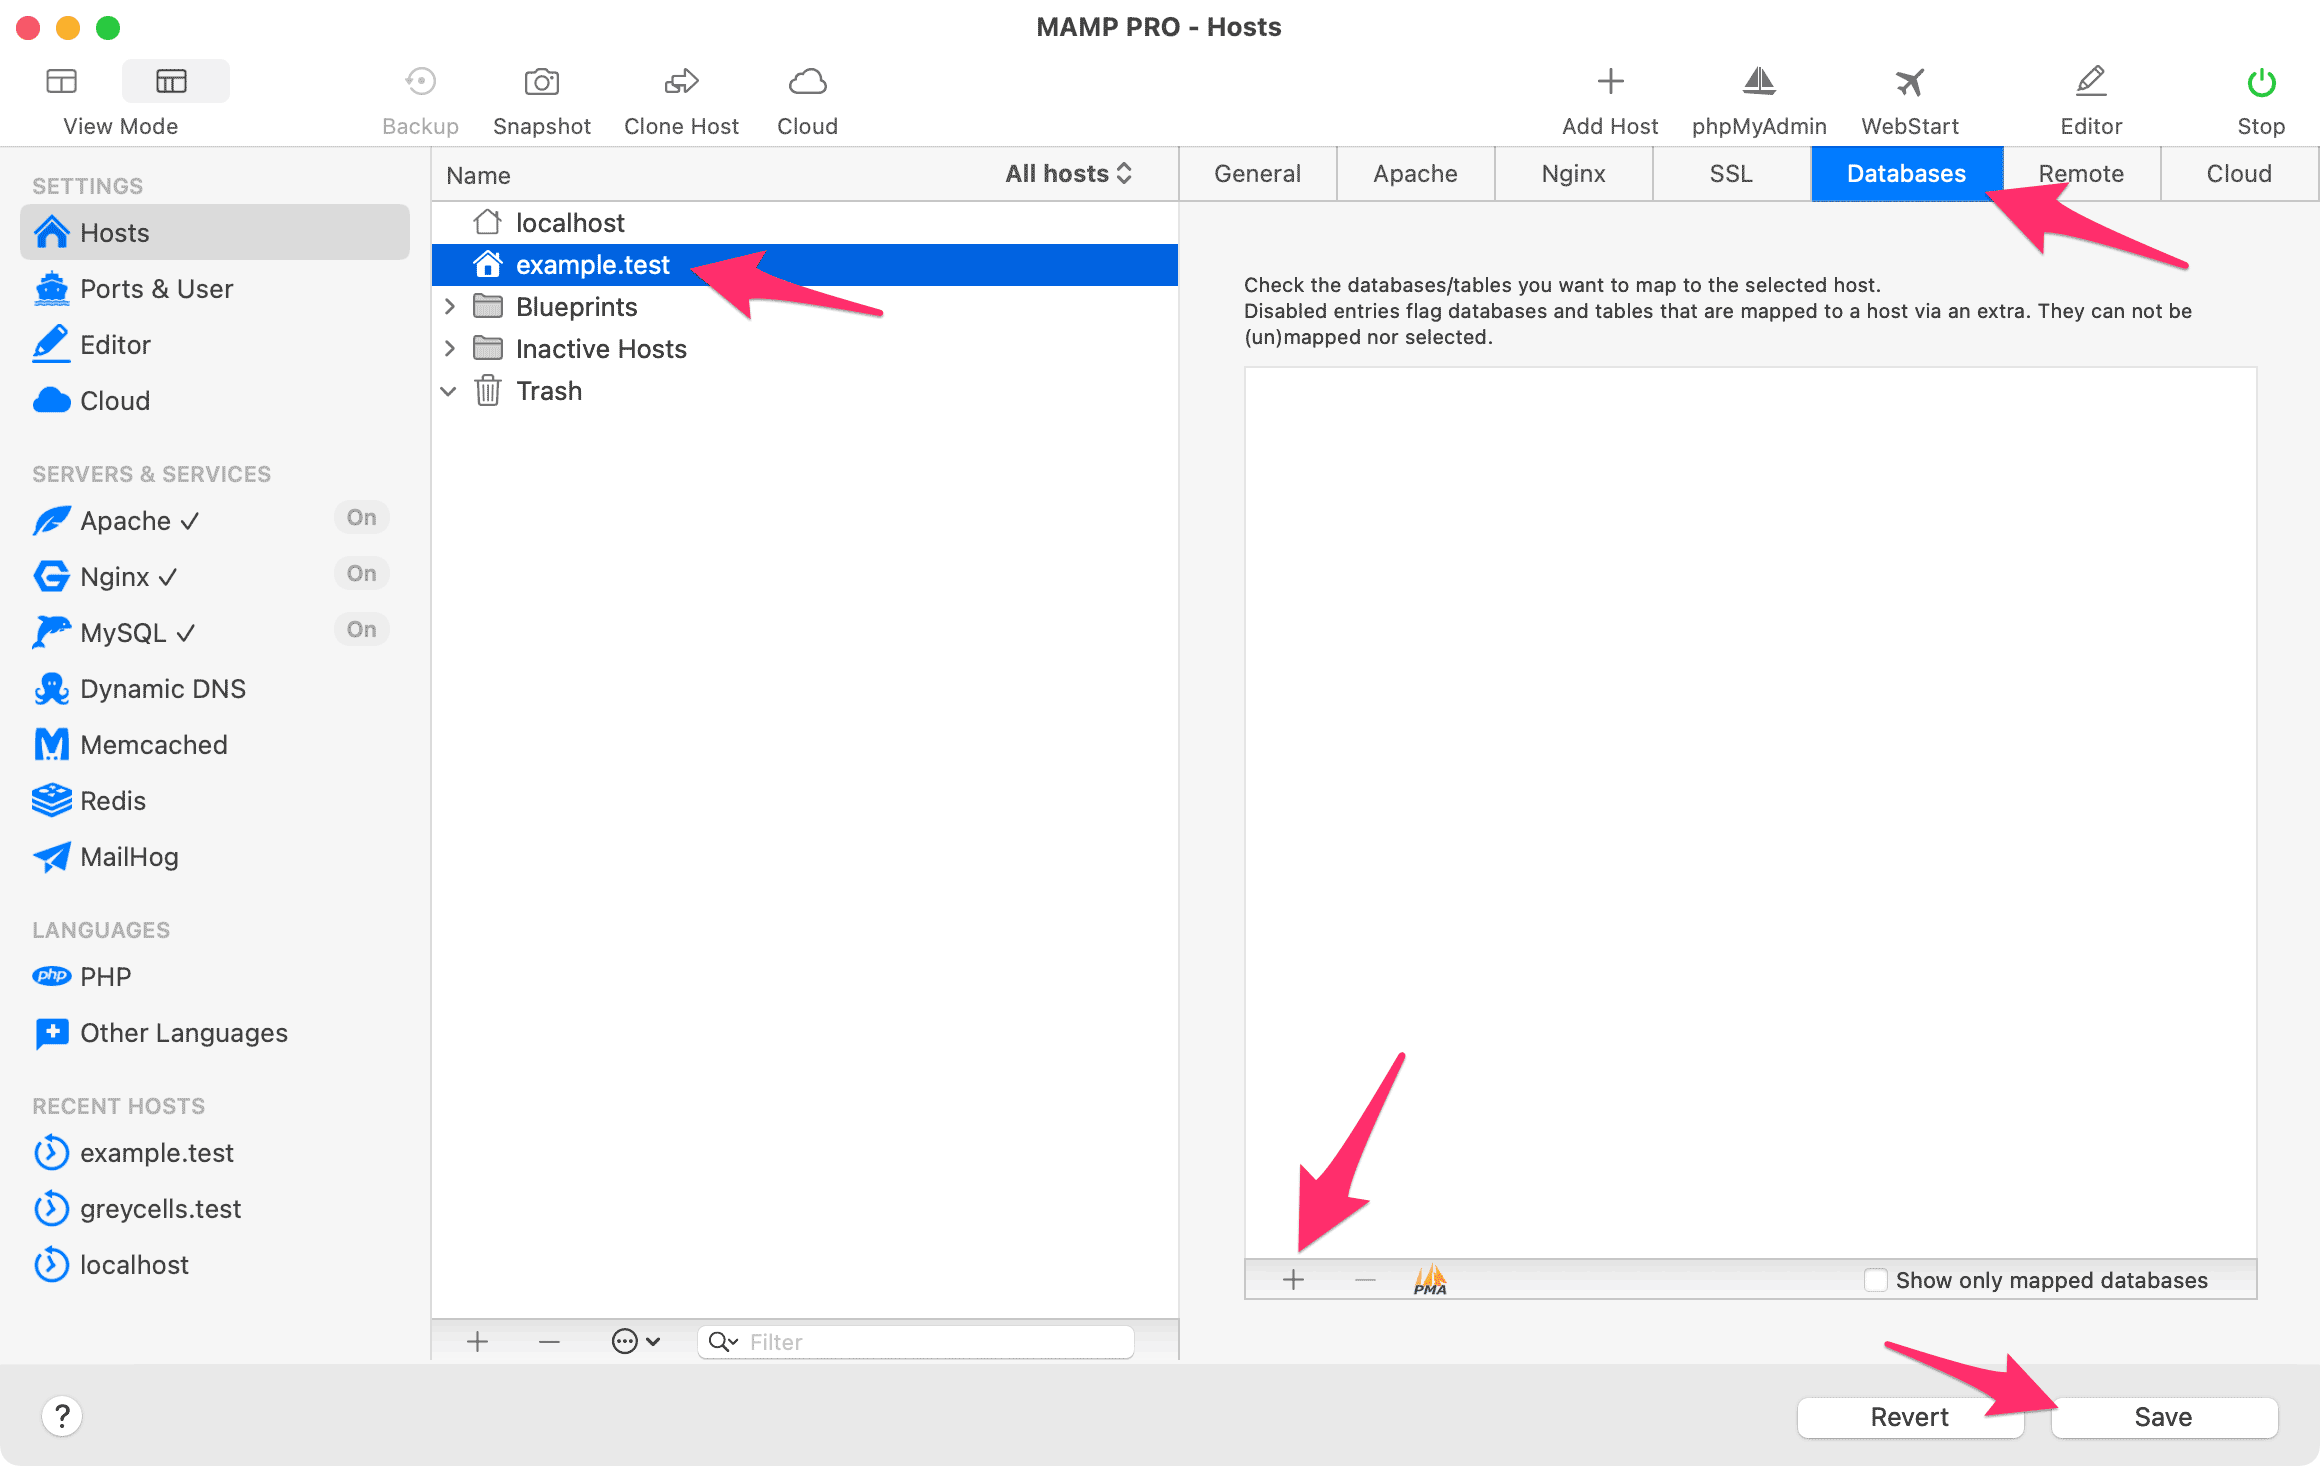
Select your host in MAMP Pro.
Click the Databases tab and then click the plus-sign to create a new database:
You can name the database whatever you like. It probably makes the most sense to name it after the test site, so we will call ours example_test:
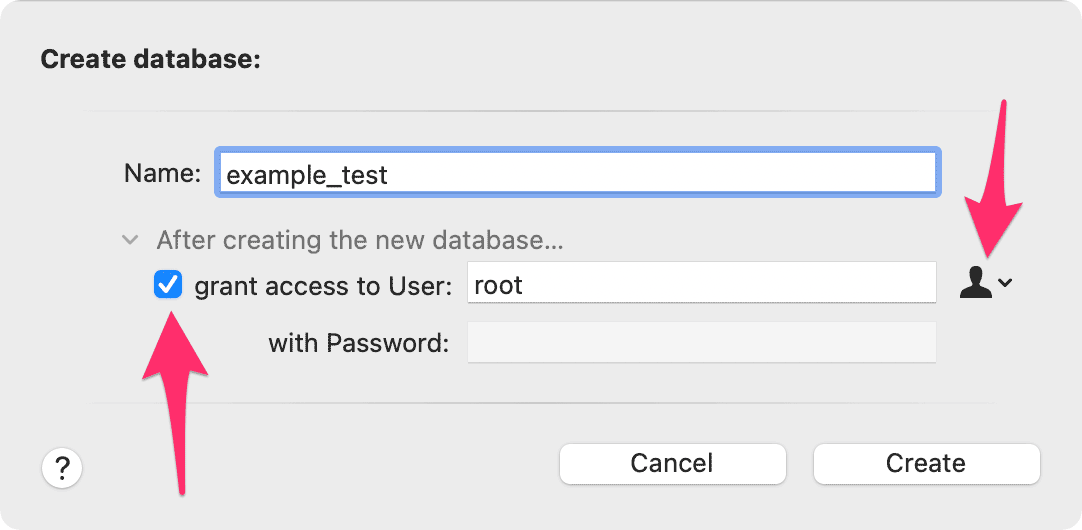
Also, select grant access to User and choose the root user from the popup menu, as shown above. This will give ExpressionEngine read/write access to the database via the root MySQL user.
Click Create and then select the checkbox next to the new database. This will map it to the MAMP Pro host:
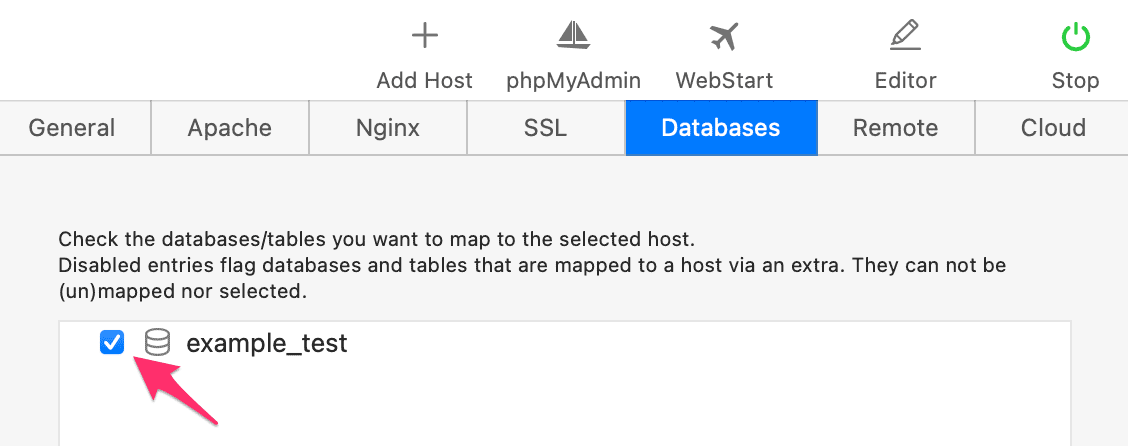
Finally, click Save.
Updating with the database dump
Next, we’ll use MAMP Pro’s built-in database administration software, phpMyAdmin, to update the new database with the dump from our live server.
In MAMP Pro, click the phpMyAdmin button in the toolbar:
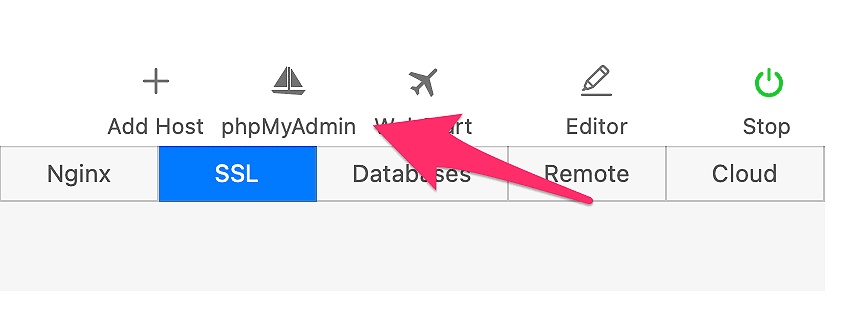
After launching phpMyAdmin, you will see this window:
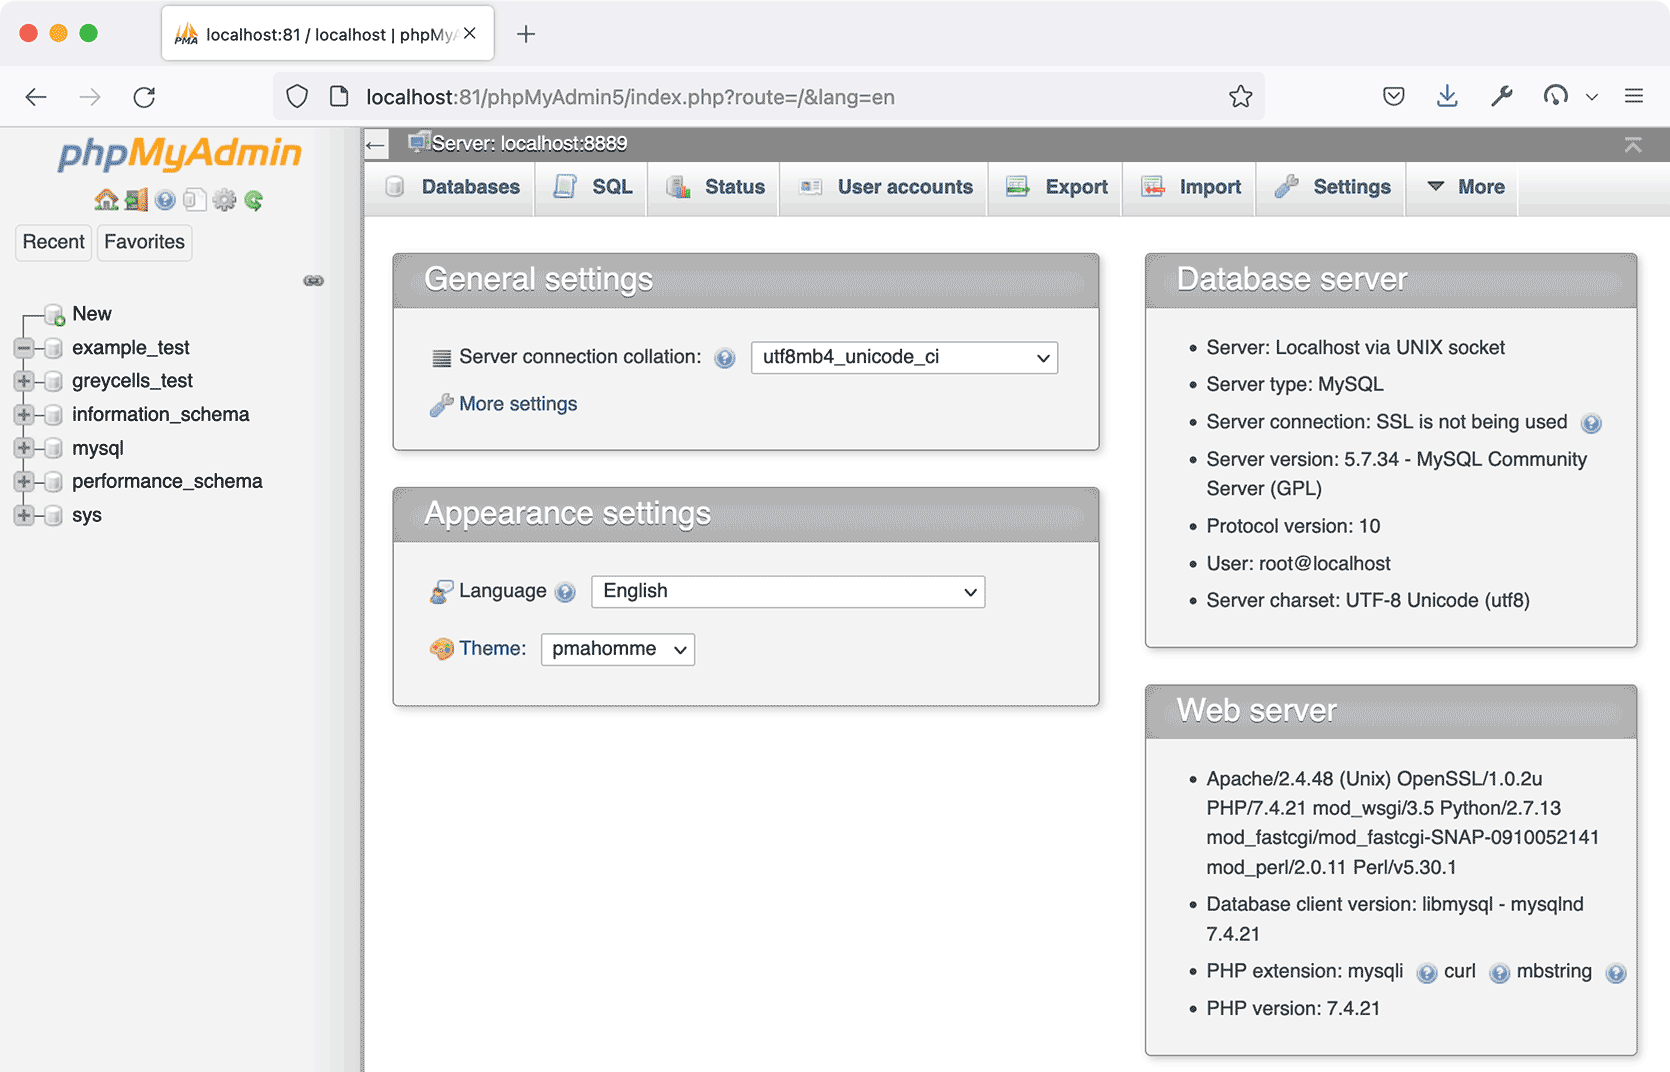
The left sidebar shows any databases available to phpMyAdmin, including example_test that we just created.
The screenshot also shows one named greycells_test. This is the database for my own Greycells test site — you won’t have that one.
The rest are databases MySQL uses internally.
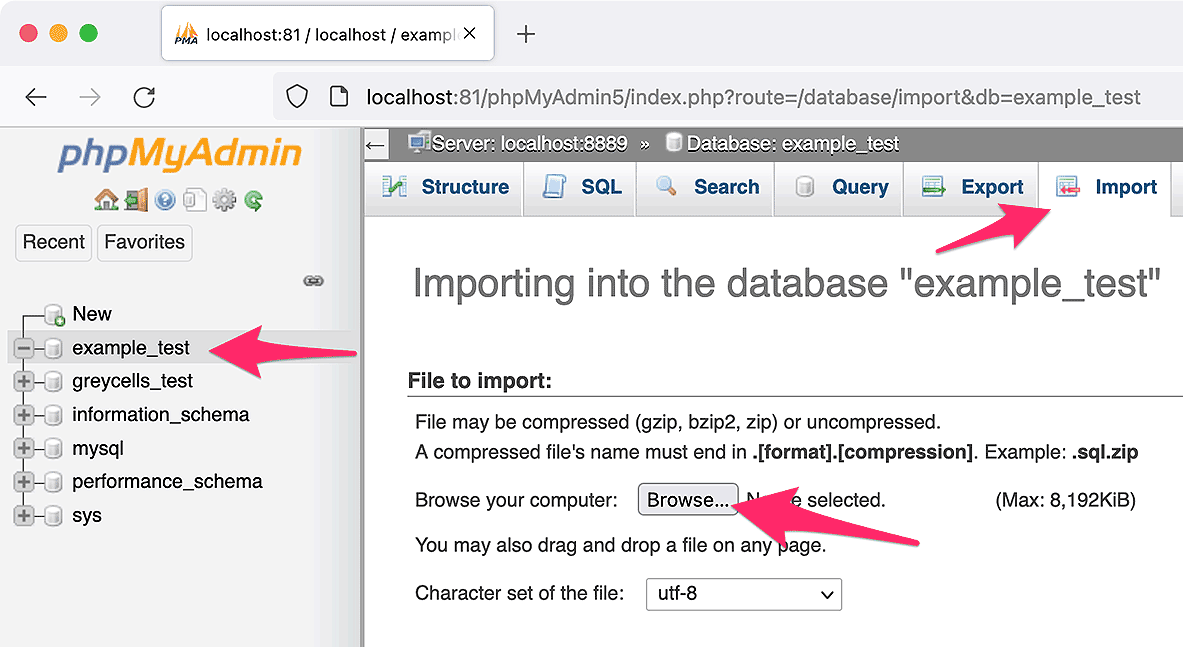
To import the database dump, click on example_test (or whatever you named your database). Double-check that the correct database is selected!
Then select the Import tab and click Browse…:
Navigate to the dump of your real site’s database. This is the file we generated here. It will be located inside MAMP Pro’s document root on your hard drive and then in
/system/user/cache/and be named something likereal-site-db-name_2021-09-26_10h05mCEST.sql. That is: The name of your real site’s database, plus the date and time of the dump, and then .sql.The full path to the file on my computer would be:
/Users/tbo/Sites/example.test/system/user/cache/real-site-db-name_2021-09-26_10h05mCEST.sqlAfter locating the SQL file, click Open in the file selection dialog and then Go in phpMyAdmin.
After a short while, you should see the sidebar filled with lots of new tables and a green success banner:
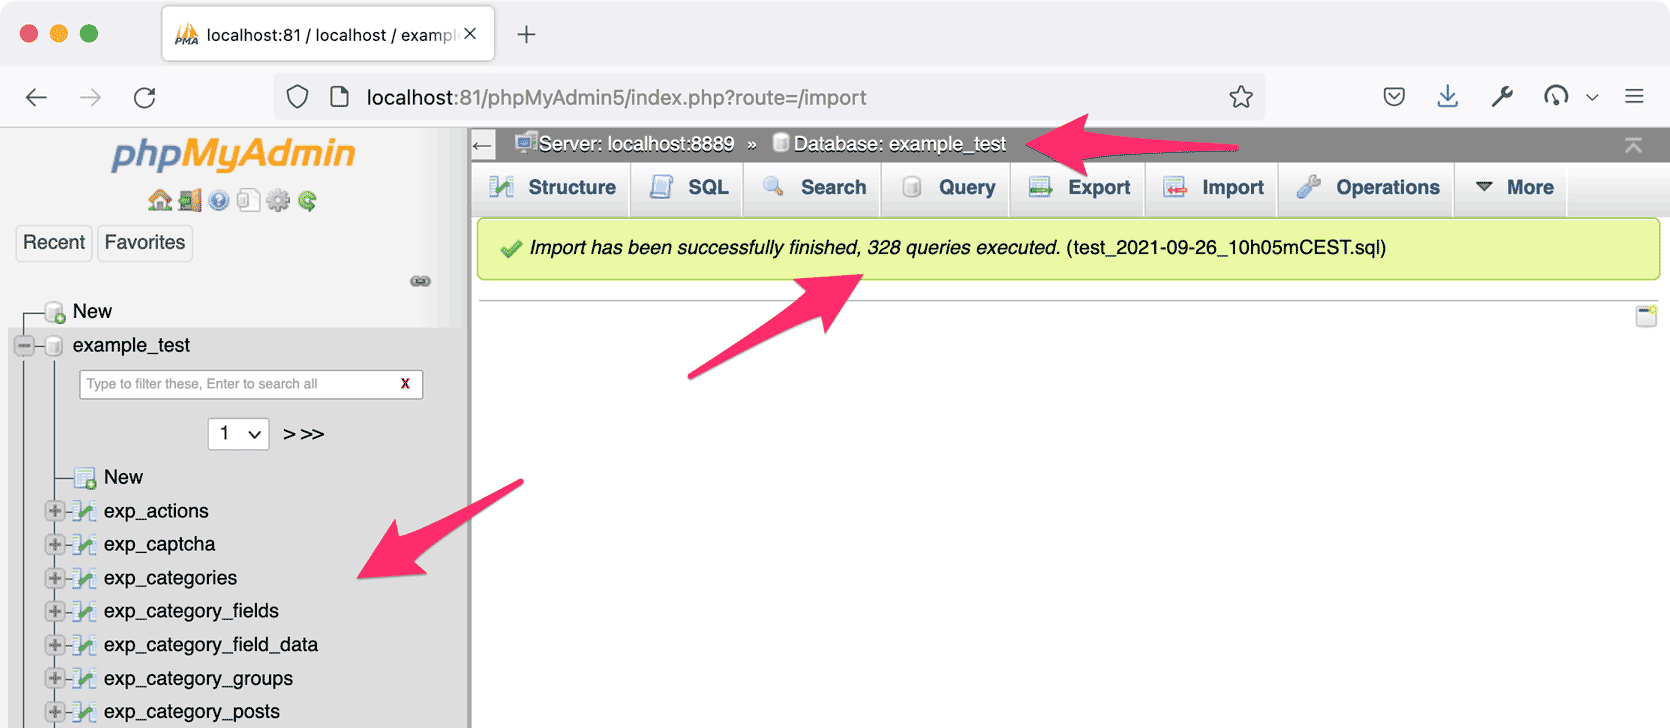
Note: Here, I imported a file called test_2021-09-26_10h05mCEST.sql to create the screenshot. Yours will be named differently :)
Now we’re really close. Just need to edit a few things, and then we can see our test site :)
Editing config.php
Next, we need to edit a few things in ExpressionEngine’s config.php file.
Go to MAMP Pro’s document root folder on your hard drive and then drill down to find config.php here:
/system/user/config/config.phpOn my computer, the full path to config.php would be:
/Users/tbo/Sites/example.test/system/user/config/config.phpOpen config.php in your text editor. I’m using Visual Studio Code but if you already have a favorite editor, just use that. If you choose Visual Studio Code, we have some tips on using it with ExpressionEngine sites, in our guide: Use Any HTML Template With ExpressionEngine - Part 2.
Theme and MySQL related configs
With config.php open, we need to update the following:
- Edit the location of ExpressionEngine’s themes folder.
- Make ExpressionEngine use MAMP Pro’s MySQL server.
In config.php, change — or add — the following two configs, so they point to the correct URL and path for the test server:
$config['theme_folder_url'] = "https://example.com/themes/";
$config['theme_folder_path'] = "/home/user/example.com/themes/";
So for
$config['theme_folder_url']it’s the test site’s URL +/themes/And for
$config['theme_folder_path']it’s the test site’s document root +/themes/Note: If you have never moved the site before, you may not have those two configs in config.php. In that case, just copy them from above, add them to config.php, and modify them to point to the themes directory.
On my own Greycells test server, they look like this:
$config['theme_folder_url'] = "https://greycells.test/themes/";
$config['theme_folder_path'] = "/Users/tbo/Sites/greycells.test/themes/";
With config.php still open, find the MySQL configs, as shown here:
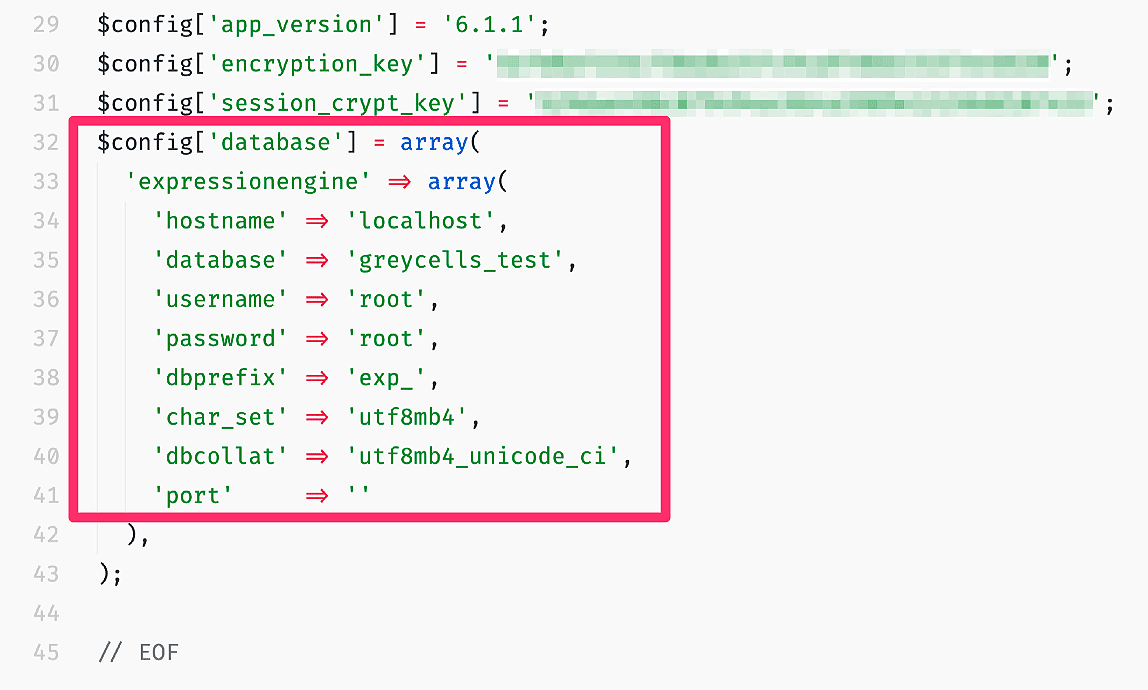
Note: The values shown in the screenshot are from my own Greycells test server.
Change the values for database, username, and password.
Here I have highlighted in pink the parts that should be edited:
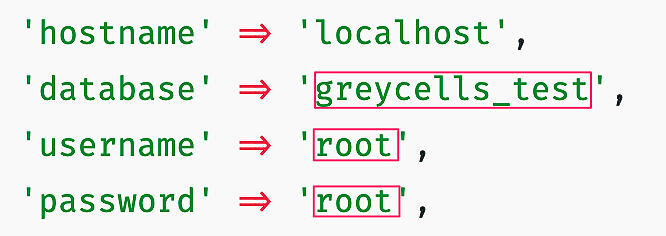
- database = The name of the database you created in MAMP Pro. Make sure you change it to the name you gave the database when you created it, for instance, example_test.
- username = Unless you changed it, under MAMP Pro, this will be root
- password = The same here, unless you changed it, this will be root
Save config.php in your editor.
Verifying settings in the control panel
Now we just need to set and verify a few things in ExpressionEngine’s control panel, and then our test site is ready!
Note: As mentioned in the ExpressionEngine User Guide under Moving to another server, you can also set the values below in config.php if you prefer.
Open your browser, go to the ExpressionEngine control panel of the test site, and log in. Your username and password will be the same as for your real site.
We need to set the following URLs and paths to their correct values for the test site:
Under Settings → URL and Path Settings, change all URLs and paths, so they are correct for your test server.
Note: The values shown in the screenshot below are from my own test server!
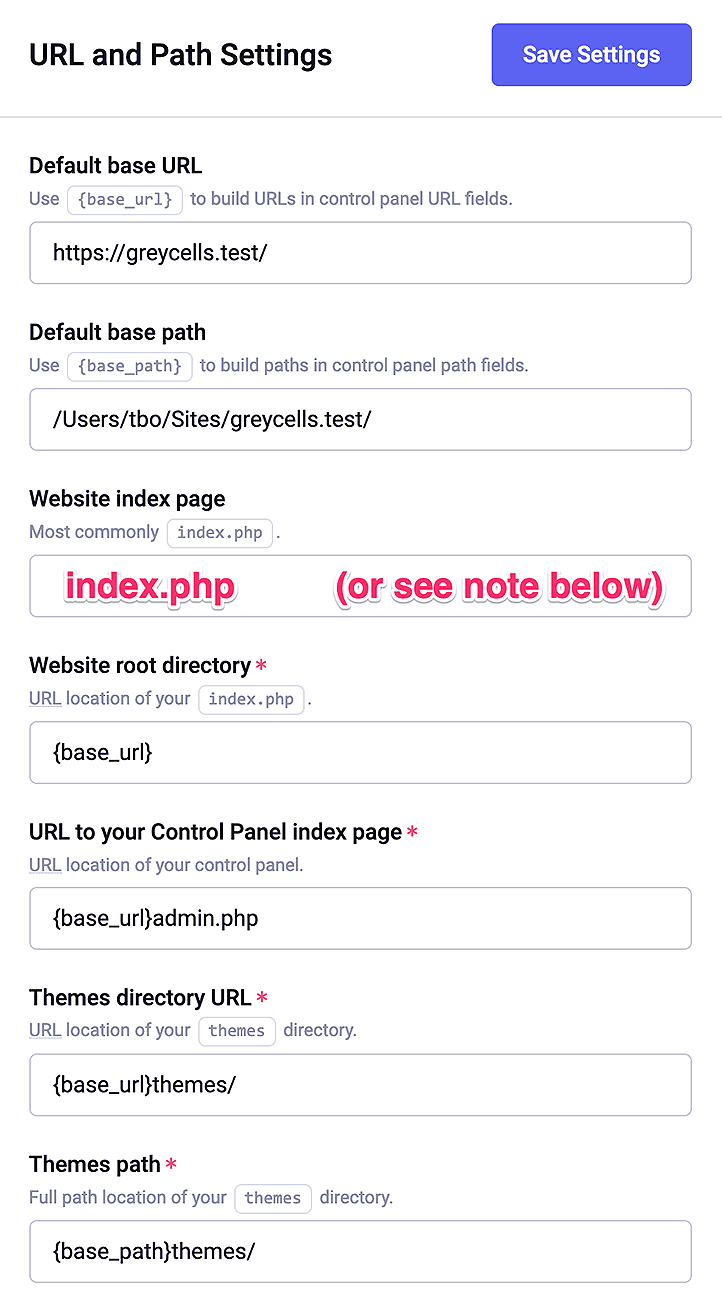
So, for Default base URL, set that to https://example.test/, or whatever you decided to name your test site.
Similarly, for Default base path, set that to your host’s document root.
- Note how using
{base_url}and{base_path}can save you from having to update tons of places in the control panel. If you ever move your site, like we’re doing here, you only have to update the Default base URL and Default base path fields, and every other field that uses these values will instantly be up-to-date. This works throughout the control panel.
- Note how using
Note: If (and only if) you’re removing index.php from your URLs, check that the field Website index page is blank (meaning the field has no content).
On the other hand, if you’re not removing index.php, its value must be set to index.php
Click Save Settings when done.
Next, go through the following sections of the control panel and check that all fields have the correct URLs and paths for the test site. Change them if not:
Settings → CAPTCHA
Settings → Content & Design
Settings → Avatars
Developer → Channels
Files → Any upload directories you’ve made
Make sure the site is set to On under Settings → General Settings → Website online?
Congratulations! Your new test site is now ready to use (and abuse) so let’s go do that :)
Viewing the test site for the first time
Yes, it’s true — you can now finally load the site in your browser and begin developing and testing all the new features and optimizations you’ve had planned for ages.
The last sections of this guide are optional but contain some great tips. If you can’t bear reading any more now, and who could blame you, you can always come back later :)
Troubleshooting
Can’t log in to Control Panel on Test Site
If you’re using the free version of MAMP and you’re unable to log in to the test site’s control panel, you may have run into the issue that reader striio mentions in the comments below. He was kind enough to post a solution to it too, which we’ll reprint here:
The issue stems from this control panel setting: Settings → Security & Privacy → CP session type.
If this is set to Cookies and session ID or to Cookies only on your real site, then on the MAMP free site, you won’t be able to log in. The reason is that MAMP free doesn’t support SSL/HTTPS. So if you transfer a site that uses HTTPS and the above settings, you won’t be able to log in.
Luckily it’s an easy fix:
You can set the CP session type to Session ID only before dumping your real site’s database and downloading its files and folders. After the DB dump and FTP transfer, you can set it back.
Or, as striio mentions in the comments, you can add the following config to
/system/user/config/config.php:$config['cp_session_type'] = 's';Both do the same thing, so if you’ve already gone through the guide and can’t log in, adding the above config to config.php is the easiest solution.
Thank you very much to striio for mentioning this and for providing the solution — it’s very much appreciated! :)
Optional Tips & Tricks
The rest of this guide consists of a few optional tips and tricks:
- Telling the two sites apart: Now that we have a carbon copy of our real, live site, it’s very easy to mistake the two for each other. And, trust me, it will happen and can cause all kinds of trouble. So next, we take a look at differentiating the test site, so we never mix them up.
- Snapshotting the test site: Then we look at Snapshots in MAMP Pro. With snapshots you can always restore a working version if you get a bit too excited with the code changes.
- Blueprint Hosts: Another excellent feature of MAMP Pro is Blueprint Hosts. This lets you prepare a host and then use it again and again as a template for other hosts.
Making the test site visually different
Now that we have an exact duplicate of our site, we run into the problem that it’s an exact duplicate! This can and will cause confusion:
- We can make changes to our real site that we thought were made on the test site. The exact thing we’re trying to avoid.
- This also “works” in reverse. We can update our test site thinking it’s the real thing.
- When making changes to templates and other code, a combination of the two can also happen.
As you can probably hear, I have made those mistakes. So below are a couple of small yet effective ways to differentiate the two sites to spare you the same trouble.
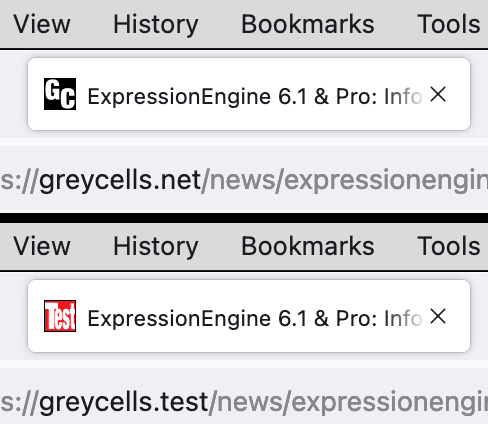
Visually different in the browser
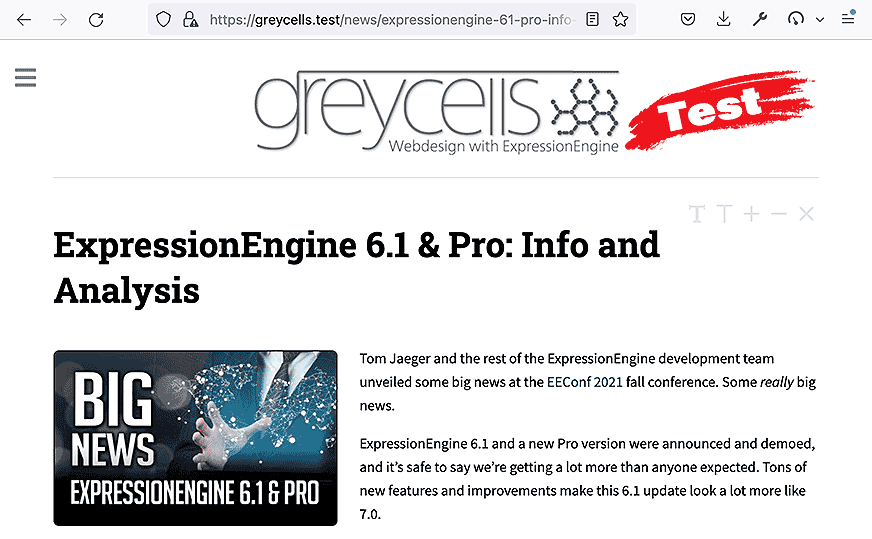
Here is what I have done to distinguish my test site from the original.
First off, you can change the header graphic or logo to stand out from the real site. Here I have made sure it really stands out:
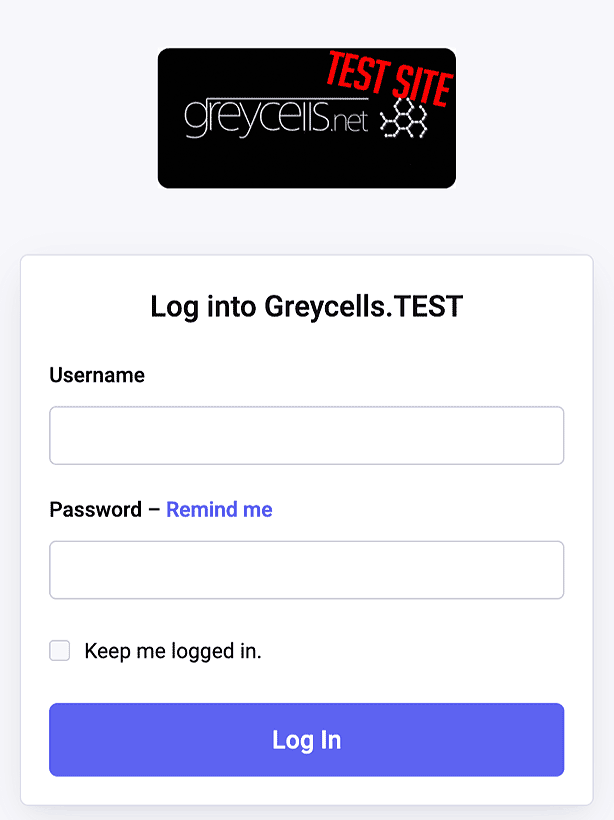
If you’re running ExpressionEngine Pro, you can add branding to your test site’s login screen:
You can change the favicon for the test site:
And finally, you can interact with your test site exclusively from one browser. I use Firefox Developer Edition for my test site and Safari for the live one. Of course, I test in multiple browsers, but otherwise, Firefox Dev is the only place I run the test site.
Visually different when editing code & templates
It’s also important not to make code changes for the wrong site. I use Visual Studio Code, and here are the things I changed to make the test site stand out:
I changed the name of the workspace I use for the test site to greycells_TEST, so it stands out a bit when I switch workspaces. Tip: You can switch among open workspaces with Ctrl-W.
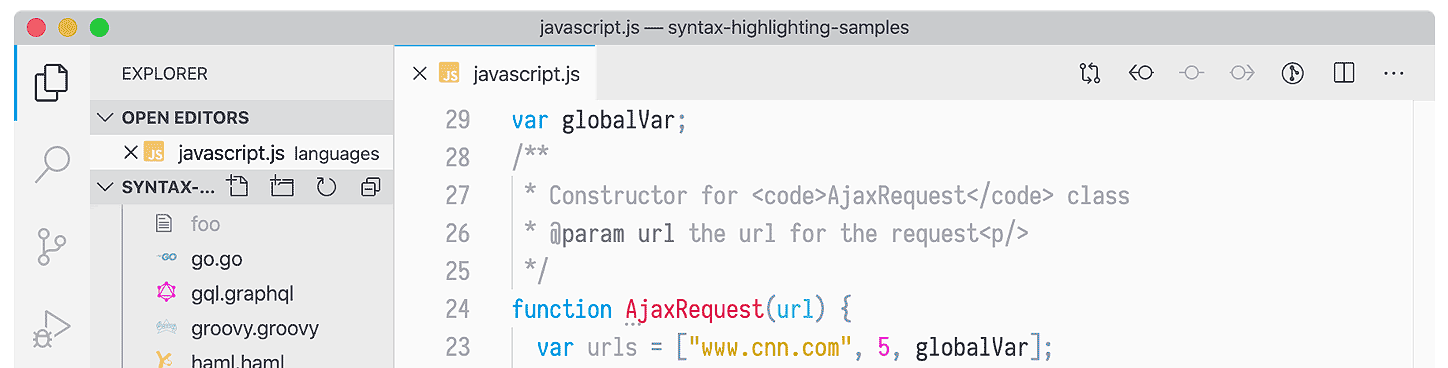
I also changed the Color Theme to something that stands out more:
For the real Greycells.net workspace, I use the Bluloco Light Theme, which is nice and subtle:
But for the test site, I chose the GitHub Sharp Theme, which has a nice dark border that really stands out.
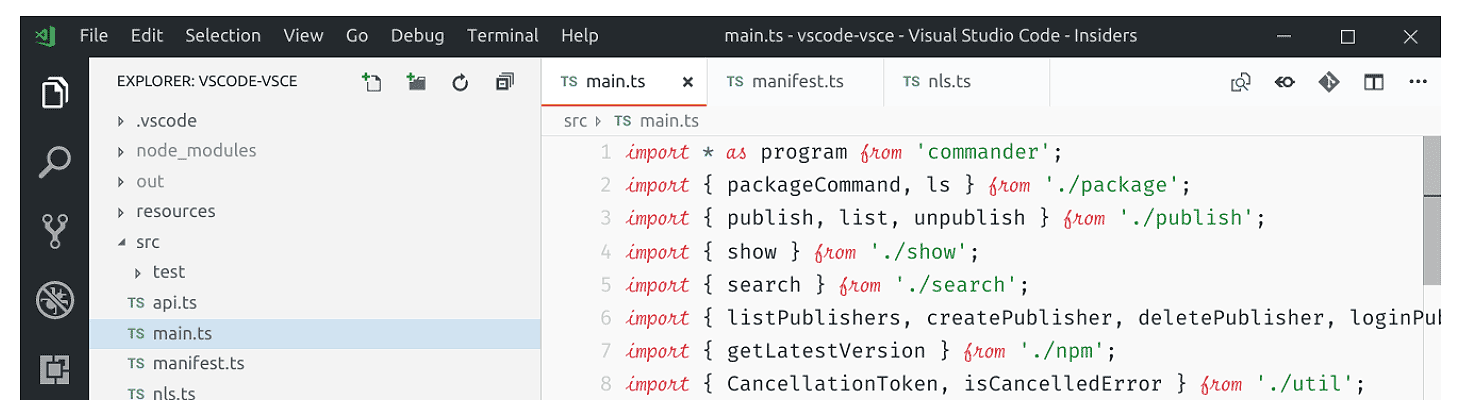
You can see which theme is active and switch among installed themes in Visual Studio Code by hitting Cmd + K + T (macOS) or Ctrl + K + T (Windows).
Creating snapshots in MAMP Pro
One of the many great features of MAMP Pro are snapshots. They’re straightforward to create, and when done, you’ll have an instant snapshot of your current host. The ExpressionEngine files, templates, and database are backed up, so you can always return to that point in time if anything breaks.
But… If this guide’s whole point is to allow us to break stuff, why do we care? Because, even if it doesn’t matter that our test site breaks, it does take time to set it up again if we really break it. By having snapshots, we don’t need to troubleshoot the test site. We can just revert to a time before someone screwed it up :)
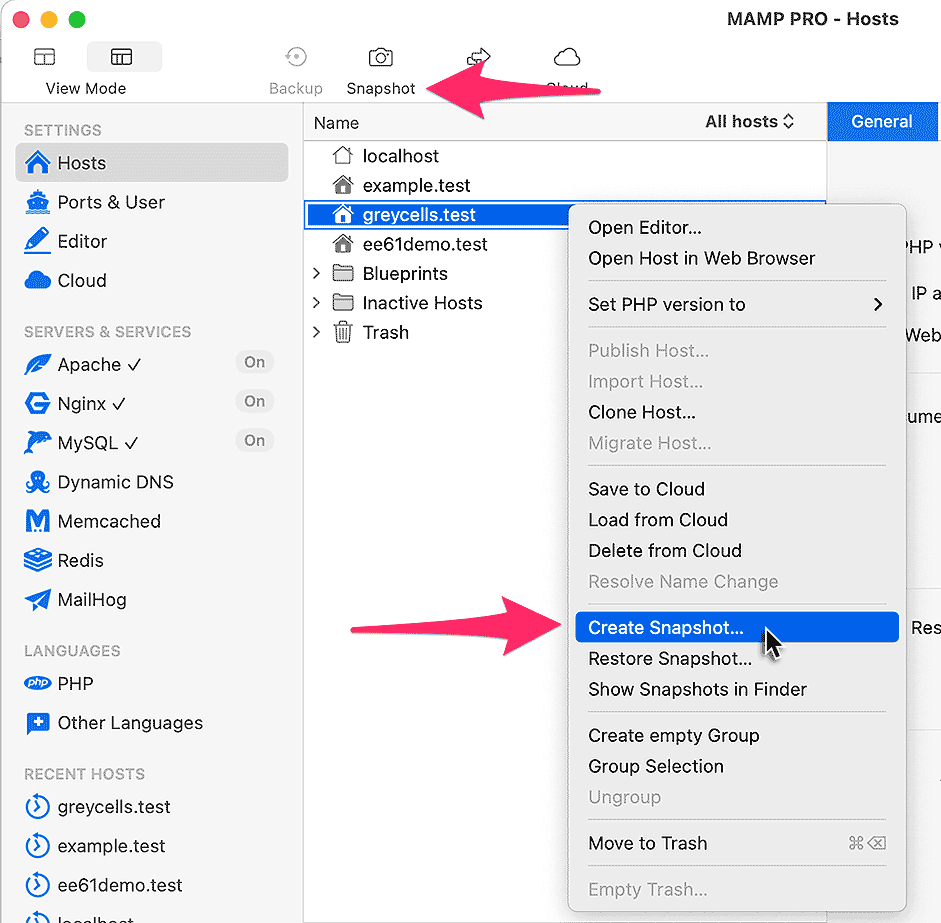
So here’s how snapshots work:
Simply right-click on the host and select Create Snapshot…:
Note: Creating a snapshot can take some time. About 30 seconds to a couple of minutes, depending on the file sizes and complexity of the host/site.
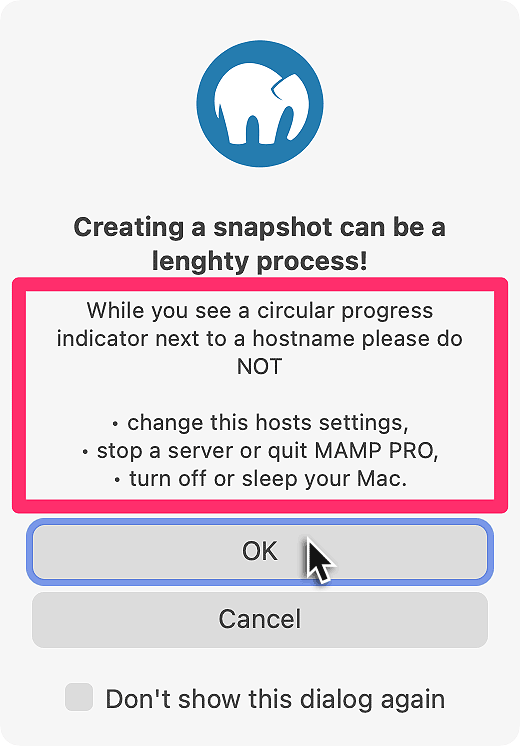
Click OK to the dialog that pops up. Note the warning I have highlighted:
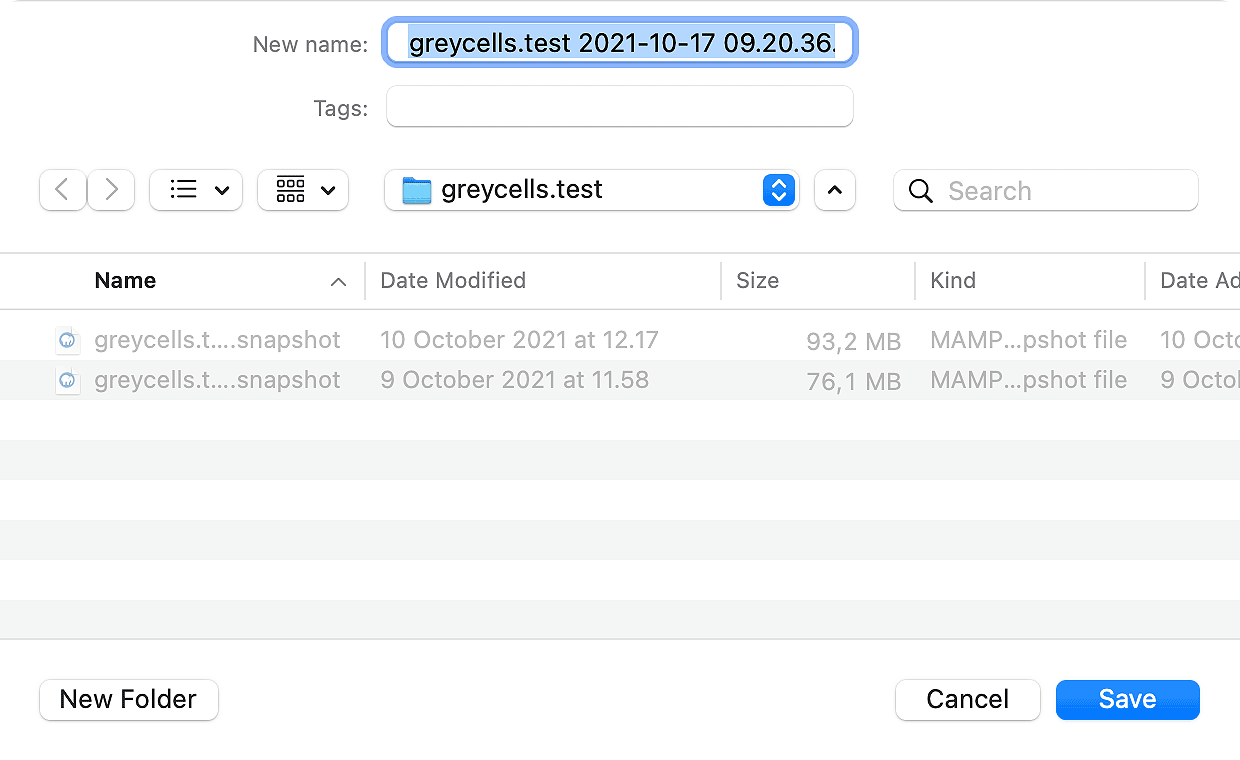
Then select where to save the snapshot. MAMP Pro recommends
~/MAMP PRO/snapshots/name-of-host/but you can save it where you like. You can even share and exchange snapshots with other users on the same MAMP Pro platform (macOS or Windows, snapshots are not cross-platform).MAMP Pro will suggest a filename with the host’s name plus the date and time. This makes it easy to revert to the correct snapshot:
Restoring a snapshot is the same in reverse: Right-click → Restore Snapshot → then select the snapshot file you wish to restore from.
Note: MAMP Pro also has a Cloud Saving feature, where your host can live in Dropbox or OneDrive. But for our use here, snapshots are more appropriate.
Blueprint Hosts
Another great feature of MAMP Pro is Blueprint Hosts. These are described in the docs as:
A “Blueprint” host is a clone of a host in the “Blueprint” group. This allows you to prepare a certain type of host and then use it again and again as a template for other hosts.
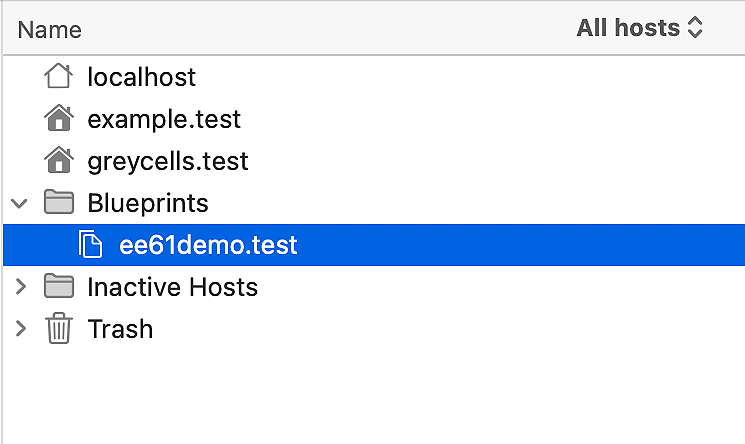
So, let’s say we have created a new ExpressionEngine host that’s set up just right. Before we start developing anything on it, if we move it to the Blueprint group in MAMP Pro:
Then the next time we create a new host, we can choose that as a template. We just select the Advanced tab and then Blueprint:
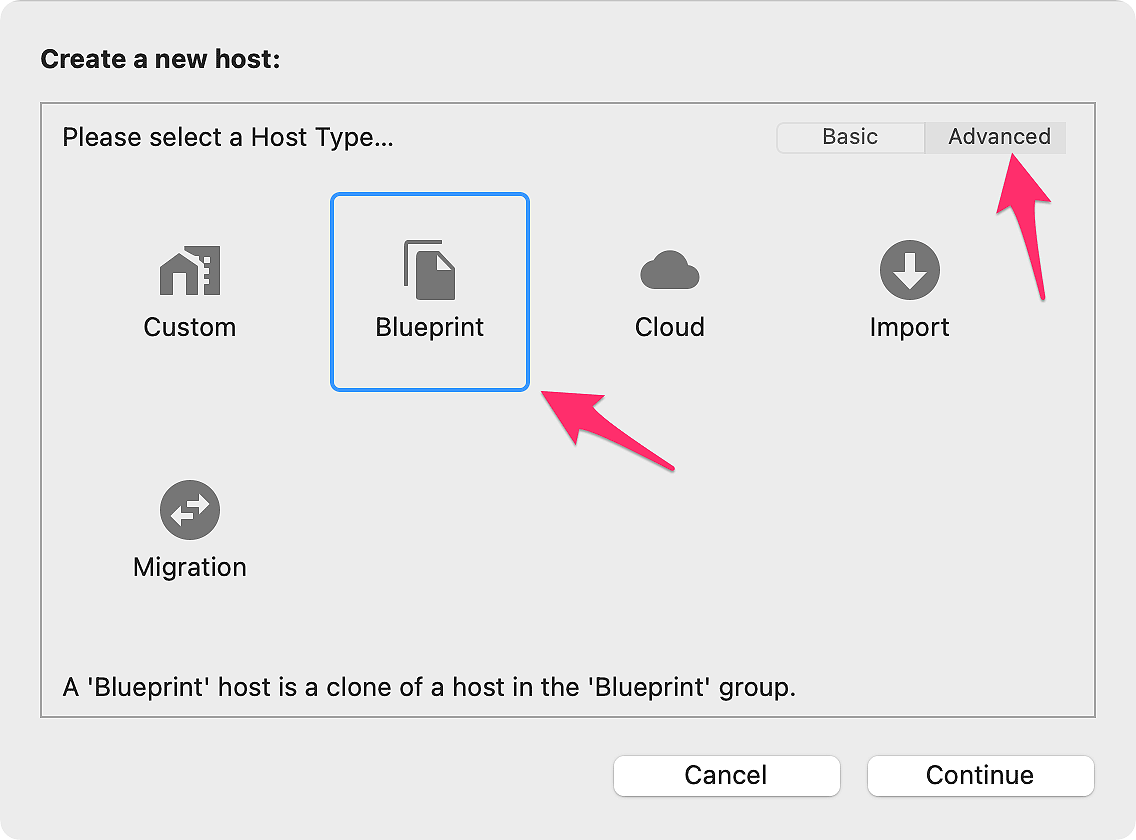
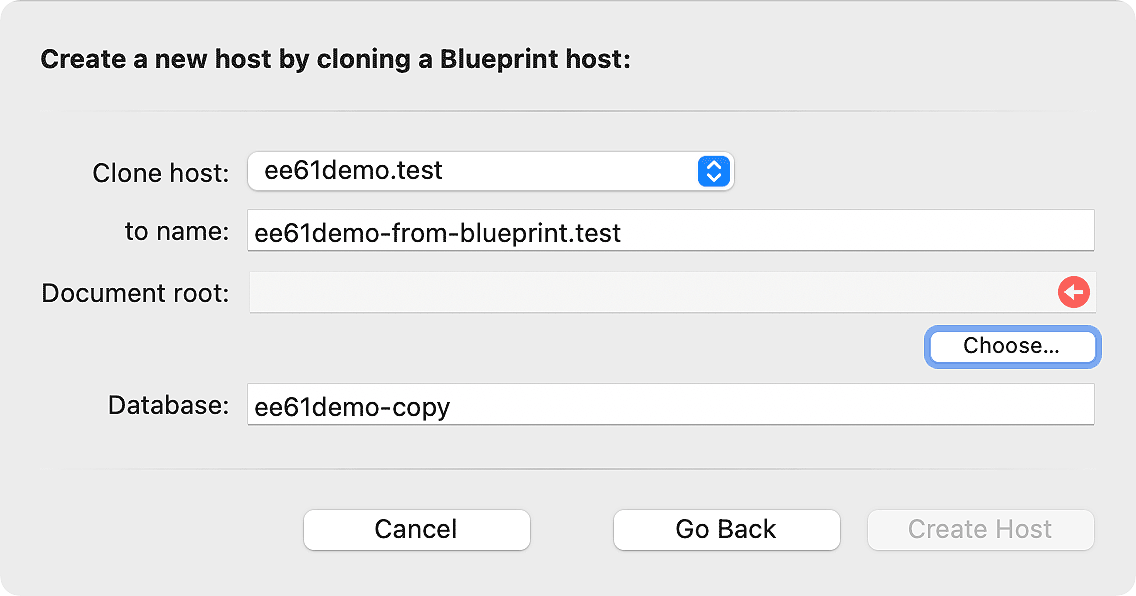
This is an excellent feature that can save a lot of setup time in the long run.
That’s it!
I really hope this guide will help you develop sites with the confidence that you can’t screw things up. Test sites in MAMP Pro have certainly changed my workflow for the better. Especially with this site beginning to get a bit of an audience, it has become important not to have any downtime :)
Thank you for your support and encouragement, everyone!
-Thomas
Comments
Write a Comment:
Previous Comments:
Just wanted to say this article was really useful and perfect timing as I am new to MAMP (I use the free version at the moment) and also was my first time creating a local duplicate of an ExpressionEngine site. It is nice to find an up-to-date EE resource (besides the official website) as a lot of the independent EE advice online seems to be about 10 years old. Thanks!
One stumbling block I encountered was that I couldn’t log into the admin control panel on the local testing site. On submit, the login form would just refresh to an empty form again. After a lot of trial and error, I think it was caused by the fact that the settings imported from my live site used ‘cookies only’ as the CP session type sent securely (https) whereas I don’t think you can use https on MAMP Free, so I assume it was causing a conflict. I fixed by temporarily adding $config[‘cp_session_type’] = ‘s’; to my config file so login used session ID instead. Then I could actually login and update the settings in the control panel (and remove overriding ones in config file) to make it all work.
By striio on Thu, November 11, 2021
@striio Thank you for your kind words, they made me very happy and motivated to continue! :)
And you’re right, a lot of content on EE is pretty outdated, which is a big part of why I started this site. So great to hear you found it useful.
I’m sorry about the trouble you had though, and you’re right: It’s definitely MAMP free’s lack of support for HTTPS. Thank you for mentioning this, and for finding a solution - I will update the guide with this info when I get a chance!
Let me know if you have other wishes for guides or articles, I’m always on the hunt for new topics :)
Thanks again,
Thomas
By Thomas Boelskifte on Sat, November 13, 2021
striio, my friend, I finally got around to updating the guide with your info on MAMP free and it’s lack of HTTPS support, and how this could/would make CP login impossible.
I added a note in the “MAMP Pro alternatives” section with a link to a new “Troubleshooting” section near the end of the guide. That way, we should be able to catch anyone copying an HTTPS site to MAMP free, and telling them about the workaround, before they end up being unable to log in :)
Thank you again for your help and for taking the time to write a comment! Let me know if I can ever help you with anything!
-Thomas
By Thomas Boelskifte on Tue, November 30, 2021
Hope you can see the comments. I posted one on the sitemap article too which was excellent.
Honestly, great to see someone who is passionate about what he does and cares less about the money he is going to make! Also, I would suggest a “beginner” category where you write about the very basics, like the URL tags and how to use. And gradually, maybe add some youtube videos to supplement.
Keep up the great work!
By Anoop on Fri, January 14, 2022